What Is a Spoon Motor? Simple Science You Can Build at Home
- Table of Contents
- What Is a Spoon Motor? Simple Science You Can Build at Home
- What Is a Spoon Motor, in Plain Words?
- Why Do People Build a Spoon Motor?
- How Does a Spoon Motor Work?
- What Parts Do You Need for a Spoon Motor?
- How Do You Build a Spoon Motor Step by Step?
- Why Won’t My Spoon Motor Spin?
- How Can I Make My Spoon Motor Faster?
- What Variations Can I Try Beyond the Spoon?
- How Do Real Motors Compare to a Spoon Motor?
- Where Does the Spoon Motor Fit in STEM Learning?
- Safety Tips You Should Know
- Useful Data and Observations
- References
- FAQ
- Key Takeaways
A spoon motor is a tiny, homemade motor you can build with simple parts. It shows how electric current makes a magnetic field and how that field can make things spin. You will see electromagnetism in action. I wrote this guide so you can build one, fix it if it stalls, and understand the science behind it.
Read this if you want a fun STEM project that teaches basic motor principles, energy conversion, and circuit building. You will save money, learn fast, and have a cool science fair idea.
What Is a Spoon Motor, in Plain Words?
A spoon motor is a simple electric motor you make at home. You use a metal spoon as a rotor or as a support. You wrap copper wire into a coil. You place magnets near the coil. You connect a battery so current flows. Then the coil turns and the spoon turns with it. That is your homemade motor.
This is not a store product. It is a DIY motor project and a kids’ science project. It is great for a science fair motor, a physics project, or a STEM project motor. It uses office supplies and recycled materials. You can use a paperclip motor frame, a Styrofoam cup base, or a wood block.
The main goal is to show how electrical energy turns into kinetic energy. You see rotational motion and torque generation. You see magnetic repulsion and attraction. You also learn what open circuit vs closed circuit means. You watch DC motor operation in a simple way.
Why Do People Build a Spoon Motor?
Problem. Motors look hard. Big words scare people. Many think you need a lab. You do not. You only need a battery, wire, and a magnet. You can build a motor from scratch on your kitchen table.
Agitate. Maybe you tried before. The coil did not spin. The spoon wobbled. The battery got hot. You felt stuck. You did not know if voltage and current were right. You did not know how many coil turns you needed. Your commutator scratched and stopped.
Solution. Follow this guide. I will show you easy steps. I will share troubleshooting tips. I will show you how to use neodymium magnets, how to strip enamel wire, and how to balance the rotor. You will learn basic electrical concepts while you build. You will see magnetic field lines with your own eyes when the coil moves.
How Does a Spoon Motor Work?
You use a battery to push electric current through a wire coil. A current makes a magnetic field. This idea goes back to Oersted. He found that a wire with current can move a compass needle. That is electromagnetism. Your coil becomes a simple electromagnet. The nearby permanent magnets make a magnetic field too.
When current flows in the coil, the coil faces a force. That force is the Lorentz force. Some people use Fleming’s Left-Hand Rule to show the direction. The force gives the coil a push. The push makes the coil spin. The commutator flips the current each half turn. That keeps the spin going the same way.
The spoon helps in two ways. First, the spoon can act as the rotor or a rotor blade. Second, the spoon can serve as a pivot point or motor shaft holder. A spoon motor diagram shows the coil, the spoon, the magnets, the battery, and the simple circuit diagram. When the circuit is closed, current flows and the coil spins. When the circuit is open, it stops.
What Parts Do You Need for a Spoon Motor?
Here is a simple list. You can swap parts if you get stuck.
- A battery. AA or D works. A 9V can work for a faster spin with care. This is your power source for a small DC motor.
- Insulated copper magnet wire. Use 20–24 AWG. This is your enamel wire for the coil.
- Two strong neodymium magnets or ceramic magnets. These are your permanent magnets.
- A metal spoon. You can use a plastic spoon for support if you use a separate metal axle/shaft.
- Two paper clips. These make brushes or simple contact points.
- Rubber bands and electrical tape to hold parts.
- A Styrofoam cup or a small wooden block as a base.
- Alligator clips for quick connections. Learn alligator clips uses as you test.
- Sandpaper, wire strippers, scissors, and pliers to prep parts.
- A small nail or screw as a pivot.
- A simple battery holder DIY can help if you have one.
You also need a bit of patience. You will learn resistance in circuits. You will see how polarity, North Pole, and South Pole line up. You will see magnetic field generation and electric field ideas in action. This is learning electricity basics the fun way.
How Do You Build a Spoon Motor Step by Step?
- Wind the coil. Wrap the insulated wire around a round form. A marker works. Make a coil about 1–2 inches across. That is 2.5–5 cm. Do 10 to 50 turns. More turns make a stronger electromagnet. Too many turns add resistance. Find a balance.
- Make the commutator. Leave two straight wire ends on the coil. Strip the enamel coating on both ends. Now sand only the top half of one end. Leave the bottom half coated. This trick turns current on and off each half turn. That acts as a simple commutator.
- Mount the coil. Use paper clips as brushes and as a stand. Bend them into a cradle. Tape them to the Styrofoam cup or wood base. Put the nail as a pivot if you like.
- Add magnets. Place the neodymium magnets under or beside the coil. You want the magnetic field to cross the coil. Flip the magnets to test polarity.
- Add the spoon. Tape the spoon handle to the coil. The spoon can act as a rotor arm. It can catch air like a propeller. Or it can serve as a motor shaft alternative if you keep it light.
- Connect power. Clip one alligator clip from the battery to one paper clip. Clip the other battery end to the other paper clip. Now tap the coil gently. The coil should spin. You made a miniature motor.
This is elementary motor construction with household items. It shows motion from electricity well. You now have a beginner electronics project that works.
Why Won’t My Spoon Motor Spin?
Problem. It stalls. The coil twitches and stops. You feel annoyed. You ask, “Why does my spoon motor not work?”
Agitate. Maybe your wire coil drags. Maybe the brushes do not touch. Maybe your battery is weak. A bad contact wastes current. A rough pivot adds drag. Weak magnets kill torque. Too few coil turns weaken the field. The coil looks unbalanced. It wobbles and hits the magnets.
Solution. Try this troubleshooting list.
- Clean the ends. Strip the enamel well. Sand the right half of the commutator end. You want clean, firm electrical contact. Loose connections ruin it.
- Check the circuit. The coil should run only when the shiny side faces the brushes. That shows your closed circuit. The coated half should stop current. That is your open circuit.
- Reduce friction. Smooth the pivot. Use a tiny bit of oil. Align the axle/shaft.
- Use stronger magnets. Neodymium magnets beat weak ones. Move them closer to the coil.
- Balance the coil. Make both sides even. The spoon must not pull the coil off center.
- Try a fresh D-cell battery. A weak battery drops voltage. The current falls. The motor stalls.
If you follow these steps you can fix most problems. That is how you build skill in problem-solving and critical thinking.
How Can I Make My Spoon Motor Faster?
You can boost RPM of a simple motor in a few ways. Use stronger permanent magnets. Add more coil turns but not too many. Keep the coil diameter around 1–2 inches for balance. Use thicker wire like 20–22 AWG to lower resistance. Use a fresh 9V battery for short runs. Watch heat. If it gets hot, stop.
Cut friction. Smooth the pivot points. Keep the brushes light but firm. Make the coil round and tight. Balance the spoon blade if you use it as a propeller. Small tweaks can raise speed. This is optimizing spoon motor speed in a simple way.
You can also tune current direction and magnetic field direction. Flip the magnets. Flip the battery. Watch how polarity changes the direction of rotation. Try the left-hand rule to predict the push. You will see how principles of torque show up in a small build.
What Variations Can I Try Beyond the Spoon?
You can build a paperclip motor without a spoon. You can build a homopolar motor that spins from a battery, a magnet, and a wire. You can try a motor without magnets by learning induction coil principles and Faraday’s Law, yet that is harder for beginners. Start with magnets first.
You can try a simple electromagnet as a separate test. Wrap wire on a nail. Connect to a battery for a homemade electromagnet. Pick up paper clips and learn about magnetic field lines. You can then use that nail as part of your motor stator frame.
As you build, you learn rotor and stator ideas in a simple way. The coil acts like a rotor. The magnets act like a stator. You also see a commutator definition in action. The brushes are your simple contact points. The circuit carries direct current (DC). That is DC motor operation in a small kit.
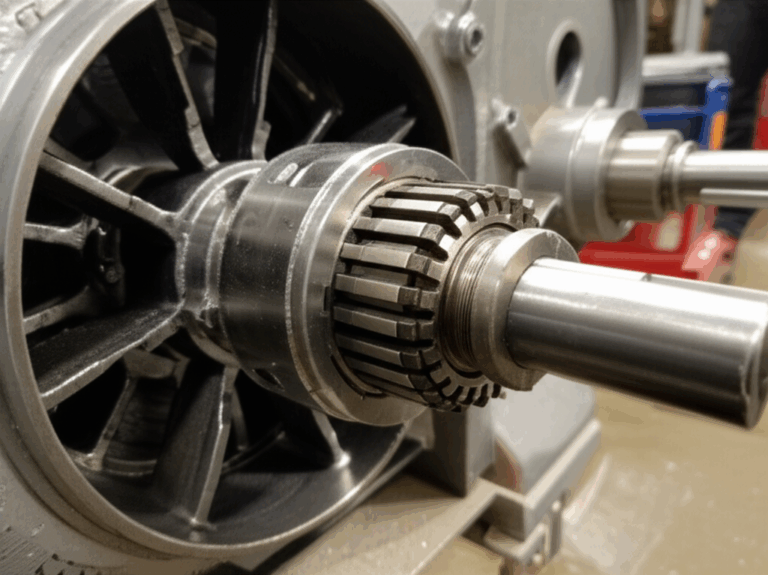
How Do Real Motors Compare to a Spoon Motor?
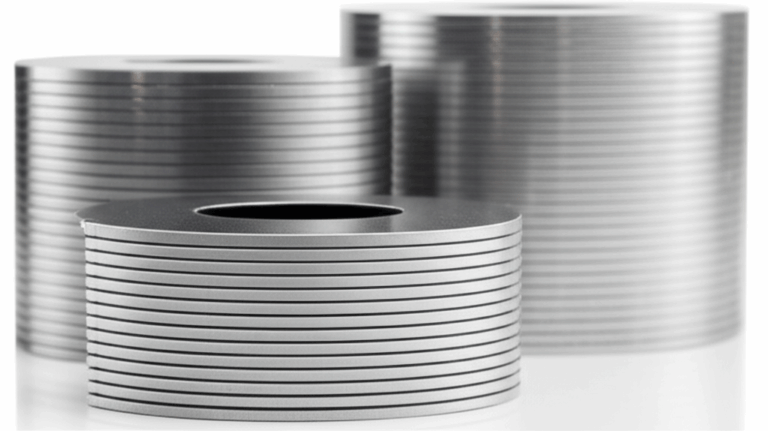
Your spoon motor runs. It teaches the basics well. Yet real commercial DC motors run better. They are efficient. They use engineered parts. They use motor core laminations to cut losses. If you want to see how pros build cores, look at these helpful resources:
- Learn why a well built stator core lamination matters in a motor.
- See how a precise rotor core lamination boosts performance.
- Explore different motor core laminations for various motor types.
- Study the role of high grade electrical steel laminations in reducing losses.
These pages show how electrical steel helps motors run cooler and smoother. You will see silicon steel laminations, CRGO and CRNGO grades. You will see how core lamination stacks reduce eddy currents and raise efficiency. Your spoon motor is fun. Real motors use tight tolerances and lamination to reach 70–90% efficiency.
If you build projects beyond a spoon motor, you will meet BLDC stator cores, transformer lamination cores, EI cores, and UI lamination cores. You will see how careful stator and rotor design guides electromagnetic field flow.
Where Does the Spoon Motor Fit in STEM Learning?
This project brings STEM education home. You touch basic physics experiments and basic electrical concepts. You watch energy conversion from electrical to mechanical. You test resistance and current. You see magnetic field generation up close.
Teachers like it. Kids like it. Parents like it. It fits school project motor units. It works well for a science fair. It supports learning electricity basics with a clear how an electric motor works demo. You can even pair it with educational motor kits to compare results.
I have used this as a DIY science project with my own kids. We used alligator clips for fast tests. We tried a battery holder DIY for neat builds. We switched power sources for small motors from AA to D to 9V. We measured spin and wrote down results. We learned how voltage and current relation changes speed.
Safety Tips You Should Know
- Do not short the battery. A wire from plus to minus with no load can get hot fast.
- Watch the wire coil. If it gets hot, stop and let it cool.
- Keep neodymium magnets away from phones and cards.
- Wear eye protection when you cut wire.
- Use adult help for young kids. This is an easy motor for kids, yet safety matters.
Useful Data and Observations
Here is a quick look at real world notes from makers. Use this to plan your build.
| Aspect | Detail / Observation | Why It Helps |
|---|---|---|
| Typical Materials Cost | $5–$20 for wire, magnets, and a battery. Spoons and paper clips are often free. | Low cost makes this a recycled materials motor you can try today. |
| Common Power Sources | 1.5V AA or D cells. A 9V can work but watch heat. Current is in mA unless shorted. | Higher voltage can raise speed. It can also raise heat in thin wire. |
| Coil Design | 20–24 AWG wire. 10–50 turns. 1–2 inch coil. | More turns make a stronger electromagnet. Too many turns add resistance. |
| Observed Performance | Spins from a few RPM to a few hundred RPM. Very low torque. | It is for show not for work. That is fine for learning. |
| Success Rate | Most builds spin at least a little. Smooth pivots and strong magnets help a lot. | Clean contacts and balance give stable spin. |
| Educational Impact | Very popular on video tutorials and in classrooms. | Kids see magnetic force turn into motion. |
| Comparative Efficiency | Real motors: 70–90%. Spoon motor: under 1%. | Your motor shows the idea. Real motors use laminations and better design. |
References
- Oersted and electromagnetism: https://en.wikipedia.org/wiki/HansChristian%C3%98rsted
- Fleming’s Left-Hand Rule: https://en.wikipedia.org/wiki/Fleming%27sleft-handrule
- Khan Academy, Magnetic forces and fields: https://www.khanacademy.org/science/physics/magnetic-forces-and-magnetic-fields
- Science Buddies, How to make a simple motor: https://www.sciencebuddies.org/science-fair-projects/project-ideas/Phys_p064/physics/simple-electric-motor
- NASA Glenn, Beginner’s guide to electric motors: https://www.grc.nasa.gov/www/k-12/airplane/short.html
FAQ
- What does the spoon do?
The spoon can act as the rotor, a propeller, or a pivot support. It adds fun and makes the spin easy to see.
- Can I build a motor without magnets?
You can build motors that use induction and Faraday’s Law. That takes more parts and skill. Start with permanent magnets first.
- How many turns should I use?
Try 20–30 turns of enamel wire to start. Adjust for speed and torque.
- What wire gauge should I use?
Use 20–24 AWG insulated wire. Thicker wire lowers resistance and can run cooler.
- Does the coil need a commutator?
Yes. A simple half stripped wire end acts as a commutator in this build. It flips the current direction each half turn.
Key Takeaways
- A spoon motor is a homemade motor that shows electromagnetism in action with simple parts.
- You need a battery, copper wire, magnets, a spoon, paper clips, and a base.
- The coil turns because of the Lorentz force and a simple commutator.
- Fix stalls by cleaning contacts, reducing friction, using strong magnets, and balancing the coil.
- You can boost speed by raising magnetic field strength, tuning coil turns, and smoothing pivots.
- Try other builds like homopolar motors, paperclip motors, and simple electromagnets.
- Real motors use stator and rotor parts with laminations to raise efficiency and cut losses.
- For deeper learning, explore how motor core laminations, stator core lamination, rotor core lamination, and electrical steel laminations shape real motor performance.
- This is a great STEM project for school, home, or a science fair.
- Keep it safe. Keep it fun. Build, test, and learn the principles of motion and electromechanical conversion.