What Are Motor Mounts? The Simple, No-Nonsense Guide I Wish I Had
Table of contents
- Introduction: Why motor mounts matter
- Motor mounts 101: What they are and where they sit
- Why motor mounts are critical for comfort, performance, and safety
- Types of motor mounts: Rubber, hydraulic, vacuum-actuated, solid, polyurethane
- Symptoms of bad motor mounts: What I look for first
- What happens if you keep driving with bad mounts
- How long motor mounts last and what shortens their life
- How I check motor mounts step by step
- When and how to replace motor mounts: Costs, parts, and labor
- DIY or professional replacement: How to choose
- OEM vs aftermarket motor mounts
- Polyurethane vs rubber: Pros and cons for everyday drivers and enthusiasts
- Automatic vs manual transmission mounts
- Extending the life of your motor mounts
- Electric and hybrid vehicles: Mounts still matter
- Quick FAQs I get all the time
- Final thoughts
Introduction: Why motor mounts matter
I used to think motor mounts were boring brackets. I was wrong. The first time I felt an engine thump forward under hard braking, I realized they’re the unsung heroes that hold the whole powertrain together. You don’t see them. You feel them when they start to go. Vibrations creep in. You hear a clunk during acceleration. The cabin starts to buzz at idle. That’s the whisper before the shout.
In this guide I’ll break down what motor mounts do, the types you’ll find, the symptoms of worn or broken mounts, and how I decide between DIY and hiring a mechanic. I’ll share the checks I use in the driveway, the cost ranges I see, and the smart habits that make mounts last longer. You’ll leave with a clear answer to “what are motor mounts” and the confidence to spot trouble early.
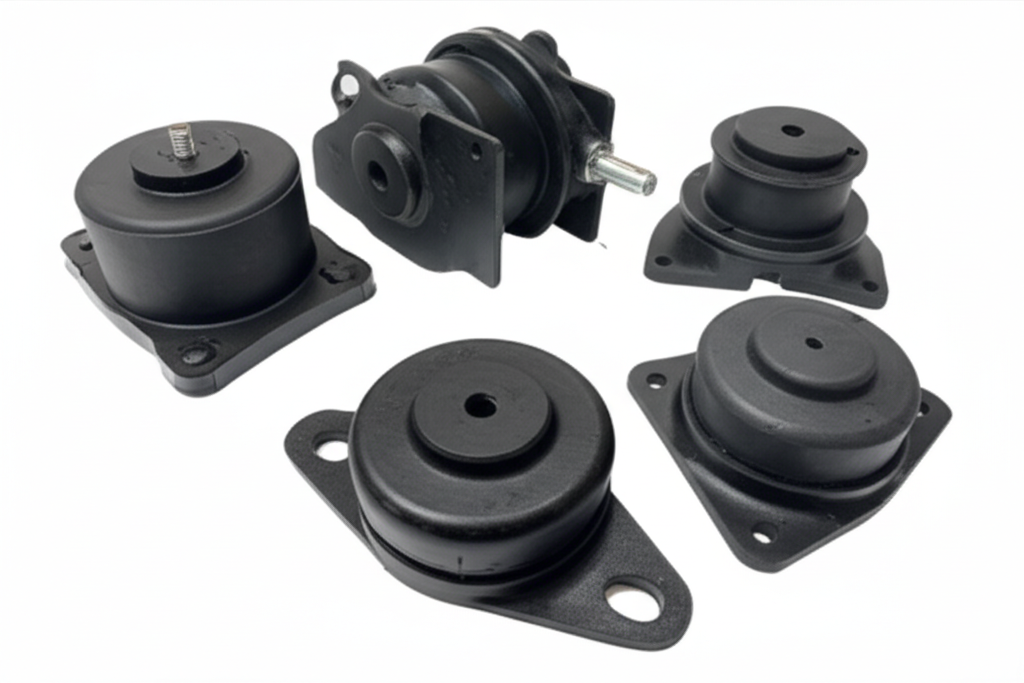
Motor mounts 101: What they are and where they sit
Motor mounts (also called engine mounts) connect the engine and transmission to the chassis or subframe. Think of them as strong, cushioned links that:
- Secure the engine and transmission in place
- Absorb engine vibration and road shock
- Prevent metal-on-metal contact between the powertrain and frame
- Keep engine and transmission alignment correct for smooth power delivery
Most vehicles use three to four mounts. On front-wheel-drive cars you’ll often see:
- A front mount and a rear mount
- A side mount on the timing cover side
- A transmission or torque strut mount to control twist
Rear-wheel-drive layouts vary with the frame or engine cradle. You’ll still see a transmission mount, engine side mounts, and sometimes a torque strut depending on design.
If you hear “engine mount vs motor mount,” don’t overthink it. People use both terms for the same part.
Why motor mounts are critical for comfort, performance, and safety
When mounts do their job you don’t notice them. When they don’t, everything feels off.
- Ride comfort and NVH: Good mounts cut down vibration and noise in the cabin. They isolate engine vibration at idle and under load. They keep your dashboard and steering wheel from buzzing like an electric toothbrush.
- Performance and alignment: Mounts help maintain drivetrain stability and alignment. That matters for smooth shifting, proper axle angles, and consistent torque transfer.
- Component protection: Excessive engine movement stresses CV axles, driveshafts, exhaust hangers, the radiator and its hoses, power steering lines, vacuum lines, transmission fluid lines, even the engine wiring harness. I’ve seen cracked exhaust flex pipes and stretched radiator hoses because the engine rocked too far.
- Safety: In hard braking or a collision, intact mounts help prevent major engine displacement. Extreme failures are rare, yet I take the safety implications seriously.
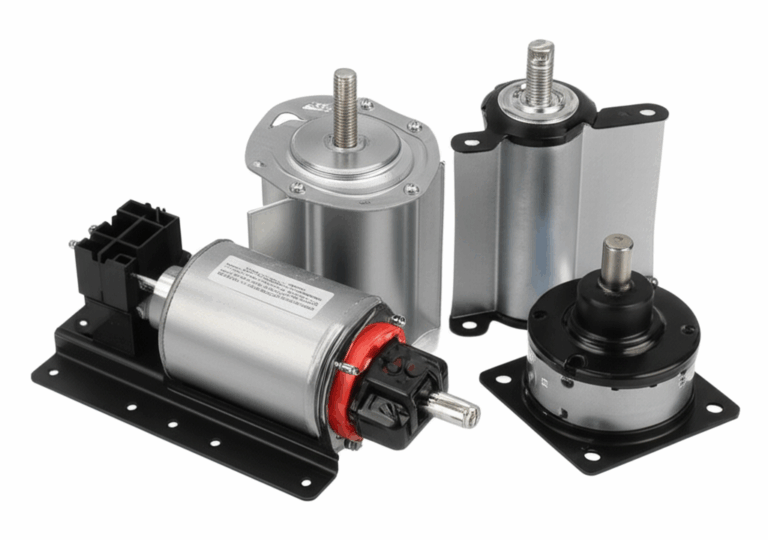
Types of motor mounts: Not all are created equal
Over the years I’ve handled four main types. Each has tradeoffs.
- Rubber motor mounts: The workhorse. A rubber bushing bonded to metal brackets. They offer solid vibration dampening with reasonable cost. Rubber hardens and cracks with age, heat, and fluids.
- Hydraulic motor mounts: Fluid-filled for better vibration absorption, especially at idle. Common on luxury or refined vehicles. They feel great when new. They can leak hydraulic fluid and fail earlier in some cases.
- Vacuum-actuated motor mounts: Electronically managed mounts that change stiffness with engine load or RPM. They use a vacuum source or an internal chamber to alter damping. Great for balancing comfort and control. More moving parts means more failure modes.
- Solid and polyurethane motor mounts: Stiffer for performance. Polyurethane motor mounts come in various durometers. They reduce engine movement and sharpen throttle response. They also transmit more vibration into the cabin. Solid motor mounts go all-in on stiffness which I don’t recommend for street use unless you accept lots of NVH.
If you drive daily on rough roads or in a city with potholes, hydraulic mounts can feel dreamy. If you track your car or add power, stiffer polyurethane motor mounts can help control torque twist at the cost of more vibration.
Symptoms of bad motor mounts: What I look for first
Bad motor mounts don’t always scream. They tap on the glass first. Here are the signs I see most often.
- Excessive engine vibration: You feel it at idle or at specific RPMs. The steering wheel and seats buzz. Rough idling makes it worse, yet a misfire can mimic the same feeling. Diagnose both.
- Loud clunking or banging noises: You hear a thunk during acceleration or deceleration. You might hear a bang when shifting from Park to Drive or Reverse.
- Engine movement or rocking: Open the hood. Have a helper brake firmly and blip the throttle. If the engine rocks hard front to back you likely have a torn mount or a failed torque strut mount.
- Harsh shifting or driveline lash: Automatics can slam into gear with worn mounts. Manuals can feel jerky or load/unload the drivetrain too fast.
- Visual damage: Cracked rubber, a completely separated bushing, or leaking fluid from a hydraulic mount. You might see a mount sitting crooked or a bracket touching metal where it shouldn’t.
- Secondary symptoms: Exhaust leaks due to movement, squeaking or grinding noises near the mounts, or sudden jerks during acceleration as the engine lurches.
I also check for fluid leaks from the engine, transmission, power steering pump, and AC compressor. Oil and coolant degrade rubber. Leaks shorten mount life.
What happens if you keep driving with bad mounts
I’ve seen drivers push it. The car still runs, so they keep going. That can turn a small mount job into a bigger repair.
- Accelerated wear of related parts: CV axles, driveshafts, exhaust flex joints, radiator hose connections, and power steering hoses hate extra motion. The engine wiring harness and fuel lines can stretch or rub. Vacuum lines and brake lines near the engine can chafe.
- Reduced comfort and performance: You’ll feel more NVH in the cabin. The engine can sit out of alignment which affects shifting smoothness and throttle response.
- Cost creep: A $200–$600 repair turns into a $1,000+ repair because of collateral damage.
- Safety risk: In extreme failures the engine can shift enough to damage the oil pan or slam parts against the subframe. It’s uncommon. It’s ugly when it happens.
If a mount has fully separated, park it. Towing beats a damaged exhaust or busted axle.
How long motor mounts last and what shortens their life
I don’t give a single number because driving style and environment matter.
- Typical lifespan: 5–7 years or about 50,000–100,000 miles for standard rubber mounts in average conditions
- Early failure: High torque engines, aggressive driving, towing, off-roading, or rough roads can chew through mounts in 30,000–60,000 miles
- Long life: Highway miles, gentle driving, and good maintenance can stretch them well past 100,000 miles
What shortens life:
- Oil, power steering fluid, or coolant leaks onto the rubber
- Harsh acceleration and sudden braking
- Frequent shock loading from potholes and speed bumps
- Worn suspension or subframe bushings that transfer more impact to mounts
- Manufacturing variances on cheap aftermarket parts
How I check motor mounts step by step
I like simple checks first. Then I scale up if needed.
- Visual inspection up top: With the engine off I check the upper engine mount and torque strut mount. I look for cracked rubber, collapsed rubber, metal-to-metal contact, or leaking hydraulic fluid. I check brackets and bolts for looseness.
- Rock test with the hood open: With the parking brake on and wheels chocked I watch the engine as a helper shifts from Park to Reverse then to Drive. I look for excessive engine movement or thunks.
- Powerbrake test: I hold the brake firmly in Drive and apply a little throttle while watching the engine. Then I repeat in Reverse. I stop if anything looks risky. Excessive rocking points to a failed front or rear mount on FWD cars. The torque strut mount is a common culprit.
- Under-car inspection: With the car safely lifted I inspect the transmission mount and lower engine mounts on the subframe or crossmember. I check for collapsed bushings, tears, and mount-to-bracket alignment. I look at the exhaust flex and radiator hoses for signs of rubbing or stretching.
- Rule out impostors: A misfire or rough idle can feel like a bad mount. I scan for codes and check for engine misfire issues if the vibration changes with RPM. I consider the ECM’s role in idle control. A rough engine can make a good mount look bad.
A small mirror and a flashlight help. So does patience.
When and how to replace motor mounts: Costs, parts, and labor
When to replace
- Obvious damage like cracked or separated rubber or a leaking hydraulic mount
- Excessive engine movement that you can see
- Clunks when shifting or taking off from a stop
- A pro diagnosis that confirms the failure
What I see for costs
- Parts per mount:
- Aftermarket standard: about $30–$150
- OEM standard: about $100–$300
- Hydraulic or vacuum-actuated: about $150–$500+
- Performance polyurethane: about $50–$200+
- Labor:
- 1–4 hours per mount depending on access and whether you need to support the engine, remove a crossmember, or drop a subframe
- Shop labor can range widely based on rates and vehicle complexity
- Total per mount at a shop:
- Often $200–$800. Some luxury models cost more
You’ll see “engine mount kit” options that include multiple mounts. Bundling makes sense if several look worn. If the front mount failed and the rear mount looks tired I replace both. It saves labor down the line.
What replacement looks like
- Support the engine or transmission with a jack and a block of wood at the oil pan or transmission case
- Remove mount bolts and brackets
- Lift or shift the engine slightly to relieve load on the mount
- Install the new mount with proper torque specs
- Check alignment and clearances
- Road test for noise and vibration
Some mounts hide under the battery tray, the airbox, or a frame bracket. Plan for extra time.
DIY or professional replacement: How to choose
I ask three questions.
- Can you safely support the engine and work under the car
- How difficult is access on your exact model
- Do you have the right tools for stubborn bolts and tight spaces
DIY makes sense if:
- Access is good and you have a solid jack, stands, and basic tools
- You can follow torque specs and reassemble brackets correctly
- You’re comfortable with powerbrake testing and simple driveline checks
Hire a pro if:
- The mount sits in a cramped spot behind the subframe or near the exhaust downpipe
- You need to drop the subframe, move the radiator, or unbolt a crossmember
- You don’t have a safe way to support the engine or transmission
I’m handy yet I still farm out the monsters. No shame in that.
OEM vs aftermarket motor mounts
I ask two questions here. How sensitive is the car to vibration. How long do you plan to keep it.
- OEM mounts: Best fit and consistent quality. Rubber durometer matches factory NVH tuning. Often cost more. They usually last longer. I prefer them on daily drivers and luxury vehicles.
- Aftermarket economy mounts: Cheaper with mixed quality. Sometimes fine. Sometimes too soft or too stiff. Your mileage may vary.
- Aftermarket performance mounts: Polyurethane or stiffer rubber that control engine movement better. They add vibration. Great for track use or high torque builds.
If you want a quiet cabin and factory feel, choose OEM or high-quality aftermarket that matches OE specs. If you want sharper throttle response and don’t mind idle vibration, go stiffer.
Polyurethane vs rubber: Pros and cons for everyday drivers and enthusiasts
Rubber
- Pros: Best vibration dampening, quiet cabin, factory feel
- Cons: Ages faster with heat and fluids, can tear under high torque
Polyurethane
- Pros: Stiffer, better torque control, sharper shifts, durable in performance use
- Cons: Transmits more vibration and noise, especially at idle or low RPM
- Tip: Look for inserts or staged stiffness options if you want a middle ground
If you’re on the fence, start with stock or OEM-plus mounts. You can always upgrade if you add power later.
Automatic vs manual transmission mounts
Automatics and manuals stress mounts in different ways.
- Automatics: Often show harsh engagement or a bang when shifting into gear if a mount fails. The transmission mount takes a beating during load changes.
- Manuals: You feel it as driveline lash or a clunk when taking up slack. Aggressive clutch engagement can tear a worn mount faster.
Some vehicles use different transmission mount designs for automatic vs manual. If you swap transmissions, match the mount to the setup.
Extending the life of your motor mounts
You can’t baby everything. You can baby this.
- Fix fluid leaks fast: Oil and coolant attack rubber. Don’t let a valve cover leak drip on a mount for months.
- Drive smoother: Avoid repeated full-throttle launches and panic stops if you want mounts to live a long life.
- Watch your suspension: Worn struts and bushings hammer the mounts with more shock. Fix the root cause.
- Inspect during routine service: Peek at upper mounts every oil change. Glance under the car during tire rotations. Early cracks and sag tell a story.
- Choose quality replacement parts: OEM or reputable aftermarket brands pay off in both fit and lifespan.
Electric and hybrid vehicles: Mounts still matter
Even if your vehicle uses an electric motor it still needs mounts to isolate vibration and control movement under torque. Electric motors make instant torque which can load mounts hard. You don’t have engine combustion pulses yet you do have driveline loads and road shock. EVs and hybrids often feel smoother because the motor itself runs with lower inherent vibration. The mounts still work hard when you stomp the pedal.
If you’re curious about what’s inside an electric motor:
- The stator and rotor use laminated steel to reduce eddy current losses and heat. The quality of the electrical steel laminations matters for efficiency and torque density.
- The stator core lamination forms the static magnetic circuit that surrounds the rotor.
- The rotor core lamination spins within that field and delivers torque to the wheels.
- Automakers rely on precision motor core laminations to balance performance and range.
Why bring this up in a motor mounts guide. Because understanding how smooth electric motors can be helps you diagnose NVH in EVs and hybrids. If you feel new vibration in an EV, don’t ignore mounts, subframe bushings, or driveshaft CVs. The motor may be silent. The hardware around it still moves under torque.
Quick FAQs I get all the time
- How many motor mounts does my car have
- Most cars use three to four. Common layouts include a front mount, a rear mount, a side mount, and a transmission or torque strut mount.
- Can I drive with a bad motor mount
- Sometimes for a short period if the damage is minor and you drive gently. I don’t recommend it. Severe failures can cause more damage fast.
- What do motor mounts cost to replace
- Parts can run $30 to $500+ per mount. Labor runs 1–4 hours per mount depending on access. Total at a shop often lands between $200 and $800 per mount.
- How do I know it’s the mount and not a misfire
- A misfire often sets codes and gets worse under load. Mount-related vibration often matches gear changes and throttle transitions. I still scan for codes and rule out engine misfire before calling it a mount issue.
- Should I replace all mounts at once
- Not always. If one failed and the others look good you can replace the bad one. If the others show sag or cracking I replace them together to avoid repeat labor and uneven wear.
- Do motor mounts affect fuel efficiency
- Indirectly. Worn mounts can mess with alignment and cause the drivetrain to work harder. The effect is small. The bigger impact is comfort and component protection.
Real-world examples from my driveway and shop
I’ll keep these short and relatable.
- The “clunk on throttle” FWD sedan: The owner complained of a bang when pulling away from a stop. The torque strut mount had torn. The engine rocked forward then sprang back under deceleration. We replaced the torque mount and the front mount together. The clunk vanished.
- The mystery idle buzz: A crossover shook at idle with the AC on. No codes. The hydraulic right-side mount had leaked. The rubber looked fine until I put a pry bar on it. It moved too easily and left a small smear of fluid. A new hydraulic mount cured the idle vibration.
- The “feels like a misfire” minivan: The cabin buzzed at 1,200–1,500 RPM. No misfire codes. I watched the engine and saw it dance on throttle. The rear mount had collapsed. The fix smoothed the whole drivetrain and quieted the exhaust boom.
These patterns repeat. The details change with each make and model. The diagnostic logic stays the same.
Extra nuts-and-bolts that help during inspection
- Look at the bracket geometry: If the mount sits off-center or the bolts don’t line up easily, the mount may have collapsed or the engine may have shifted.
- Check surrounding parts: Exhaust hangers, the engine oil pan clearances, and the driveshaft carrier bearing on RWD models. Excess movement shows up there too.
- Don’t overlook the transmission mount: Many people fix the obvious upper engine mount and leave a torn transmission mount. The clunk returns a week later.
- Torque specs matter: Over-tightening can bind the mount and transmit more vibration. Under-tightening can let the mount walk and wear fast.
- Short test drives tell the truth: Accelerate briskly then coast. Shift from Drive to Reverse with your foot on the brake. Listen for thunks and watch for sudden jerks.
Common causes of motor mount failure
Based on what I see and what many mechanics agree on:
- Age and heat that harden and crack rubber
- Fluid leaks that soak and degrade rubber
- Repeated harsh acceleration and sudden braking
- Potholes and rough roads that send shock through the subframe
- High torque loads from towing or performance upgrades
- Manufacturing variance on cheaper parts
- Impact damage from accidents or undercarriage hits
If you fix leaks and drive smoothly your mounts will thank you.
Worn vs broken: Know the difference
- Worn motor mounts: The rubber looks sagged or cracked. You feel more idle vibration and see more movement on throttle. The car still drives.
- Broken motor mounts: The rubber separates fully or the bushing tears through. You hear loud clunks and may feel the engine lurch. Don’t push it. Get it fixed.
Hydraulic mounts often fail “soft.” They leak internally then lose their damping ability. You won’t always see fluid leaking outside. The pry-bar test reveals the truth.
Simple checklist before you buy parts
- Confirm the exact mount location and part number for your engine and transmission combo
- Decide on OEM vs aftermarket based on your NVH tolerance and budget
- Inspect brackets and bolts for rust or damage
- Check adjacent mounts to decide whether to replace one or more at once
- Plan the job and tools. If you need to support the engine, make sure you can do it safely
What about “engine cradle,” “crossmember,” and “subframe” mounts
These terms describe the structures that mounts attach to.
- The engine cradle and subframe form the structural base that holds the engine, transmission, and suspension components
- Crossmembers tie the frame together and provide mounting points
- Some vehicles place mounts directly on the subframe. Others use brackets that connect the mount to the frame rails
If you hear a shop mention a “subframe mount” during an estimate, they’re likely talking about an engine or transmission mount that bolts to the subframe. Ask to see it. A quick look will make the estimate feel reasonable.
Troubleshooting noise: squeaking, grinding, clunking
- Squeaking near a mount: Usually a torn bushing that moves and rubs. Could also be an accessory bracket. I spray a little soapy water on the suspected bushing. If the squeak changes I found the spot.
- Grinding noises: Less common with mounts. Check the engine touching a bracket or heat shield. Metal-on-metal contact tells you the mount collapsed.
- Clunking on acceleration or deceleration: Classic sign of excessive engine movement. Torque strut mount and front or rear mounts sit at the top of my list.
Don’t forget the exhaust system. A loose hanger can mimic a mount clunk. The fix costs pocket change compared to a mount job.
The bottom line on diagnosis vs replacement
- Confirm the symptoms match mount failure
- Rule out engine misfire and transmission issues
- Inspect all mounts you can see
- Replace clearly failed mounts and recheck
- If you still hear noise, look next at axles, driveshafts, and the exhaust flex
That order saves time and money.
Conclusion: Don’t overlook your motor mounts
Mounts don’t look glamorous. They keep your engine and transmission aligned, soak up vibration, and protect everything from axles to hoses. When they wear out you’ll feel it as idle vibration, clunks, and sudden jerks during acceleration. Fixing them restores comfort and stops a cascade of bigger problems.
If you suspect bad mounts, take a look this week. Check for cracks, leaks, and engine rocking. Get a professional diagnosis if you’re on the fence. A solid set of mounts makes every drive feel tighter, quieter, and safer. That’s money well spent.