The Critical Link: How Slit Coil Quality Impacts Transformer Lamination Consistency and Performance
Table of Contents
- Introduction: Why slit coil quality makes or breaks a transformer core
- What defines “slit coil quality” for transformer applications
- Dimensional accuracy: width, thickness, camber
- Edge condition: burr, edge profile, V-notching
- Flatness and waviness
- Surface integrity: scratches, contamination, coating uniformity
- Internal material properties: magnetic homogeneity and stress
- How poor slit coil quality directly disrupts lamination consistency
- Burr height and edge profile
- Inconsistent width and camber
- Flatness issues: waviness and bow
- Surface defects and contamination
- The cascading effects on transformer performance and life
- Core losses: eddy current and hysteresis
- Efficiency and operating cost
- Hot spots and thermal stress
- Noise and vibration
- Reliability and lifespan
- Mitigating the risk: How I ensure high slit coil quality in practice
- Supplier selection and qualification
- Advanced slitting technologies and controls
- In‑house quality control and testing
- Optimizing lamination production from punching to annealing
- Practical specs, checks, and tolerances I rely on
- Final thoughts and a simple checklist you can use today
Introduction: Why slit coil quality makes or breaks a transformer core
I learned this lesson the hard way. Years ago I watched a healthy core assembly line grind to a halt after a run of electrical steel arrived with invisible defects. Nothing dramatic at first. A little extra burr at the edges. A hint of camber. Coils looked fine on the rack. The laminations did not stack quite right though. Stacking factor slipped. Noise crept up. Core losses climbed just enough to push tests out of spec. We spent days chasing the cause on the punching line. The real culprit sat upstream. The slit coil.
If you build or buy transformer cores you live and die by lamination consistency. Laminations carry the magnetic flux. They set the stage for eddy currents. They determine magnetostriction behavior. They define how tight you can clamp the core. They even influence how long the transformer can run before it runs hot. Consistency starts with the coil you feed into the press. That coil must have tight width tolerance. It must hold flatness. It must arrive with a clean, uniform insulation coating. Edges must be smooth and controlled. Residual stress must be low enough that the steel can perform as designed after punching and stress relief annealing.
In my experience slit coil quality is the overlooked first domino. Knock it and everything downstream wobbles. Punching gets noisy. Stacks shift. Gaps appear. Test benches light up with higher Watts per kilogram. Customers ask tough questions. The good news is you can control it. You can define it. You can measure it. You can improve it. Let me show you how.
What defines “slit coil quality” for transformer applications
I think about slit coil quality in five buckets. Dimensional accuracy. Edge condition. Flatness. Surface integrity. Internal material properties.
Dimensional accuracy: width, thickness, camber
- Width tolerance. Tight width control locks in part geometry. I prefer tolerances at or tighter than ±0.05 mm for most transformer laminations. Automated stacking loves consistent width. Poor control leads to overlaps or gaps in yokes and legs. That hurts flux density distribution.
- Thickness gauge control. Electrical steel thickness influences eddy currents and stacking factor. Thickness variation across the strip can throw core build‑up factor off target.
- Camber and edge camber. Camber introduces drift during punching. It also causes misalignment during stacking. I treat camber as a silent killer for automated lines.
- Coil geometry and coil set. Large coil ID/OD or coil weight can affect handling. It changes tension and flatness behavior during unwinding.
Edge condition: burr, edge profile, V-notching
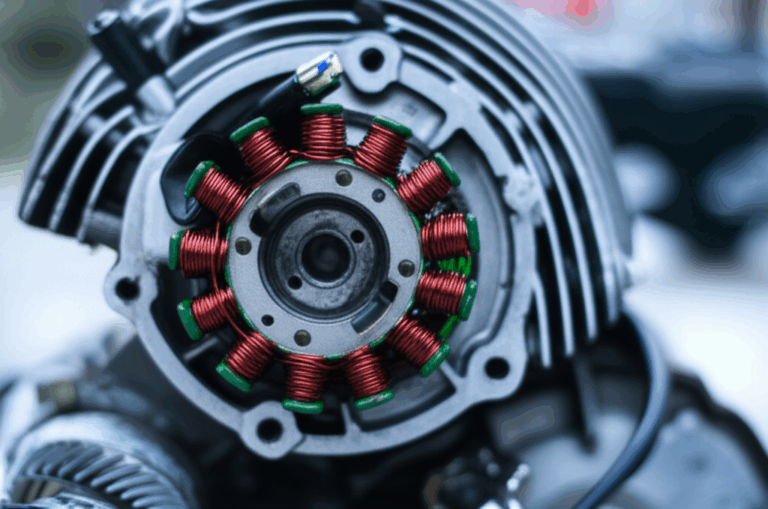
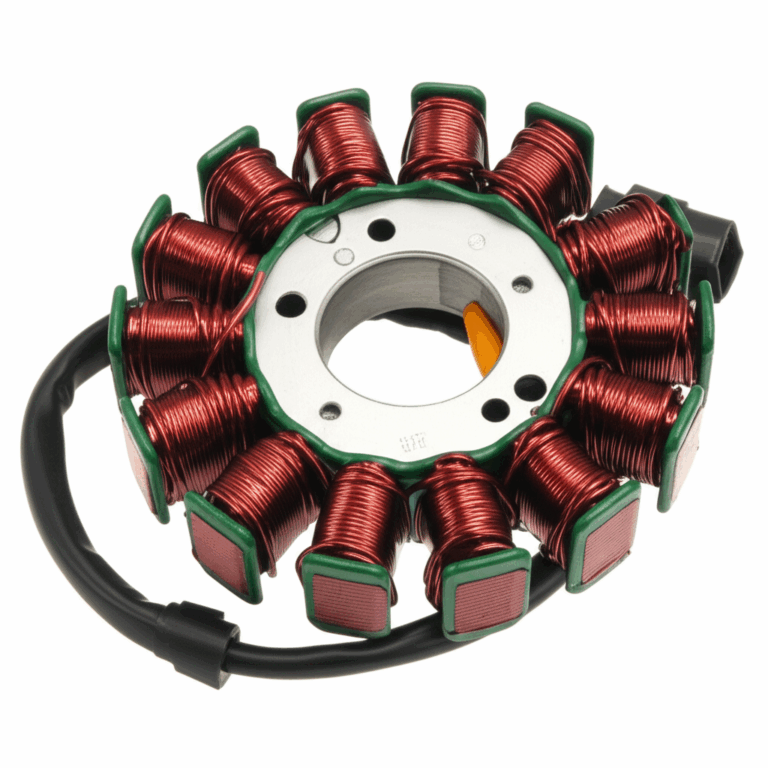
- Burr height. I track burr in micrometers. High burr reduces stacking factor. It slices insulation. It creates unintended conductive bridges between laminations.
- Edge profile and micro-cracks. A smooth edge lowers stress concentration. It preserves magnetic properties near the edge zone. It also protects coating integrity.
- V‑notch slitting and beveling. For certain geometries V‑notches help layout and assembly. They must be consistent. Random notch quality leads to repeatable faults.
- Deburring techniques. Mechanical brushing. Chemical deburring. Specialized deburring equipment. All have a place. The key is consistent results without harming coatings.
Flatness and waviness
- Flatness. Flatness keeps laminations tight in a stack. Waviness or coil set increases trapped air. Air gaps raise magnetic reluctance. That translates to higher magnetizing current and higher losses.
- Waviness metrics. I watch deviation per meter. Numbers like 2 mm/m can become a headache fast in tight stacks.
- Residual stresses. Slitting can inject stress. Stressed steel likes to move. It bows after punching. It rings louder under magnetostriction. Stress relief annealing helps yet it cannot fix everything.
Surface integrity: scratches, contamination, coating uniformity
- Insulation coating integrity. Coating type matters less than uniformity and adhesion. Think Carlite or C‑class coatings like C5. If it rubs off at the edges or flakes during pressing you will fight higher inter‑lamination conductivity.
- Scratches and dents. Surface damage concentrates stress. It can lower permeability and increase hysteresis loss locally.
- Contamination. Oil, dust, or oxide flakes can create hot spots. They also hurt coating adhesion.
- Surface finish requirements. Electrical steel benefits from a clean and controlled finish. It is not about vanity. It is about stable loss performance.
Internal material properties: magnetic homogeneity and stress
- GOES vs NOES. Grain‑oriented electrical steel (GOES or CRGO) brings magnetic anisotropy that favors the rolling direction. Non‑oriented electrical steel (NOES or CRNGO) spreads properties more evenly. Slit coil quality must respect those differences. A CRGO lamination hates misalignment to the rolling direction at higher flux densities.
- Electrical resistivity and inter‑lamination resistance. Resistivity fights eddy currents through the sheet. Inter‑lamination resistance fights eddy currents between sheets. Both matter.
- Magnetic domain structure and homogeneity. Disruptions from slitting, punching, or poor handling show up as higher local losses and uneven flux density.
- Residual magnetism. Poor demagnetization after test or handling can skew inspections and interfere with assembly magnets on automated lines.
How poor slit coil quality directly disrupts lamination consistency
Here is where the rubber meets the road. Slit coil issues flow straight into lamination problems.
Burr height and edge profile
Burr stands at the top of my defect list. It does four nasty things at once.
- It reduces stacking factor. Burr creates micro stand‑offs between laminations. The stack grows taller for the same mass of steel. Build‑up factor drops.
- It creates eddy current paths. Burr can cut through or compress the insulation coating. That opens conductive bridges between sheets. Eddy currents find the path of least resistance and your Watts per kilogram go up.
- It damages coatings during handling. A sharp edge acts like a knife. It scratches adjacent sheets and abrades coating during punch feed and stack handling.
- It concentrates stress near edges. Stress raises hysteresis losses. It also changes magnetostriction behavior. That means more hum.
I pay close attention when burr height creeps beyond roughly 30–50 µm. Industry papers and manufacturer guidelines often flag this range as a tipping point for core loss and stack factor. You can run a quick burr map across the coil width. You will often see higher burr on one edge when blade wear or tension control drifts. That asymmetry shows up later as uneven noise in the assembled core.
Inconsistent width and camber
Width variation clashes with automated stacking. A leg pack made from laminations with ±0.1 mm swings will not fit or clamp evenly. The result is:
- Troublesome line stops. Operators chase alignment issues instead of building cores.
- Gaps or overlaps in the core window. That drives uneven flux distribution. It also pushes local saturation in corners.
- Poor clamping pressure coverage. Some regions clamp hard while others float. Floating regions buzz.
- Higher scrap rates. Over‑width pieces get culled. Under‑width parts do not meet stack intention.
I treat camber like width drift’s sneaky cousin. It can push parts off the die center. It skews hole patterns. It also complicates yoke‑to‑leg fit. Fix camber or chase gremlins for days.
Flatness issues: waviness and bow
Flatness makes or breaks compact stacks. Waviness injects air. Air lowers stacking factor. It also introduces micro gaps that behave like series reluctance in the magnetic circuit. The core draws more magnetizing current. Heat follows. Magnetostriction often gets louder around micro gaps. If I see waviness around 2 mm per meter or worse I raise a red flag. That kind of variation is enough to bother tight tolerance designs and dry‑type transformer cores.
Surface defects and contamination
Surface defects look cosmetic at first. They are not. Scratches create stress risers. Stress shifts domain walls and hikes hysteresis. Oil or dust on the sheet lowers inter‑lamination resistance. Eddy currents sneak across where the coating no longer shields well. Local hot spots follow. Over time that stress shortens insulation life near those points.
The cascading effects on transformer performance and life
All those lamination problems do not stop at the stack. They flow into test benches and field performance.
Core losses: eddy current and hysteresis
- Eddy current losses. Burr bridges and low inter‑lamination resistance act like shortcuts for currents. Eddy loss grows with the square of flux density and the path area. Burr enlarges the path cross‑section. Poor coatings cut resistance. That is a bad cocktail.
- Hysteresis losses. Residual stress and mechanical damage make the magnetization loop fatter. That means wasted energy every cycle. Slitting and punching inject stress near edges. Stress relief annealing recovers most of it if your process stays clean and controlled.
- Magnetic anisotropy. GOES shines in the rolling direction. Misaligned slitting or poor coil identification can rotate laminations in assembly. That pushes parts of the core off the easy axis. You pay for it in higher losses and earlier saturation.
Efficiency and operating cost
Every extra watt of core loss turns into heat. The transformer must dump that heat to stay within rise limits. If it cannot then the unit runs hotter. Efficiency slips. Over a 20‑year life that wasted energy adds up fast. I have watched small percentage points at the test bench become large numbers on a cost‑of‑ownership model for a fleet.
Hot spots and thermal stress
Uneven flux distribution from width variation or gaps drives localized hot spots. Burr‑caused shorts do the same. Hot spots stress insulation systems in ways you do not always see in factory tests. The harm shows up later as accelerated aging. Dry‑type units feel this pain sooner because convection and surface cooling handle heat differently than oil‑filled units.
Noise and vibration
Magnetostriction loves inconsistency. When stacks are uneven or clamping pressure varies you get local stress differences. Those differences sing at 50 or 60 Hz and harmonics. You hear it. Neighbors complain. Burr at edges tends to raise vibration near leg corners and step‑lap transitions. Flatness issues add a random buzz under load.
Reliability and lifespan
All these effects compound. Higher losses mean higher temperature. Higher temperature speeds insulation aging. Aging lowers dielectric strength. At some point a surge or overload hits a weaker system. You do not want that failure on your watch. Good slit coil quality lowers that risk from day one.
Mitigating the risk: How I ensure high slit coil quality in practice
You cannot inspect quality into a product. You must build it in. That starts with picking the right partners and tooling. It continues with clear specs and relentless measurement. Here is how I approach it.
Supplier selection and qualification
- Choose experienced electrical steel slitters. Slitting mild steel is not the same as slitting GOES or NOES. This is specialty work with tight tolerances and sensitive coatings.
- Audit the process. I ask about rotary slitting parameters. I check coil tension control methods. I look at blade material, setup practices, and sharpening cycles. I ask for burr maps and width control charts from recent runs.
- Review standards and test methods. I want alignment with IEC 60404 for magnetic properties and with ASTM A343/A343M for core loss measurement methodology where applicable. The exact edition matters less than consistent, traceable methods.
- Verify material traceability. I want to connect heat numbers, coating batches, and slit coil IDs to final cores. Traceability saves you when a problem surfaces months later.
Advanced slitting technologies and controls
- Precision slitting machines. The machine must control knife penetration, clearance, and overlap. It must maintain parallelism across the arbor.
- Coil tension control. Tension must stay steady through acceleration, deceleration, and splice events. I watch unwind brakes, dancer systems, and closed‑loop control response.
- Blade wear management. Worn blades raise burr quickly. I favor proactive sharpening based on footage, not only visual checks. Blade life varies by grade and coating hardness.
- V‑notch slitting options. When a design uses V‑notches I make sure the slitter has dedicated setups. Notches should be clean with minimal burr and no micro‑cracks.
- Deburring equipment. Inline brushing or edge conditioning helps for some grades. It must not compromise the insulation coating. The proof is in inter‑lamination resistance tests after brushing.
- Online monitoring and inspection. Automated optical inspection (AOI) for edge quality and width helps. Laser width gauges catch drift. Flatness measurement systems flag coil set early. Thermal cameras can even hint at friction hotspots at the knives.
- Non‑destructive testing for steel. Eddy current or magnetic Barkhausen noise mapping can spot stress concentration zones near edges. I use these sparingly yet they help on troublesome jobs.
In‑house quality control and testing
- Incoming inspection. I always measure burr height on both edges with burr gauges. I check width at multiple circumferential locations around the coil. I record flatness, coil set, and camber. I test coating weight or thickness where the supplier’s process allows it.
- Inter‑lamination resistance. I run quick tests to confirm insulation performance. You do not need a fancy lab to find a serious problem. Simple jig tests can flag low resistance conditions.
- Core loss testing of samples. I cut standard Epstein or single sheet samples where possible and measure core loss at a relevant flux density. I align methods with IEC 60404 so results make sense.
- Stacking factor verification. I build a small trial stack with real laminations. I measure build‑up height per mass. Trial stacks catch flatness and burr problems better than a spec sheet.
- Core loss segregation. When material varies a bit you can sort sheets by measured losses. Then you build critical cores from the best group. It is not ideal. It is smarter than mixing and hoping.
Optimizing lamination production from punching to annealing
- Tooling and die setup. Sharp dies reduce punching burr and stress. Die clearance should match thickness. Misalignment adds edge damage. I log tool wear and swap inserts before they degrade part quality.
- Punching quality and stamping quality. Monitor burr from punching separate from slitting burr. Both matter. Keep lube clean so it does not attack the coating.
- Handling. Use clean gloves, slip sheets, and proper stack supports. Do not let edges grind against each other. Small habits save coatings.
- Stress relief annealing. Use the right cycle for the grade. GOES can recover a large share of its magnetic properties after mechanical work when you anneal with care. Keep oxygen control tight to protect coatings and avoid oxide build up.
- Core clamping pressure and gap control. Clamp evenly. Control yoke step‑lap patterns. Manage shims with discipline. Good clamping reduces noise and stabilizes loss measurements.
- Final demagnetization. Remove residual magnetism before test and pack. It helps with handling and prevents odd artifacts on test benches.
Practical specs, checks, and tolerances I rely on
I do not chase perfection. I chase consistency inside a practical window.
- Burr height. Keep slitting burr below roughly 30 µm for most applications. Tighter for high‑efficiency cores and high‑flux designs. Always check both edges.
- Width tolerance. Target ±0.05 mm or better when your die set and stacking require high precision. Watch for drift during long runs.
- Flatness. Aim for less than 2 mm deviation per meter. Tighter for tall stacks or thin laminations.
- Coating integrity. Check adhesion and continuity. Confirm inter‑lamination resistance meets your house spec. Do not assume a coating label equals performance on your line.
- Residual stress. If you fight bowing after punching try a small anneal test on a few pieces. If losses drop and flatness improves you have a stress issue upstream or in the die.
A few specifics by material and application
- GOES (CRGO). Orientation matters. Keep rolling direction clearly identified on all slit coils. Use consistent step‑lap patterns. Consider domain refinement only if your supplier integrates it with coating and loss control.
- NOES (CRNGO). Tolerates direction changes better. Still wants low burr and good flatness. High‑frequency applications demand thinner gauges and tighter slit edge quality to control eddy losses at higher frequencies.
- Distribution vs power transformers. Power transformers push flux density harder. They punish burr, width variation, and coating defects. Distribution units forgive a bit more yet not much. Dry‑type cores tend to broadcast any inconsistency louder as audible noise.
- Special shapes. E‑cores and UI cores bring extra attention to window alignment and leg‑yoke fit. Camber and width variation show up there first.
Standards and test alignment
I keep measurement methods aligned to common standards so teams speak the same language.
- IEC 60404 series. Framework for magnetic property measurement and core loss testing. It defines methods for Epstein frames and single sheet testers.
- ASTM A343/A343M. Legacy reference for AC magnetic properties of materials. Many labs still use similar methods. You want procedure alignment so a 1.5 T measurement means the same thing everywhere.
- Internal quality control procedures. Document your burr measurement method. Define how you measure camber and flatness. Set trigger limits for hold or reject. Consistent methods make data useful.
Real‑world signals that your slit coil is hurting you
- Stacks that feel “spongy.” That is trapped air or burr stand‑off. Check flatness and burr maps.
- Noise complaints during first energization. Run a torque check on clamps. Review step‑lap alignment. If all good then look upstream at flatness and edge condition.
- A stubborn 2–8% increase in core loss that you cannot fix with clamping. Check inter‑lamination resistance and look for coating damage at edges.
- Increased reject rates on the punching line after a new coil batch. Confirm camber and width variance. Audit coil tension logs during the slitting run.
Cost and throughput implications
People ask if these controls slow production. My experience says the opposite. You spend minutes on incoming inspection and save hours of rework. You lock in burr and width and your automated stacking just runs. Production line efficiency improves. Waste material reduction follows. Scrap bins shrink. Quality control teams spend less time chasing ghosts and more time improving the process.
Material sourcing and supplier relationships
I treat electrical steel producers and slitters as partners. Share your loss targets. Share your stacking factor goals. Align on insulation coatings and allowable handling. Ask for data that matters to you like burr maps, width histograms, and flatness scans. In return be predictable. Forecast grade mixes like GOES vs NOES. Share coil widths and slit patterns early. That gives them room to optimize slit plans and knife setups. Everyone wins.
A quick note on measurement gear that helps
- Core loss testers. Epstein frames and single sheet testers aligned to IEC methods.
- Burr gauges and edge microscopes. Cheap and powerful.
- Flatness measurement systems. Manual straight edges work for a quick check. Laser systems tell the truth at scale.
- Electrical resistivity and inter‑lamination resistance meters. Essential for coating QA.
- AOI cameras and laser width gauges on the slitter. They pay for themselves.
- Stress relief annealing ovens. A modest lab oven with a controlled atmosphere can run recovery tests on small batches and guide process decisions.
Putting it all together with design intent
Design engineers care about saturating flux density, magnetization curves, magnetization current, and magnetostriction. Manufacturing teams care about scrap rates, punching life, and throughput. Procurement cares about cost and delivery. Slit coil quality ties these interests together. Good edges protect coating and permeability. Tight width supports step‑lap geometry. Flat sheet packs tight and quiet. Strong insulation keeps eddy currents in check. You hit loss targets. You pass sound limits. You deliver on time. That is how the whole team wins.
If you need a quick refresher on what goes into a transformer lamination set the pages here are helpful:
- See the basics of a transformer lamination core to connect material quality to final assembly.
- For an overview of material form factors check electrical steel laminations.
- If you work with grain‑oriented material review how a CRGO lamination core behaves in stacks and why rolling direction control matters.
- For material families and coatings see silicon steel laminations.
Final thoughts and a simple checklist you can use today
I judge slit coil quality by what it does for me on the floor. Does the strip feed straight and punch clean. Do the stacks pack tight. Do the cores pass loss and noise targets the first time. If the answer is yes then you rarely hear about slit coil at all. It becomes a non‑issue because everyone did their job upstream.
Here is the checklist I run every time:
- Confirm material grade and rolling direction. Label clearly for GOES.
- Verify width tolerance on arrival across the coil circumference. Record it.
- Measure burr height on both edges at multiple locations. Map it.
- Check flatness and coil set. Reject coils with significant waviness.
- Inspect coating integrity and run a quick inter‑lamination resistance test.
- Review the slitter’s tension and blade maintenance records when something looks off.
- Build a small trial stack and measure stacking factor. Listen for buzz on a low‑power excitation test.
- Keep traceability from coil to core. It saves you when troubleshooting.
If you follow this routine you will feel the difference. Punching sounds cleaner. Stacks behave. Loss numbers stabilize. Noise drops a notch. Your line runs smoother. Your customers notice. That is the payback for doing the quiet work up front.
Wrap up
Slit coil quality shapes lamination consistency. Lamination consistency shapes magnetic performance. Magnetic performance sets efficiency, thermal behavior, and noise. Everything connects. Burr height, width control, flatness, surface integrity, and residual stress sit at the center of this chain. Control them with good slitting practice, disciplined inspection, and smart annealing. Align with IEC 60404 for measurement. Respect the quirks of GOES vs NOES. Use AOI and laser gauges to keep drift in check. Then let your cores speak for themselves on the test bench.
That is what I learned. That is what I practice. You can do the same starting with the next coil that rolls through your door.