Motor Laminations Explained: Material Choices, Manufacturing, and Design Trade‑offs
Every design engineer faces the same crossroads at some point. You need higher motor efficiency and lower heat. You also need parts that build fast and repeatable at a cost your project can carry. The heart of that decision often sits in the laminated core. If you have ever asked “How thin should my laminations be” or “Do I really need a higher grade of electrical steel for this duty cycle” you are in the right place.
This guide tackles the real engineering problem behind motor laminations. We will unpack the physics that drive core loss. We will map material and process options to your application. Then we will give you clear next steps so you can design with confidence and talk to a lamination supplier in the same language.
In This Article
- Why lamination design and material choice are critical
- Core loss fundamentals: eddy currents and hysteresis
- Material considerations for motor cores
- Manufacturing and assembly processes that affect performance
- Choosing the best fit for your application
- Quality, testing, and procurement checkpoints
- Engineering takeaways and next steps
Part 1: The Relatable Hook — Is This the Right Approach?
You are balancing torque density, temperature rise, noise, cost, and lead time. Change lamination thickness by 0.1 mm and you alter eddy-current loss, slot fill, and stack height. Switch to a higher silicon content steel and you reduce hysteresis loss, yet you may fight brittleness during stamping. Pick laser cutting over tooling and you move faster on prototypes, yet you risk heat‑affected edges that raise loss.
The stakes are real. Laminations set the ceiling for efficiency, thermal behavior, and acoustic noise. They also anchor the manufacturability of your stator and rotor stacks. Get this decision right and you buy yourself margin for the rest of the design. Get it wrong and you fight heat, wasted watts, and variability on the production line.
Part 2: What’s Really Going On? The Engineering Fundamentals
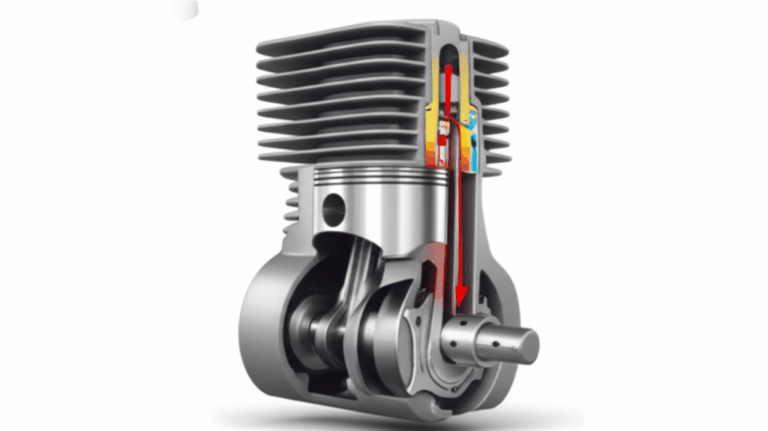
Let’s strip the physics to the essentials. A motor core carries alternating magnetic flux. Two main loss mechanisms turn some of your electrical input into heat inside that steel.
- Eddy‑current loss: The changing flux induces small circulating currents in the steel. Those currents meet resistance and waste energy as heat. Think of eddy currents like tiny whirlpools in a river. Thinner, insulated laminations break each large whirlpool into many tiny ones. Smaller whirlpools lose their punch and you cut loss.
- Hysteresis loss: The magnetic domains in the steel flip direction each cycle. That switching costs energy based on the material’s coercivity. Lower coercivity means lower hysteresis loss.
A few more concepts dial in the picture:
- Magnetic permeability: How easily the material conducts magnetic flux. Picture a sponge soaking water. A high‑permeability steel soaks up flux with less magnetizing force.
- Saturation flux density: The upper limit of how much flux the material can carry. Cobalt‑iron alloys push this limit higher. That helps when you chase power density.
- B‑H curve: The relationship between magnetic flux density (B) and magnetizing field (H). The loop area gives you hysteresis loss per cycle.
- Stacking factor: The percentage of solid steel in your stack after you account for insulation coating and interlam bonding. A higher stacking factor means more effective iron per unit height, yet you need enough insulation to block eddy currents.
- Stress and burrs: Mechanical stress and edge burrs degrade magnetic properties. They raise core loss and noise. You avoid them with tight die control, proper annealing when needed, and smart process choices.
Frequency matters. Eddy currents scale strongly with lamination thickness and frequency. High switching frequencies and rich harmonics from modern drives push loss unless you go thinner, choose better insulation, and control cutting heat and stress.
Thermal environment matters too. Loss turns into heat that raises coil resistance and worsens magnet performance in PM machines. Your lamination choices ripple into winding temperatures and bearing life. Treat the core like the foundation of a building. If you pour it well, everything above it stands straighter.
Part 3: Your Options Explained — The Guide
We will split this section into two parts. Material considerations first, then manufacturing and assembly processes. The goal is to help you weigh trade‑offs without bias.
Material Considerations
1) Non‑oriented silicon steel (NOES)
- What it is: Iron alloyed with silicon (commonly 1.0–3.2% Si) designed for isotropic magnetic behavior in the sheet plane. Most motor laminations use NOES.
- Why it helps: Silicon raises electrical resistivity and lowers hysteresis loss. You get lower core loss and better efficiency at power frequencies and beyond.
- Pros:
- Balanced properties in all directions. Good for rotating machines.
- Broad availability and cost‑effective for volume.
- Comes in a range of thicknesses such as 0.50 mm, 0.35 mm, 0.27 mm, and thinner premium grades.
- Cons:
- Lower saturation than cobalt‑iron. If you chase extreme power density, you may hit saturation sooner.
- Thinner gauges improve loss yet increase brittleness during stamping and make handling more delicate.
2) Grain‑oriented silicon steel (GOES)
- What it is: Electrical steel with grains aligned to favor one direction. It shines in transformer cores that see unidirectional flux.
- Pros:
- Very low loss along the rolling direction.
- Cons:
- Poor cross‑grain performance. Not suited for most motors that rotate flux.
- Often reserved for transformer laminations rather than motor stators or rotors.
3) Cobalt‑iron alloys (e.g., ~49% Co FeCo)
- What it is: Iron‑cobalt alloys with very high saturation flux density and good permeability. Typical saturation can exceed 2.3 T.
- Pros:
- Higher flux density allows more torque or smaller core size at the same torque. Great for aerospace, traction, and high power density e‑machines.
- Can reduce copper mass because you can run higher flux without saturating.
- Cons:
- Expensive raw material. Global supply can swing.
- More challenging to stamp due to hardness and brittleness. Tool wear increases. Laser cutting can add heat‑affected loss if not controlled.
4) Nickel‑iron alloys (e.g., 50–80% Ni)
- What it is: Alloys with high permeability and low coercivity. Known as Permalloy in some forms.
- Pros:
- Very low hysteresis loss at low frequencies. Excellent magnetic softness.
- Cons:
- Low saturation compared to Fe or FeCo. Not common for traction motors. Better suited to sensors, shielding, and specialty low‑frequency components.
5) Amorphous and nanocrystalline ribbons
- What it is: Very thin ribbons with disordered or ultra‑fine grain structures. Extremely low loss at high frequency.
- Pros:
- Outstanding core‑loss performance at tens of kHz to MHz.
- Cons:
- Difficult to stamp. Typical use in transformers, inductors, and specialty machines rather than mainstream rotors and stators.
6) Insulation coatings on electrical steel
- Why coatings matter: They electrically isolate laminations from each other. That isolation breaks eddy current loops between sheets. Coatings also affect stacking factor and corrosion resistance.
- What to look for:
- Coating class and thickness. Thicker coatings reduce interlam conduction yet lower stacking factor.
- Temperature rating and chemical resistance. You need compatibility with your impregnation resin and thermal class.
- Standards: Insulating coating classes are covered by ASTM A976. Magnetic property measurements are covered by IEC 60404 series. Electrical steel specifications often reference ASTM A677 and ASTM A876 for fully processed and semiprocessed NOES.
How to choose thickness
- Lower frequency and simple drives: 0.50 mm and 0.35 mm gauges often strike the best balance between loss, cost, and manufacturability.
- Medium frequency or PWM drives with rich harmonics: 0.35 mm or 0.27 mm reduce eddy currents. You get lower heat and quieter operation in many cases.
- High speed or high switching frequency: Ultra‑thin gauges can pay off. Be ready for more delicate stamping, higher tooling standards, and potential bonding changes.
Don’t chase minimum thickness by default. Run the numbers. The best gauge is the one that meets your loss target with the lowest total landed cost and acceptable yield. That includes scrap rate, tool life, and stacking efficiency.
Manufacturing and Assembly Processes
1) Progressive die stamping
- What it is: Coils of steel feed through a die with multiple stations that punch features and final profiles. You get high speed and consistent part quality.
- Pros:
- Lowest cost per part at volume. Tight repeatability. Low burr with well‑maintained dies.
- Compatible with interlocking tabs, pole skew features, and in‑die stacking in some programs.
- Cons:
- High tooling cost and lead time. Tool changes when you tweak design.
- Requires careful die clearance and lube control to protect magnetic properties and coatings.
2) Compound or single‑hit stamping
- Useful for low to medium volume. Lower tooling complexity than progressive dies. Slower cycle time.
3) Laser cutting
- Pros:
- Fast design changes. Perfect for prototypes and low‑volume complex shapes.
- No hard tooling cost. Great for early iteration while you dial slot geometry.
- Cons:
- Heat‑affected zone raises local hardness and loss. You mitigate with optimized parameters or post‑processing. Watch for burr and dross. Validate magnetic loss with coupon tests.
4) Wire EDM and waterjet
- Pros:
- No significant heat‑affected zone. Superb precision.
- Cons:
- Slow and expensive for production motor stacks.
5) Burr control and edge quality
- Why it matters: Burrs short adjacent laminations and create micro‑hotspots. They raise loss and noise. They also reduce insulation life.
- What to control:
- Punch‑to‑die clearance, tool sharpness, and appropriate lubricants.
- Deburr processes that do not smear coatings across edges.
6) Stress relief and annealing
- Cold work during stamping raises dislocation density. That hurts magnetic performance. Some materials benefit from a stress‑relief anneal. You must coordinate with the coating supplier and resin system.
- Not all stacks can be annealed after bonding or welding. Plan the route early.
7) Stacking and bonding methods
- Interlocking laminations: Small tabs crimp like LEGO bricks. You get a rigid stack without welding. This avoids heat and preserves magnetic properties.
- Bonding/Backlack: Organic coatings that cure and bond under heat and pressure. You get tight stacks with excellent vibration behavior and high stacking factor.
- Welding and riveting: Strong but can add local stress or heat. Use sparingly and away from high‑flux paths. Validate loss impact.
8) Skew, segmentation, and venting
- Skew reduces cogging torque and acoustic noise. It complicates manufacturing. In‑die skew or segment skew both work with the right tooling.
- Segmented stators help with winding automation and repair. They also change lamination handling and bonding.
- Vent channels manage oil or air flow through the stack. They can also reduce eddy‑current path length when designed smartly.
9) Quality control
- Key metrics: Burr height, lam thickness, flatness, concentricity, tooth tip integrity, hole position, and coating continuity.
- Automotive programs often run under IATF 16949. Many suppliers also follow ISO 9001. For magnetic property verification, reference IEC 60404 series test methods such as Epstein frame and Single Sheet Tester.
Part 4: Which Application Is This For? The Best‑Fit Section
Let’s match typical scenarios to practical choices. Be honest with your constraints. You will choose better and move faster.
- Industrial motors on 50/60 Hz mains with VFD up to a few kHz switching
- Material: Mid‑loss NOES such as 0.35 mm or 0.50 mm in a suitable coating class.
- Process: Progressive die stamping for volume. Interlock or bonding for noise control.
- Why: You get good loss performance without exotic alloys. The switching harmonics are manageable with 0.35–0.50 mm.
- High‑speed BLDC or PMSM with high PWM frequency or strong harmonic content
- Material: Premium NOES at 0.27–0.35 mm with robust insulation. Consider ultra‑thin gauges if loss budget is tight.
- Process: High‑precision stamping. Tight burr control. Bonded stacks to improve vibration damping.
- Why: Eddy currents dominate at speed and harmonics. Thinner gauge reduces heat. Better damping trims acoustic peaks.
- Aerospace traction or racing e‑machines chasing maximum torque density
- Material: Cobalt‑iron for high saturation. Validate laminations with your winding and cooling plan.
- Process: Advanced stamping with hardened dies and careful lube. Validate any laser cut edges with loss testing. Consider stress relief if permitted by coating.
- Why: FeCo pays off when you run near saturation to shrink mass. You must validate process effects or you give back gains as heat.
- Low‑volume prototyping and design iteration
- Material: The same grade you target for production where possible. Do not swap to a softer or thicker steel only to “get parts.” You will misjudge loss.
- Process: Laser cut or EDM for quick turns. Specify cut parameters and test samples for magnetic loss to avoid surprises when you scale.
- Why: Speed matters early. Just measure the right properties so your loss model stays honest.
- Transformer and inductor cores
- Material: GOES or even amorphous/nanocrystalline for high‑efficiency transformers. Motors rarely use GOES due to rotating flux.
- Process: Stacking and annealing routes differ for transformer laminations. Do not assume motor practices apply.
A quick caution on “more silicon is always better.” Higher silicon content reduces loss. It also reduces mechanical toughness. The result can be cracked teeth, higher scrap, and faster die wear. Balance magnetic and mechanical properties. Use actual formability data from the coil lot you plan to run.
Part 5: Quality, Testing, and Procurement Checkpoints
You can design the perfect core on paper. You still need a clean supply chain and hard data from the shop floor. These checkpoints reduce risk.
- Material certs and traceability
- Request mill certs for each coil. Confirm chemical composition, thickness, mechanical properties, and coating class per ASTM and IEC references.
- Lock the exact coating and thickness combination. Coating changes alter stacking factor and insulation compatibility.
- Incoming inspection
- Gauge variation matters to slot fill and stack height. Verify thickness and flatness. Inspect coating continuity and surface quality.
- Run sample Epstein or Single Sheet tests on critical lots if your application pushes limits. Coordinate with a lab that follows IEC 60404 methods.
- Tooling and burr control
- Define burr height limits in your print. Measure early in PPAP and at regular intervals. Burrs creep as tools wear.
- Use controlled lubricants and cleaning steps. Protect coating integrity.
- Prototype to production transfer
- If you cut prototypes with laser or EDM then switch to stamping, expect loss changes. Plan a correlation build to reset your model’s loss constants.
- If you go from interlock to bonding, update stacking factor and mechanical damping assumptions. Validate NVH changes.
- Thermal and impregnation compatibility
- Check the insulation coating against your varnish or resin. Some coatings dislike certain solvents or cure schedules.
- Align the lamination thermal class with your winding insulation system. Avoid weak links.
- Standards and compliance
- Magnetic testing: IEC 60404 series.
- Electrical steel specifications: ASTM A677 and A876 are common references for NOES. Insulating coatings: ASTM A976 classification.
- Automotive quality: IATF 16949. General quality: ISO 9001. Environmental compliance: RoHS and REACH where relevant.
- Cost and lead time realities
- Tooling can be the long pole. Start die design early if you know your geometry.
- Cobalt‑iron alloys carry price volatility. Get commercial coverage before you commit to volume.
- Bonded stacks can shorten assembly time and improve consistency. They may add per‑part cost. Run the full process cost, not just material price.
Part 6: Practical Design Rules of Thumb
Treat these as starting points. Validate with your own geometry and duty cycle.
- Use the thinnest lamination that meets your loss target at your switching spectrum and budget. Do not over‑specify gauge without quantifying the benefit.
- Design to avoid saturation margin pinches. If you move to FeCo for torque density, validate the heat and acoustic trade‑offs.
- Specify burr limits, stacking factor targets, and allowable bonding or interlock locations on the print. The drawing is the contract.
- Keep flux paths smooth. Sharp corners, thin bridges, and tooth tips with stress risers raise local loss and noise.
- Skew can tame cogging and whine. It complicates tooling. Evaluate early so you do not redesign the die late.
- Validate loss with material and process coupons that match production. Do not rely on catalog data alone for final numbers.
Part 7: Where Each Component Fits — Stator vs Rotor
Stators do the heavy lifting for flux guidance. They also host windings or concentrated coils. They benefit most from clean slot geometry, tight burr control, and consistent stack height. For a deeper look at stator geometry and its impact on performance, see the overview on stator core lamination.
Rotors see different demands. Induction rotors carry bars and end rings. PM rotors demand precise magnet pockets and tight balance. Rotor laminations often need extra care in punching keyways, bridges, and vent features. You will find practical design notes in this concise guide to rotor core lamination.
Both stacks depend on the same base craft. You need consistent steel, disciplined cutting, and a repeatable bonding or interlock plan. The specific geometry changes. The physics of loss and stress do not.
Part 8: Tying It Together With Motor Architecture
Your motor architecture sets the constraints. Lamination choices follow.
- Induction motors
- Rotors use conductive bars. Rotor lamination bridges must support casting or bar insertion. Too thin and they crack. Too thick and they waste slot area and raise losses.
- Stators benefit from tooth tip shapes that control leakage and reduce noise. Balance tooth strength against slot fill and thermal paths.
- PM machines
- Surface PM rotors rely on magnet retention sleeves or high‑strength bridges. Keep bridges strong enough to survive overspeed. Avoid large eddy current loops near magnets by using segmented magnets or flux barriers where appropriate.
- Interior PM rotors use flux barriers to shape torque production. Lamination punching must hold tight tolerances on these thin features. Tooling and stress‑relief choices matter more here.
- Switched reluctance and synchronous reluctance
- Rotor saliency drives torque. Thin webs and narrow bridges amplify flux focusing. They also push the limits of stamping and burr control. Expect more attention to material formability and die life.
- BLDC stators with concentrated windings
- Teeth see higher local flux and hotspot risk. Bonding improves damping and reduces noise. Skew or fractional slot choices alter harmonics significantly.
If you are mapping options to a complete core system, this primer on modern motor core laminations provides a helpful snapshot of how material and geometry work together.
Part 9: Modeling, Measurement, and the Reality Check
You can predict core loss with Steinmetz‑type equations and harmonic analysis. That gives you a map. The road still has potholes.
- Harmonics from PWM drives cause additional losses. Model the harmonic spectrum from your inverter and load. Include slotting and tooth ripple effects.
- Stress and cutting raise loss beyond catalog values. Use correction factors or test coupons cut by the same method as your production plan.
- Temperature rises affect resistivity and magnetic properties. Close the loop with thermal simulations and test data. Loss feeds heat. Heat feeds loss in some regimes. Iterate.
Test like you mean it
- Epstein frame and Single Sheet Tester methods in the IEC 60404 series give you comparable data across lots and suppliers.
- Ring cores or stator‑like fixtures capture edge and punching effects more realistically.
- NVH validation matters. Micro‑structure, bonding, and assembly pressure all change acoustic behavior. Listen early and often.
Part 10: Procurement and Supplier Collaboration
Great lamination programs come from tight teamwork between design, manufacturing, and supply chain. A few habits pay off.
- Share real duty cycles and harmonic content with your supplier. They will steer you toward materials and coatings that last.
- Lock critical features and tolerances early. Give freedom where it does not matter. You get better pricing and fewer change orders.
- Ask for process capability data. Cpk on burr height and critical dimensions prevents surprises in the ramp.
- For global programs, plan dual‑source strategies for specialty alloys like FeCo. Audit both for the same coating class and test regimen.
- Keep an eye on stacking factor. Bonding systems and coating thickness move this number more than you think. Update your electromagnetic model with the actual factor from production laminations.
Material selection remains the cornerstone. If you want a concise survey of available grades and coatings to align with your target frequency and loss, this overview of electrical steel laminations is a straightforward place to start.
Part 11: Common Pitfalls and How to Avoid Them
- Designing to catalog core loss without process correction
- Fix: Apply loss adders for your cutting route. Measure parts cut the way you will build them.
- Chasing the thinnest gauge without considering yield and tool wear
- Fix: Run a total cost model that includes scrap, die maintenance, and throughput. Often 0.35 mm wins over 0.27 mm for mainstream drives.
- Ignoring insulation compatibility with varnish or resin
- Fix: Cross‑check the coating chemical resistance and cure temperature with your impregnation plan. Use ASTM A976 coating class as a common language.
- Over‑welding stacks to meet rigidity targets
- Fix: Shift to bonding or interlocking where possible. If you must weld, keep welds short and away from high‑flux regions. Validate loss.
- Late skew decisions
- Fix: Decide skew angle and method before the die is cut. In‑die skew saves time later but locks geometry.
- Undefined burr limits on drawings
- Fix: Specify burr height and measurement method. Inspect routinely.
Part 12: A Quick Word on Transformers vs Motors
Engineers sometimes ask if transformer laminations will work in a motor. The short answer is no for most cases. Transformers see unidirectional flux. Motors sweep flux through many angles. Grain‑oriented steels deliver their magic in one direction. Motors need balanced behavior in the sheet plane. You will find GOES and related forms in transformer cores, not in rotating machines. If you are exploring transformer stack designs in parallel to your motor program, a focused primer on transformer laminations will help you tune core geometry and coating selection.
Your Engineering Takeaway
- Laminations set your motor’s efficiency, heat, and noise floor. Choose them with the same rigor you give magnets and windings.
- Eddy currents and hysteresis drive core loss. Thinner, well‑insulated laminations curb eddy currents. Low‑coercivity steels cut hysteresis.
- NOES is the default for motors. GOES is for transformers. FeCo unlocks higher torque density at a premium.
- Manufacturing choices matter. Stamping shines at volume. Laser and EDM are great for prototypes yet change losses. Control burrs and stress or you pay in heat and noise.
- Bonding or interlocking beats heavy welding for magnetic performance. Validate NVH early with the stack method you will ship.
- Test like production. Use IEC 60404 methods. Add process correction to your loss model.
- Specify burr limits, stacking factor, and coating class on the print. Protect performance at the source.
Ready to translate these choices into a buildable stack? Share your duty cycle, target losses, and packaging constraints, then request sample laminations cut by your intended process. A short loop of model‑test‑tune beats months of guesswork.
If you want a high‑level refresher on the building blocks and how they show up in different motor types, this overview of motor core laminations is a solid place to continue.
Author’s note on standards and data integrity
- For magnetic property measurement, see the IEC 60404 series.
- For electrical steel specifications, see ASTM A677 and ASTM A876.
- For insulating coating classification, see ASTM A976.
These widely used references will help you align supplier data sheets with your design models and quality plans.
Empowering next steps
- Define your allowable core loss at operating point and harmonics. Translate that into lamination gauge candidates.
- Pick two material options and two manufacturing routes for an A/B test. Stamp one set. Laser‑cut or EDM the other. Measure magnetic loss and NVH.
- Lock coating class, stacking factor, burr limits, and bonding method on your drawings. Protect your design intent through production.
- Align on quality gates with your supplier. Request process capability on burr height and critical dimensions. Review sample test reports against IEC 60404 methods.
Build smart. Validate early. Your laminations will pay you back every time your motor runs cooler, quieter, and longer.