How to Wire a 24V Trolling Motor: A Step-by-Step Guide for Safe & Optimal Performance
- Table of Contents
- Introduction
- What Is a 24V Trolling Motor System?
- What Tools and Materials Do You Need?
- What Wire Gauge Should You Use? (With Chart)
- Where Do You Put the Circuit Breaker or Fuse?
- How Do You Wire Two 12V Batteries in Series?
- How Do You Connect the Plug and Receptacle?
- How Do You Mount and Route Wires the Right Way?
- How Do You Test Voltage and Polarity?
- What Mistakes Should You Avoid?
- How Do You Charge and Care for Your Batteries?
- How Do You Troubleshoot Power Problems?
- Can You Upgrade From 12V to 24V or Add Solar?
- Bow Mount vs Transom Mount: Does Wiring Change?
- Inside the Motor: Why Build Quality Matters
- Safety and Standards You Should Know
- FAQs
- References
- Key Takeaways
You want more thrust and longer run time. A 24V trolling motor gives you both. If you wire it right you get smooth power and safe trips. If you wire it wrong you get heat, blown fuses, and a dead day on the water. I wrote this to show you how to do it the right way with clear steps, simple parts, and smart checks.
What Is a 24V Trolling Motor System?
A 24V system uses two 12V deep cycle batteries wired in series. Series means you connect the negative of the first battery to the positive of the second battery. You do not tie both positives together and you do not tie both negatives together. That would be parallel which stays at 12V.
Why go 24V? You get more thrust with less current for the same power. The motor draws fewer amps at 24V than at 12V to make the same watts. Lower amp draw means less voltage drop and cooler wires. That helps your motor and batteries last longer.
You may run a Minn Kota or a MotorGuide. You might have a GPS trolling motor with features like Spot-Lock. No matter the brand the wiring basics stay the same. Use marine grade wire. Use proper overcurrent protection. Check polarity. Follow ABYC best practices.
What Tools and Materials Do You Need?
You do not need a fancy shop. You do need the right tools and good materials. Weak tools make weak crimps which cause heat and trouble.
- Tools
- Wire strippers
- Ratcheting crimping tool
- Heat gun
- Multimeter or voltmeter
- Wrenches and screwdrivers
- Cable cutter
- Torque wrench for lugs if you have one
- Materials
- Marine grade wire (tinned copper) sized for your run
- Heat shrink connectors and heat shrink tubing
- Marine battery terminals and terminal connectors
- Circuit breaker or ANL fuse and ANL fuse holder
- Trolling motor plug and trolling motor receptacle (IP67 if possible)
- Battery boxes or battery trays and strap kit
- Zip ties and marine electrical conduit
- Marine silicon sealant
- Anti-corrosion spray
- Battery charger for a 24V system or a dual bank charger
- Disconnect switch or a marine battery selector switch if you want a master off
I like brands made for boats. Ancor makes wire and terminals. Blue Sea Systems makes circuit breakers, bus bars, and terminal blocks. Good gear costs a bit more yet it saves you headaches.
What Wire Gauge Should You Use? (With Chart)
Use wire that is big enough to keep voltage drop low. For trolling motors the target is a 3% voltage drop. That is an ABYC E-11 guideline for critical circuits. Long runs need thicker wire. High amp draw needs thicker wire too.
First find your motor’s max current at full speed. A 70–80 lb thrust motor may draw 55–70A at 24V. A 100–112 lb thrust motor may draw 80–95A. Then measure the total wire length from battery to motor and back. That is the round trip length.
Here is a simple chart for 24V trolling motor wiring. It assumes 3% drop, tinned copper conductors, and typical amp draw ranges. Use the next size up if in doubt.
| Motor Thrust (lbs) | Max Current (A) | Breaker/Fuse (A) | Round Trip 0–5 ft | Round Trip 5–10 ft | Round Trip 10–15 ft | Round Trip 15–20 ft |
|---|---|---|---|---|---|---|
| 50–60 | 45–55 | 60 | 8 AWG | 6 AWG | 4 AWG | 2 AWG |
| 70–80 | 55–70 | 80 | 4 AWG | 2 AWG | 1/0 AWG | 2/0 AWG |
| 100–112 | 80–95 | 100 | 2 AWG | 1/0 AWG | 2/0 AWG | 3/0 AWG |
Problem: Undersized wire causes voltage drop and heat.
Agitate: The motor feels weak, the breaker trips, and the insulation can melt.
Solution: Pick the right AWG from the chart and keep runs as short as you can.
Where Do You Put the Circuit Breaker or Fuse?
You need overcurrent protection. A short can happen fast on a boat and a breaker can save your day and your boat.
- Put the circuit breaker or fuse on the positive wire near the battery. ABYC says within 7 inches of the first battery positive if the wire is not in a protected conduit.
- Size the breaker to match the motor’s max draw. Use 60A for many 50–60 lb motors, 80A for many 70–80 lb motors, and 100A for 100–112 lb motors. Check your motor manual.
I mount the breaker on a board by the battery tray. Keep it dry and easy to reach.
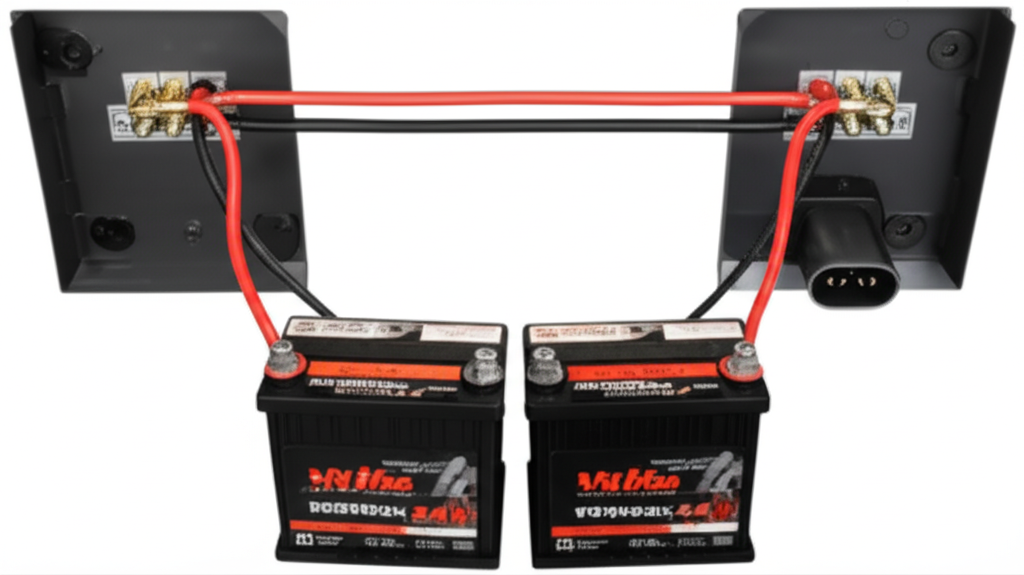
How Do You Wire Two 12V Batteries in Series?
Let’s wire the batteries to make 24V. You can do this in a few clean steps.
- Step 1: Put your two 12V deep cycle batteries side by side in battery boxes or trays. Flooded, AGM, or Lithium (LiFePO4) all work if they meet the motor’s specs.
- Step 2: Use a short heavy cable to connect the negative terminal of Battery 1 to the positive terminal of Battery 2. That jumper link is the series connection.
- Step 3: The remaining free positive on Battery 1 is your 24V positive. The remaining free negative on Battery 2 is your 24V negative.
- Step 4: Install the circuit breaker on the positive coming from Battery 1.
Visualize a simple diagram. Battery 1 (+) goes to breaker then to motor positive. Battery 1 (–) goes to Battery 2 (+) with a short jumper. Battery 2 (–) goes to motor negative. That is a series wiring diagram for a trolling motor 24V system.
Problem: People often wire in parallel by accident.
Agitate: You think you have 24V so the motor runs weak or not at all.
Solution: Always cross link negative of Battery 1 to positive of Battery 2 to build 24V.
How Do You Connect the Plug and Receptacle?
A trolling motor plug and matching receptacle makes life easy. You can unplug for service so you also reduce battery drain when parked.
- Wire the receptacle to your main power wires. Positive from the breaker to the positive pin. Negative from the bank to the negative pin. Follow the receptacle’s wiring diagram.
- Wire the plug to the motor leads. Match color codes for 24V marine wiring. Red is positive, black is negative on many motors. Some brands use different wire color codes for 24V so check the manual.
- Use marine grade butt connectors with heat shrink. Seal with heat to make a waterproof joint. IP67 rated connectors resist spray and rain.
I like to mount the receptacle near the bow for a bow mount trolling motor. Use a gasket and marine silicon sealant so water stays out.
How Do You Mount and Route Wires the Right Way?
Good routing protects the wire and your boat. It also makes the boat neat which helps with troubleshooting later.
- Secure the battery bank in a dry spot. Use battery tray installation hardware and straps. A battery box adds spill protection and room for a bus bar or disconnect switch.
- Route wires along smooth paths. Protect wires from abrasion with loom or marine electrical conduit. Avoid sharp edges. Avoid fuel lines. Keep wires up off the bilge when you can.
- Use zip ties and clamps. Add a disconnect switch near the bank for service. Use a bus bar to split power if you need to feed a quick disconnect, a foot pedal, and a remote control head.
- Keep cable lengths short. The longer the run the higher the voltage drop. If you must extend trolling motor wires size up the gauge.
Follow marine electrical best practices and your boat will look pro. It will also run better.
How Do You Test Voltage and Polarity?
Before you hit the water test the system. A few checks save you from a no power call later.
- Voltage Check: Set your multimeter to DC volts. Measure the receptacle or main power leads. You should see about 24–25V if fully charged. Lithium may read a bit higher.
- Polarity Check: Red lead on positive, black lead on negative. If the meter shows a minus sign you have reverse polarity. Swap the leads or fix the wiring. Reverse polarity can damage motor electronics fast.
- Amp Draw: You can check amp draw with a clamp meter on the positive when you test in the water. Compare to the trolling motor amp draw spec at top speed.
If voltage reads 12–13V you wired in parallel. If it reads 0V the breaker may be off or a connection is open.
What Mistakes Should You Avoid?
I have seen the same errors over and over on bass boats, pontoon boats, and jon boats. Avoid these traps.
- Wiring in parallel not series
- Using undersized wire
- Skipping the breaker or fuse
- Making poor or uninsulated connections
- Mixing old and new batteries in one bank
- Crossing the motor leads (reverse polarity)
- Running wires where they get pinched or scuffed
- Using non-marine parts that corrode quick
Problem: You skip overcurrent protection or you use cheap connectors.
Agitate: A short cooks a wire, the breaker trips all day, or corrosion eats your terminals.
Solution: Use a proper circuit breaker or ANL fuse, marine grade wire, heat shrink connectors, and anti-corrosion spray.
How Do You Charge and Care for Your Batteries?
Good battery care gives you longer run time and more seasons on the water. Different battery types want different charging.
- Flooded Lead-Acid: Low cost. Check water often. Keep tops clean. Vent the box. Use a smart charger set to flooded.
- AGM Battery: Maintenance free. Likes smart charging. Do not overcharge. Handles vibration well.
- Gel Battery: Needs a gel profile charger. Slower charge rate. Less common today.
- Lithium-ion Battery (LiFePO4): Light and strong. Needs a charger that supports LiFePO4 with a Battery Management System (BMS). Very long life.
Here is a quick comparison.
| Battery Type | Pros | Cons | Typical Cycles |
|---|---|---|---|
| Flooded Lead-Acid | Low cost, easy to find | Needs water checks, heavy | 200–400 at 50% DOD |
| AGM | No spill, charges faster than flooded | Costs more, dislikes overcharge | 400–800 at 50% DOD |
| Lithium (LiFePO4) | Very light, long life, steady voltage | High upfront cost, special charger needed | 2000–5000+ at 80–100% DOD |
Use a 24V battery charger or a dual bank 12V charger that charges each battery separately. Keep batteries charged after each trip. Store them on a maintainer. For flooded types keep water above the plates. For all types keep terminals tight and clean. Spray with anti-corrosion spray.
How Do You Troubleshoot Power Problems?
Things break. You can fix most trolling motor wiring issues fast if you follow a simple path.
- Motor Not Turning On
- Check the breaker. Reset it. Make sure the disconnect switch is on.
- Measure voltage at the receptacle. If 24V is present check the plug. If no voltage check the breaker, fuse, and battery terminals.
- Confirm series wiring. Many “dead motor” calls end with a parallel wiring mistake.
- Intermittent Power
- Inspect for poor or corroded connections. Wiggle test the plug. Look for green or white fuzz on copper. Clean and re-crimp if needed.
- Check the foot pedal wiring if used. Check the remote control harness and connectors.
- Loss of Thrust or Performance
- Measure voltage drop under load. Low voltage at the motor equals low power.
- Look for overheating wires. Hot spots mean high resistance or undersized wire.
- Inspect the prop for weeds or damage. Replace the trolling motor prop if chipped.
- Breaker Tripping or Overheating Wires
- Confirm correct breaker size. A 70–80 lb motor wants an 80A breaker in most cases.
- Check for short circuits. Look for exposed wires and nicks.
- Size up the wire if the run is long.
If all else fails test the motor on a bench with a known good 24V source. That helps you isolate wiring from motor issues.
Can You Upgrade From 12V to 24V or Add Solar?
Yes. Many anglers upgrade from 12V to 24V for more thrust and better efficiency.
- Upgrading from 12V to 24V: Add a second 12V battery. Wire in series. Replace the breaker with the correct size. Check wire gauge for the new amp draw. Replace the plug and receptacle if they are not rated for 24V and the higher current.
- 24V System With Solar Charging: You can add a solar panel and a 24V solar charge controller. Or add two 12V panels with a suitable marine battery isolator setup. Follow the controller’s manual. Use ABYC grade wire and proper fusing on the PV input and the battery output.
A clean upgrade plan saves you time and money. Draw a simple trolling motor wiring diagram before you cut wire.
Bow Mount vs Transom Mount: Does Wiring Change?
The wiring rules do not change. The run often does.
- Bow Mount Trolling Motor 24V Wiring: The motor sits far from the stern batteries in many boats. The longer run can cause voltage drop. Use thicker wire per the chart. Install a trolling motor bracket with strain relief for the cable. Keep the shaft length in mind because longer shafts may change cable routing.
- Transom Mount Trolling Motor 24V Wiring: The run is often shorter so smaller wire may be fine. Still use a breaker near the battery. Keep wires neat and protected.
Whether you fish a bass boat, a pontoon boat, or a jon boat the basics stay the same.
Inside the Motor: Why Build Quality Matters
Wiring gets power to the motor. The motor turns that power into thrust. The build inside the motor can change how smooth and efficient it runs. Laminations in the stator and rotor lower core losses and keep heat down.
- Learn how the stator core laminations shape the magnetic field for steady torque.
- See how rotor core laminations cut eddy currents so the motor keeps cool at low speeds.
- Explore how well made motor core laminations help reduce buzz and improve efficiency.
- Dive into the metals behind it with high grade electrical steel laminations.
This matters for both brushed and BLDC motors. A quality bldc stator core and good lamination stacks reduce losses so you get more run time from the same battery bank.
Safety and Standards You Should Know
Marine electricity can bite. Follow safe steps every time.
- Disconnect all power before you work. Pull the plug. Open the disconnect switch.
- Wear eye protection and gloves. Work in a dry, well lit space. Keep a fire extinguisher nearby.
- Follow ABYC E-11 guidelines for overcurrent protection, conductor sizing, and secure routing.
- Use stranded, tinned copper marine grade wire with 105°C insulation and UV resistance.
- Seal all connections with heat shrink. Insulate every exposed lug.
- Use a bus bar or terminal blocks to split loads. Keep grounds clean and tight.
- Prevent galvanic corrosion. Keep zinc anodes in good shape. Use anti-corrosion spray on terminals.
I do not solder big marine power joints because vibration can crack the joint. Proper crimping techniques with the right tool, plus heat shrink, make a strong and waterproof connection. Soldering small signal wires can be fine if supported and sealed.
FAQs
Q: Can I run a 24V trolling motor from a single 24V lithium battery?
A: Yes. A single 24V LiFePO4 with a built in BMS works well if it meets the motor’s amp draw. Still use a breaker near the positive.
Q: What size circuit breaker do I need for a 24V trolling motor?
A: Match the motor. 60A for many 50–60 lb motors, 80A for many 70–80 lb motors, and 100A for 100–112 lb motors. Check your manual.
Q: Do I need a special charger for AGM or lithium?
A: Yes. Use an AGM setting for AGM. Use a LiFePO4 charger or a charger with a lithium profile for LiFePO4. A battery charger for 24V should match the chemistry.
Q: Does wire color matter?
A: Follow the motor brand’s wire color codes. Red is often positive and black is often negative. Always test with a meter.
Q: Can I use a quick disconnect?
A: Yes. A quick disconnect trolling motor plug and receptacle saves time and improves safety.
References
- ABYC E-11: AC and DC Electrical Systems on Boats
- Blue Sea Systems technical briefs on circuit protection and voltage drop
- Minn Kota and MotorGuide installation manuals
- SAE and ISO marine wiring practices for small craft
- Manufacturer data sheets for AGM and LiFePO4 batteries
Step-by-Step Summary: The Wiring Guide
Let’s put the whole 24V system together in clear steps that you can follow in your boat.
1) Choose and Position Batteries
- Pick two 12V deep cycle batteries matched in type and age. Flooded, AGM, or Lithium (LiFePO4) all work when sized right.
- Mount in battery trays or battery boxes. Strap them down tight in a dry, accessible spot.
2) Determine Wire Gauge
- Find the motor’s max amp draw.
- Measure round trip length. Use the chart to pick AWG by amperage and length.
- Use marine grade, tinned copper wire to limit voltage drop and corrosion.
3) Install the Circuit Breaker or Fuse
- Mount a 60A, 80A, or 100A breaker as required.
- Place it on the positive from Battery 1 within 7 inches if possible.
4) Wire the Two 12V Batteries in Series
- Connect Battery 1 negative to Battery 2 positive with a short heavy cable.
- Now Battery 1 positive is your 24V positive.
- Battery 2 negative is your 24V negative.
5) Connect Main Power Wires to Battery Bank
- Run the positive wire from the breaker to the receptacle or the motor positive.
- Run the negative wire from Battery 2 negative to the receptacle or motor negative.
6) Install Trolling Motor Plug and Receptacle
- Wire the receptacle to the main lines. Match polarity.
- Wire the plug to the motor leads. Match polarity.
- Make waterproof joints with heat shrink.
7) Connect and Secure
- Plug the motor into the receptacle or hardwire with proper lugs.
- Secure cables with clamps. Use conduit where needed.
8) Double Check and Seal
- Torque terminals. Tug test every crimp.
- Seal all connections. Spray anti-corrosion on terminals.
9) Test Your 24V System
- Confirm 24–25V at the plug with a meter.
- Test the motor at low and high speeds with the prop clear of obstructions.
Extra Tips for Performance and Longevity
- Use a disconnect switch so you can cut power when you dock.
- A marine battery selector switch can help manage banks on larger boats.
- Keep wire runs short and avoid tight bends.
- Protect wires from abrasion. Check for rubbing at the trolling motor bracket.
- Keep the bilge dry. Moisture invites corrosion and shorts.
- For lithium, make sure the BMS supports your motor’s surge amps.
Common Causes of Electrical Failure
Here is a quick view of what fails most and why.
| Failure Cause | Common Share | Impact |
|---|---|---|
| Incorrect Wire Gauge | High | Voltage drop, heat, low thrust |
| Poor/Corroded Connections | High | Intermittent power, arcing, loss of power |
| Inadequate Overcurrent Protection | Medium | Risk of fire and damage |
| Reverse Polarity | Medium | Damage to control boards |
| Battery Issues | Medium | Short run time, sag under load |
| Damaged Insulation | Low to Medium | Short circuits and corrosion |
| Incorrect Series Wiring | Medium | 12V to a 24V motor or no start |
| Non-Marine Grade Components | Low | Fast corrosion and failure |
If you avoid these you avoid most headaches.
PAS: The Core Message
- Problem: Wiring a 24V trolling motor can feel hard. Many guides skip key steps.
- Agitate: If you guess on wire size or skip a breaker you can fry wires, trip breakers, or wreck a good day on the lake.
- Solution: Follow the steps in this guide. Use marine grade parts, proper crimping, and an ABYC style layout. Test with a meter. You will get safe, strong, and reliable power.
Key Takeaways
- Use two 12V batteries in series for a true 24V system.
- Install a circuit breaker on the positive near Battery 1.
- Pick wire gauge by amp draw and round trip length to keep voltage drop near 3%.
- Use marine grade tinned copper wire and heat shrink connectors.
- Check for 24–25V and correct polarity at the plug before you launch.
- Keep connections tight, clean, and sealed against water and corrosion.
- Charge with the right charger for your battery type. Store on a maintainer.
- Use a plug and receptacle or a disconnect switch for safety and service.
- Route and protect wires to prevent abrasion and shorts.
- Test under load if you see loss of thrust or tripping breakers.
Bold steps, simple tools, clean wiring. Do it once and do it right so your 24V trolling motor runs strong every trip.