How to Test Stator Output: A Comprehensive DIY Guide for Diagnosing Charging Issues
- Table of Contents
- How to Test Stator Output: A Comprehensive DIY Guide for Diagnosing Charging Issues
- What Is a Stator and Why Should You Test It?
- What Are the Signs of a Bad Stator?
- What Tools Do You Need to Test a Stator?
- How Do You Prepare and Stay Safe?
- Test 1: Stator Resistance (Continuity) Test
- Test 2: Stator Ground Fault Test
- Test 3: Stator AC Voltage Output Test
- How Do You Read Your Results and What Do They Mean?
- What If the Stator Tests Good but the Battery Still Dies?
- When Should You Replace the Stator and What Parts Should You Choose?
- Extra Tests: Megger, Voltage Drop, Output Current, and Bench Test
- Real-World Cases: Motorcycle, ATV, Outboard, Generator, and More
- Why Core Laminations Matter to Stator Health and Output
- FAQs
- Key Takeaways
You want your bike or small engine to start. You want the lights bright. You want the battery to charge. If it does not charge, the stator may be the reason. In this guide I show you how to test stator output with a multimeter. You get simple steps, clear values, and smart tips. Read on and fix your charging system like a pro.
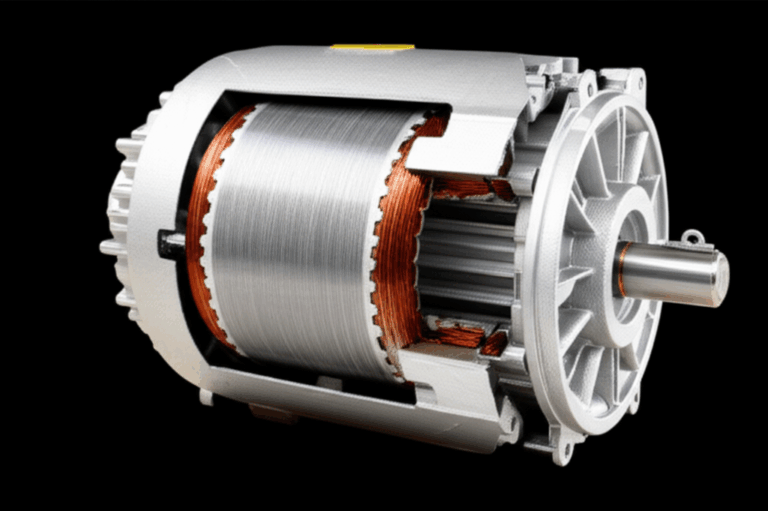
What Is a Stator and Why Should You Test It?
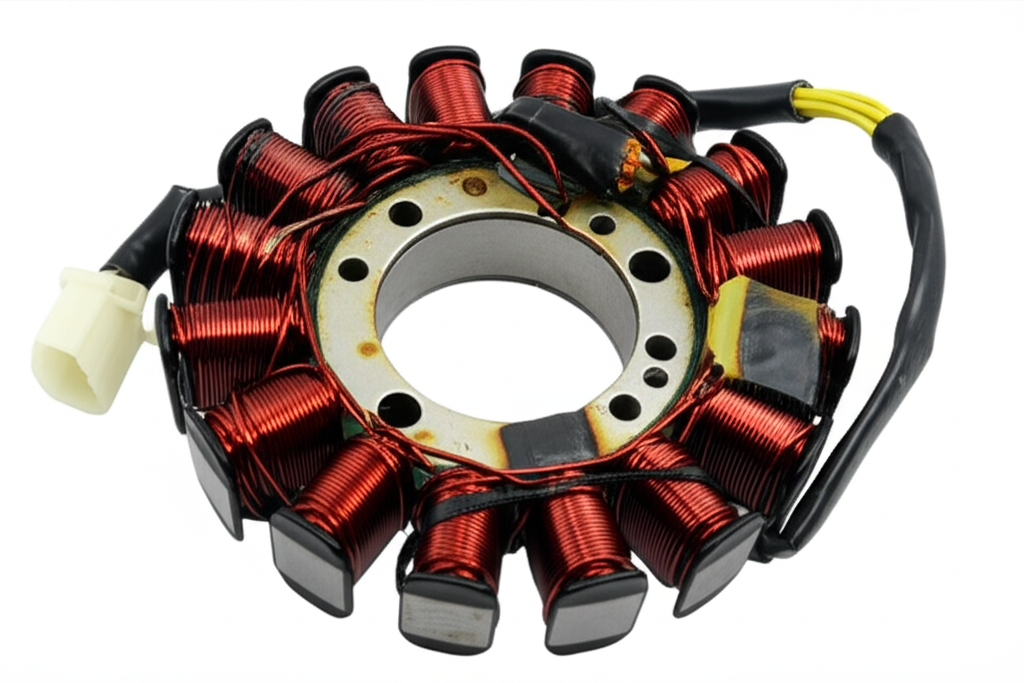
The stator is the still part of an alternator or magneto. Magnets spin on the flywheel around the stator coils. The coils make AC power. A rectifier-regulator turns that AC into DC to charge the battery. This happens in a motorcycle, an ATV, a UTV, a boat outboard motor, a garden tractor, a golf cart, and a generator. Many small engines use a permanent magnet alternator with a stator.
Here is the problem. A weak stator gives low voltage. The battery drains. The engine may misfire. Lights go dim or flicker. You sit with a dead battery. That stinks. So you test the stator and know for sure. You stop the guesswork. You save money and time.
What Are the Signs of a Bad Stator?
Let’s point out the needs. You want clear signs. These signs tell you when to test.
- Battery not charging symptoms
- Dim lights stator issue
- Flickering lights stator
- Engine misfire due to stator
- Charging system diagnosis light on the dash
- Overcharging symptoms
- Burned stator coils smell
- Stator discoloration under the cover
- Melted insulation or corrosion at the connector
Sometimes the issue is not the stator. A bad rectifier-regulator can overwork the stator. A weak battery can mimic stator faults. A bad fuse or relay can stop charging. That is why you test the stator first. Then you test the rectifier-regulator and the wiring harness.
What Tools Do You Need to Test a Stator?
Use the right tools and the job gets easy.
- A good multimeter with AC voltage, DC voltage, and Ohms resistance
- A True RMS meter helps with AC accuracy
- An ohmmeter and voltmeter are built into most multimeters
- A clamp meter can help with stator output current test
- A megohmmeter (megger) for insulation resistance test on stator coils
- Your vehicle service manual with spec sheet and wiring diagram
- Basic hand tools to access the stator connector
- Safety gear like gloves and eye protection
- A load tester for the battery
I also keep a notepad. I write the readings. I note RPM at each test. This helps me compare to the service manual. It makes the diagnosis clean.
How Do You Prepare and Stay Safe?
You want to avoid burns and shorts. So prepare and stay safe.
- Make sure the engine is cool
- Disconnect the battery for resistance checks
- Find the stator output wires and the electrical connector
- Know if you have a 2-wire single phase stator or a 3-wire three-phase stator
- Keep tools clear of the flywheel and moving parts
- Work in a clean spot with good light
Problem. Many people skip prep. They grab the meter and start poking. They get wrong readings. They touch ground by mistake. They blow a fuse. That is a bad day. Slow down for 2 minutes and set up right. Then test like a tech.
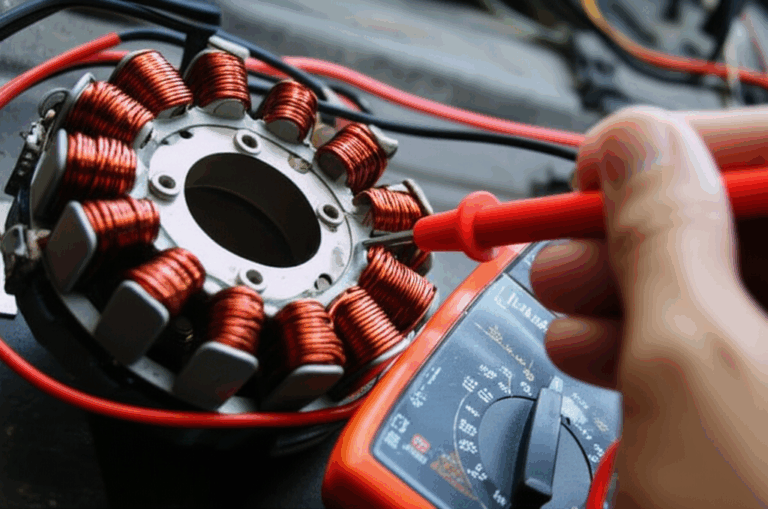
Test 1: Stator Resistance (Continuity) Test
Purpose: You check for open windings and internal shorts. This is a stator DC resistance test and a motor winding continuity test.
Steps:
Typical values:
- Three-phase stator resistance is often 0.1 to 0.8 Ohms per pair.
- Single-phase stator resistance is often 0.5 to 2.0 Ohms.
Interpretation:
- “OL” or infinite means open stator winding
- Very low and not equal across pairs may mean shorted turns
- All pairs equal and in spec means the winding likely passes
Tip: Wiggle the harness while you test. If the reading jumps, you may have a broken wire at the connector. That shows up as intermittent faults.
Test 2: Stator Ground Fault Test
Purpose: You check for a short to ground. This is a stator coil short to ground test. It points to insulation breakdown.
Steps:
Interpretation:
- You want “OL” or infinite resistance
- Any reading means a ground fault
- A ground fault means a bad stator
If you own a megger, you can do a stator coil insulation resistance test at 500 V per IEEE guidance. Good insulation reads very high. Bad insulation drops fast. Do not megger the rectifier-regulator or the battery. Only the stator coils.
Test 3: Stator AC Voltage Output Test
Purpose: You verify real output under load. This is the stator AC voltage test. It tells the story.
Steps:
- On a 3-phase stator, check 1-2, 1-3, 2-3.
- On a single-phase, check the two stator wires.
What to expect:
- Three-phase at idle often reads 18 to 30 VAC per pair
- Three-phase at 3000 to 5000 RPM often reads 45 to 80+ VAC per pair
- Single-phase at idle often reads 10 to 20 VAC
- Single-phase at high RPM often reads 25 to 50+ VAC
Interpretation:
- No AC voltage means a dead stator or open circuit
- Low AC voltage means weak magnets, partial short, or heat damage
- Uneven phase readings point to a bad phase
- Voltage should climb with RPM
Caution: Keep hands and leads clear of the flywheel. Clamp the probes or use clip leads when you can. Safety first.
How Do You Read Your Results and What Do They Mean?
You have numbers. Now you need meaning. Use the table below for quick help. Then match to your service manual.
| Test | Good Result | Bad Result | Likely Cause |
|---|---|---|---|
| Stator Resistance | 0.1-0.8 Ω per pair (3-phase). 0.5-2.0 Ω (single-phase). Readings equal across pairs. | “OL” open circuit or values far off spec. One leg way lower. | Open winding. Shorted turns. Connector damage. |
| Ground Fault | “OL” or Infinite to ground. | Any reading to ground. | Insulation breakdown. Coil touching engine ground. |
| AC Voltage Output | 18-30 VAC per pair at idle. 45-80+ VAC per pair at 3k-5k RPM. Rises with RPM. Phases equal. | No output. Low output. Unequal output. Falls with RPM. | Dead phase. Weak magnets. Heat damage. Shorted turns. |
If results pass but the battery still dies, keep going. The stator may be fine. The rectifier-regulator may fail. The battery may be weak. A bad diode can block charge. A bad connector can cause a voltage drop. You must test the whole charging system.
What If the Stator Tests Good but the Battery Still Dies?
This happens a lot. The stator gets blamed. It tests fine. The problem sits elsewhere.
- Do a rectifier regulator test. Check DC output at the battery at idle and at 3k RPM. Look for 13.5 to 14.8 VDC. Values vary by model. Use the service manual specs.
- Inspect the wiring harness. Clean the electrical connectors. Look for green corrosion. Fix loose grounds.
- Check fuses and any relay in the charging circuit.
- Load test the battery. A weak battery will not hold charge.
- Check for overcharging symptoms. A stuck regulator can cook the battery.
- Review the wiring diagram and the OEM notes. Some systems need a field wire or a sense wire to wake the charging system.
If you find a voltage drop in the harness, do a stator voltage drop test across connectors. High drop means high resistance. Clean or replace that connector.
When Should You Replace the Stator and What Parts Should You Choose?
Problem: Your tests fail. The stator is open. It is shorted to ground. The AC output is low on one leg. You feel stuck.
Agitate: You could buy a cheap part. It may fail early. You could order the wrong stator for your model. Then you wait again. You lose more ride time.
Solution: Replace the stator with quality parts. Use your OEM part number. Compare the stator specification sheet. Check stator wire color codes and connector style. Match the stator to your rectifier-regulator and your flywheel. Consider a full charging system repair if the rectifier-regulator shows stress. Many techs replace both and avoid a comeback.
I choose OEM when cost allows. Many aftermarket parts work fine. Read reviews. Ask about the winding wire, the varnish, and heat rating. Look at coil counts and pole design. Good parts last because they run cooler and handle load.
Extra Tests: Megger, Voltage Drop, Output Current, and Bench Test
You can go further.
- Stator megger test: Use a megohmmeter to test coil insulation resistance. This finds tiny leaks that a normal ohmmeter will miss.
- Stator output current test: With a clamp meter on AC amps, you can compare legs on a three-phase stator. Output should be even. Use care and follow your service manual.
- Stator voltage drop test: Check across connectors at the stator AC lines. High drop means bad pins or corrosion.
- Stator bench test: Some shops spin the flywheel with a drill. You can check AC voltage without starting the engine. Use caution and secure the engine case.
- Magnet strength check: Weak magnets cut output. A permanent magnet alternator test can include a simple “feel” test. Compare to a known good unit. Service tools exist for more exact checks.
Advanced stator testing helps with intermittent faults. Heat can change readings. Try tests when the engine is hot if the problem shows up after a ride.
Real-World Cases: Motorcycle, ATV, Outboard, Generator, and More
Motorcycle stator test: On a sport bike with a three-phase stator, you unplug the three yellow wires. You run the AC voltage test at idle and 5k RPM. If one pair reads 10 VAC lower than the others at 5k RPM, you likely have shorted turns on that phase.
ATV stator test: Many ATVs use single-phase systems. You do the stator continuity check and the ground fault test first. You then do the AC voltage test at idle and at a set RPM. If AC is fine yet the battery stays low, the rectifier-regulator test will likely fail.
Outboard charging system repair: Marine stator testing follows the same steps. Salt makes corrosion worse. Clean all grounds. Check for oil leaks in the engine casing that may soak the coils. A short to ground is common in saltwater use.
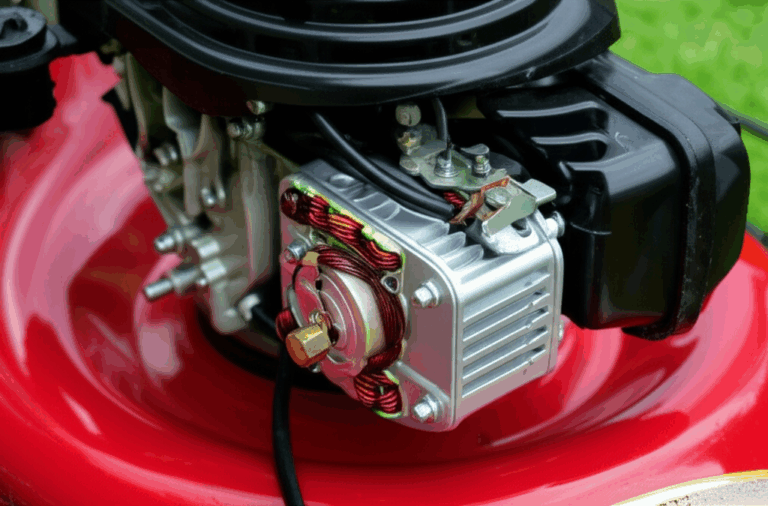
Garden tractor or UTV stator test: The small engine stator testing path is the same. Match your service manual values. Many use simple single-phase systems with lighting and charging coils. Check the spark plug and ignition system too because some systems share parts.
Generator power output test: How to test a generator stator? Test resistance. Test to ground. Test AC output at the stator. Then test wattage and amperage at the outlets under a load. Compare to the spec sheet.
Industrial motor stator test: In a plant, you may use a megger and a full motor winding resistance calculation. You may review motor core laminations and cooling to prevent heat damage. A maintenance plan with inspection and cleaning saves motors.
Why Core Laminations Matter to Stator Health and Output
Here is a secret that many skip. The heart of the stator is the steel core. The quality of the core lamination stacks makes or breaks efficiency. Good laminations cut eddy current loss. The stator runs cooler. Output stays strong at all RPM. Poor laminations waste power as heat. Coils cook. Insulation fails. Then your stator dies early.
If you build, spec, or source parts, look at the steel and the stack. You want tight stacks with precise shape. You want clean edges and proper insulation between layers. Learn more about high quality stator core lamination options that help performance and life. For full assemblies across product lines, see durable motor core laminations that support both single-phase and three-phase designs. The rotor matters too because it sets the magnetic path. Check engineered rotor core lamination choices for smooth flux and stable output. Material grade also counts. Premium electrical steel laminations reduce loss so coils stay cooler.
Problem: Heat kills stators. Agitate: You ride in summer heat. You add more lights. The rectifier-regulator runs hot. The stator sees high current and high temp. Insulation cracks. Output drops. Solution: Use quality cores and a good rectifier-regulator. Keep connectors clean. Follow the service manual for load limits.
FAQs
Q: Can I test a stator with a basic multimeter?
A: Yes. You can do the resistance test, the ground fault test, and the AC voltage test with a standard multimeter. A True RMS meter reads AC more accurately.
Q: How do I know which wires to test?
A: Use your wiring diagram and the service manual. Many three-phase stators use three yellow wires. Single-phase may use two wires with set color codes.
Q: Do I test AC or DC at the stator?
A: Test AC at the stator leads. Test DC at the battery after the rectifier-regulator.
Q: What is the best RPM for the AC test?
A: Many manuals say 3000 to 5000 RPM. Check your service manual. Record idle and high readings.
Q: When should I do a megger test?
A: If you suspect insulation failure or water damage. Do not megger the rectifier-regulator or battery. Only the disconnected stator.
Q: What if my readings change when hot?
A: Heat can uncover faults. Repeat tests after a ride. Intermittent faults often show up hot.
Q: Should I replace the rectifier-regulator with the stator?
A: Many techs do. A failing regulator can kill a new stator. Test it. Replace if weak.
References
- OEM Service Manuals and Wiring Diagrams for model-specific stator test values and procedures
- Fluke Application Notes on AC measurement and insulation resistance testing
- Bosch Automotive Handbook for alternator and rectifier-regulator basics
- IEEE guidance on insulation resistance tests for electrical windings
- Experienced technician best practices from powersports and small engine repair communities
Key Takeaways
- The stator makes AC power. The rectifier-regulator turns it into DC for the battery.
- Use three core tests: resistance, ground fault, and AC voltage output.
- Compare readings to the service manual. Equal phases matter on three-phase.
- No output or low output means a bad stator or weak magnets.
- If the stator passes, test the rectifier-regulator, the battery, and the wiring harness.
- Watch for dim or flickering lights, misfire, or a dead battery. These are classic signs.
- Keep connectors clean. Heat and corrosion kill charging systems.
- Quality laminations and materials keep your stator cool and strong.
- Replace with OEM or trusted parts. Match specs and connectors.
- Take notes. Use safe steps. Test again when hot if the problem comes and goes.
Appendix: Extra Tips and Terminology in Plain Words
- Alternator stator test: The core tests you do to check the stator.
- How to check stator resistance: Use Ohms on the meter across pairs.
- Stator winding short circuit test: Look for low uneven resistance.
- Stator open circuit test: “OL” means broken wire inside the coil.
- Stator ground fault test: Any path to ground is bad.
- Rectifier regulator test: Make sure the DC at the battery hits spec at RPM.
- Charging system diagnosis: Check stator, regulator, battery, wires, fuses, relay.
- Stator output voltage check: AC voltage rises with RPM.
- Stator DC resistance test: Low and even is good based on spec.
- Three-phase stator testing: Test all three pairs. They should match.
- Stator output voltage range: Use the service manual.
- Multimeter settings for stator test: Ohms for resistance. VAC for output.
- Permanent magnet alternator test: Same process. Check AC then DC.
- Testing magneto stator: Same steps for small engines.
- Visual inspection of stator: Look for burned coils or discoloration.
- Stator performance test: Combine all tests for a full picture.
- Service manual stator specs: Always check your model values.
- Diagnostic multimeter usage: Hold probes steady. Use clip leads when you can.
- Ohms law for stator: V = I × R helps you reason about load and drop.
- Battery not charging symptoms: Dim lights. Slow crank. Low voltage.
- Overcharging symptoms: Swollen battery. High DC voltage. Boiling acid.
- Wiring diagram: Your map to the system. Use it.
- OEM vs aftermarket: Quality matters. Match parts to specs.
- Marine stator testing: Watch for corrosion. Clean grounds.
- Industrial motor stator test: Add megger and more advanced checks.
- Stator bench test: Spin by hand or with a drill in a safe setup.
- Voltage regulator rectifier test: Check DC at idle and higher RPM.
- Load tester: Check battery health under load.
- Spark plug and ignition system: Some systems share power. A short can affect charging.
- Amperage and wattage: Current and power matter to avoid overload.
This simple path works for motorcycles, ATVs, UTVs, boats, garden tractors, golf carts, and generators. Follow it step by step. You will find the fault. You will fix the charging system. You will ride with bright lights and a healthy battery.