How to Test a Stator Without a Multimeter: Practical DIY Checks
Table of contents
- Why I test a stator without a meter
- Symptoms that point to a bad stator
- What the stator does in plain English
- Safety first
- Tools and simple substitutes
- Method 1: The visual inspection
- Method 2: The stator output light bulb test
- Method 3: The stator ground test with a test light
- Method 4: The spark test for ignition stators and pickup coils
- Method 5: The screwdriver magnet test on the flywheel
- Bonus no-meter checks that help narrow things down
- What to do if the stator fails these tests
- Limits of no-multimeter methods
- My quick-reference checklist
- When to call in a pro
I learned how to test a stator without a multimeter the hard way. My old motorcycle ate a battery on a weekend trip. The lights went dim. The engine stumbled. Then it died at a gas station with no shop in sight. I had a basic test light, a spare bulb, and some jumper wire. No meter. I still found the fault. The stator had a short to ground on one leg. That day taught me two things. First, you can do a stator test without tools like a multimeter if you know a few tricks. Second, you need a process or you end up chasing ghosts.
In this guide I’ll walk you through the exact no-meter stator diagnosis steps I use. You’ll see simple DIY stator test methods that cover charging stators and ignition stators. You’ll also see how I use a 12V light bulb to check stator AC output. How I check for a ground fault without a meter. How I judge flywheel magnet strength with a screwdriver. Along the way I’ll explain common stator symptoms. I’ll point out gotchas like a bad regulator/rectifier that pretends to be a bad stator. I’ll keep it practical. If I can do it on the side of the road you can do it in a driveway.
Why I test a stator without a meter
Sometimes you just don’t have a meter. Maybe you’re trailside on an ATV. Maybe your boat is stuck at the dock. Maybe your generator won’t charge after a storm and the only store open sells hot dogs and ice. I’ve been there. In those moments I lean on no multimeter stator diagnosis methods. They’re not perfect. They can still separate a good charging stator from a dead one. They can tell you if a winding has shorted to ground. They can give you a yes or no on ignition spark. That’s enough to decide whether you should tow it, park it, or push forward.
I use these methods for:
- Stator test without tools beyond a bulb, a test light, and a screwdriver
- How to check a stator without a meter on a motorcycle, ATV, scooter, small engine, or generator
- Quick charging system troubleshooting when a battery isn’t charging
- Ignition stator and pickup coil sanity checks when an engine won’t start
Symptoms that point to a bad stator
Before I pop covers or unplug connectors I look for telltale signs. Stator symptoms show up as electrical weirdness and poor running.
Common signs of a bad stator:
- Dead or weak battery. It charges overnight. It dies after a ride. You’ve got a battery not charging stator test candidate.
- Dim headlights or flickering dash lights. They glow at idle then brighten with RPM. Or they flicker while cruising.
- Engine misfire at higher RPM. Rough idle that cleans up then comes back. Electrical misfires can mimic fuel problems.
- Difficulty starting or no spark. It cranks forever. It pops once then quits. You suspect ignition stator or pickup.
- Engine cutting out randomly. You lose power when hot. It restarts after a cool down.
- Overheating or a burnt smell from the stator cover. That cooked varnish smell turns my stomach because I’ve smelled it before.
- Fuses blowing for no clear reason. Shorts in charging system wiring can come from melted stator leads.
- Battery overcharging. Boiling battery fluid, wet battery tops, or strong sulfur smell. That often points at a bad regulator/rectifier, not the stator itself.
- Power loss. RPM drops when lights switch on. Poor acceleration tied to electrical load.
A bad stator is not the only cause. I’ve chased “stator problems” that ended up as corroded connectors, a dying regulator/rectifier (R/R), or a bad ground. Still, the list above primes your thinking. If you see two or three of those, the stator goes to the top of the suspect list.
I also note machine type:
- Motorcycle stator test methods often deal with 2 or 3 yellow AC leads from a three-phase charging stator.
- ATV stator troubleshooting feels similar. The routing gets muddy after creek crossings. Corrosion bites harder.
- Boat stator charging issues often involve outboard alternator stators under flywheels. Water and salt love terminals.
- Generator stator problems can show up as low AC output or no output at the receptacles.
- Scooter stator diagnosis must account for small multi-function stators that charge and feed the CDI.
What the stator does in plain English
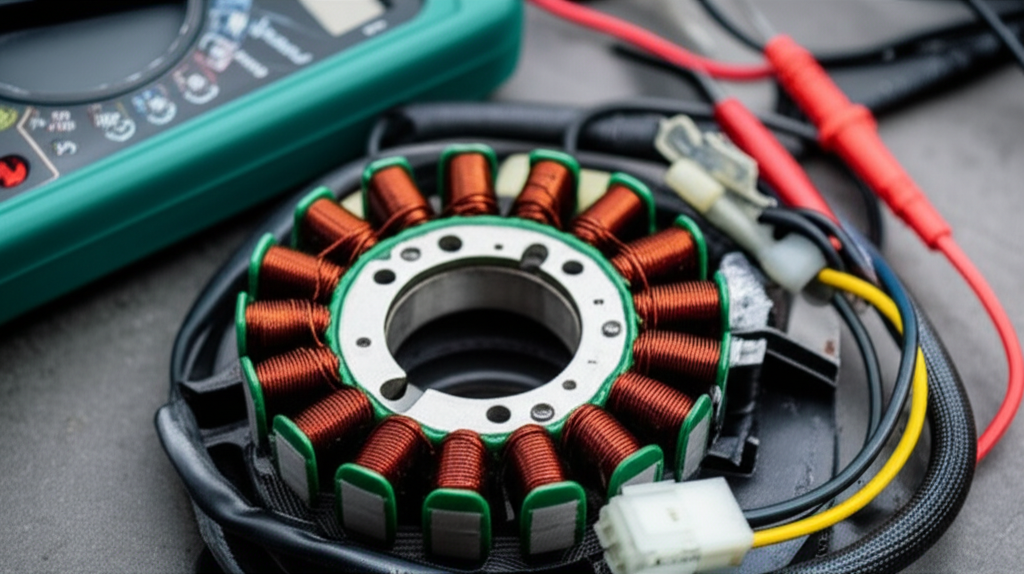
The stator is a stationary bundle of copper windings wrapped around an iron core. The flywheel spins magnets past those windings. That changing magnetic field induces AC current in the windings. It’s simple electromagnetic induction. That AC feeds the regulator/rectifier. The R/R converts AC to DC and clamps voltage so the battery and electronics survive.
Two families show up in small engines:
- Charging stators. They feed the R/R to charge the battery and power lights.
- Ignition stators and pickup coils. They create the trigger and sometimes the energy that a CDI uses to fire the ignition coil. Some machines use DC-powered ignition, others use AC CDI that relies on the stator.
The core under those windings uses thin steel sheets. If you’re curious about what those sheets are, they’re called stator core laminations. Laminations reduce eddy currents and cut heat. In many machines the spinning part also uses laminations. In motors and some alternators the rotating part uses laminated stacks too; you can read more about the idea in rotor core lamination. All of these stacks come from specialty steels that guide magnetic flux. If you want to go a level deeper on the material science, check out electrical steel laminations. Different machines choose different stack designs and shapes; a quick sense of that variety sits here: motor core laminations.
You don’t need that depth to do a stator test without a meter. It helps you understand why overheating bakes insulation. Why shorts happen. Why a cracked core or loose laminations can create noise and heat.
Safety first
I’ve burned my fingers on a stator cover. I’ve also seen a test light wire catch on a spinning flywheel. Respect the hazards.
- Disconnect the battery before unplugging major connectors. You’ll avoid accidental shorts.
- Keep loose wires and fingers away from moving parts. Don’t route a test bulb near a spinning flywheel.
- Work on a cool engine when you can. If you must start it for a test, plan your hands and tools first.
- Use insulated pliers for the spark test. Use gloves. Wear eye protection.
- If fuel leaks or fumes build up, stop. Electricity and gasoline make bad partners.
Tools and simple substitutes
No multimeter required. Here’s what I keep handy for no-meter stator diagnosis:
- 12V automotive test light
- A small 12V bulb with two wires (a 1156 or 1157 tail/turn lamp works)
- A few short jumper wires with alligator clips
- A medium flathead screwdriver
- Spark plug wrench and insulated pliers
- Dielectric grease and contact cleaner if you have them
- Flashlight and paper towels
If you lack a formal test light, a simple bulb and wire set works. That turns into a homemade continuity tester and a rough AC indicator.
Method 1: The visual inspection
I always start with a visual stator inspection. It’s the simple stator check that often solves the mystery.
How I do it:
What I’ve learned:
- Burnt smell plus melted connectors usually means high resistance at the plug or a dying R/R that drove excess current.
- Oil on the windings isn’t always a death sentence. Some stators live in oil baths by design. Detached insulation and darkened windings are what matter.
- If a fuse keeps blowing after you connect the stator, that suggests a short to ground inside the windings or a pinched wire.
If the visual check screams “failure,” you might have enough to call it. If not, move to the simple tests.
Method 2: The stator output light bulb test
Purpose: Check if a charging stator generates AC without a multimeter.
Materials: A 12V test light or a small 12V bulb with wires. I prefer a bulb like an 1156 because it gives a better feel for output by brightness and it handles load.
Setup and steps:
Interpreting results:
- Bright, steady light that gets brighter with RPM indicates healthy AC output on that pair. That pair is a phase. The brightness should roughly match on all pairs for a three-phase stator.
- No light at idle and no change with a rev points to an open circuit on that phase. That phase could be dead. The light bulb test catches open windings without precise voltage numbers.
- Dim light or flickering that doesn’t improve with RPM hints at weak output. That could be a partial short, a failing winding, or very weak flywheel magnets.
- One bright pair and one dim pair means the stator may have a bad phase. For three-phase units I want all three pairs to look similar.
Tips I use:
- I keep the revs modest. The bulb adds load. A quick blip is fine. I don’t hold it high to avoid cooking anything.
- If the bulb looks like a strobe light that jumps with RPM, the stator still produces AC. The strobe effect comes from the AC peaks. That’s okay as long as it brightens with RPM.
What this test can’t do:
- It won’t give stator AC output voltage expectations in numbers. You can’t say “this is 50 VAC at 5,000 RPM.” You only know it produces light and increases with RPM. It’s a coarse yes/no test.
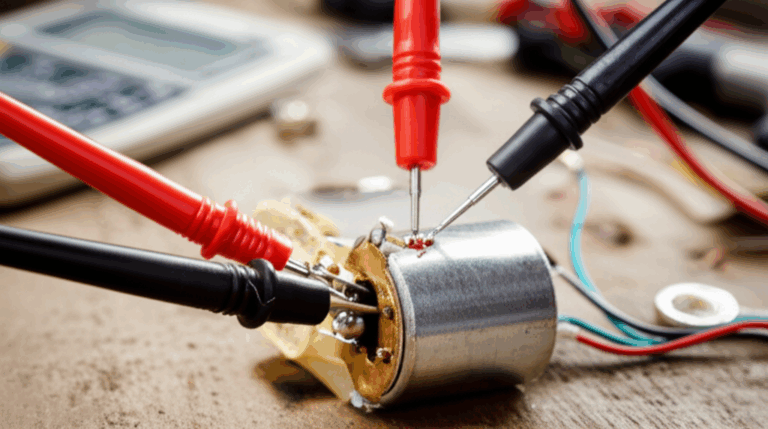
Method 3: The stator ground test with a test light
Purpose: Check if any stator winding is shorted to the engine ground without a meter.
Materials: 12V automotive test light or bulb with a jumper. Battery must be connected for this test because the test light uses battery power to check the circuit to ground.
Setup and steps:
Interpreting results:
- Light comes on when you touch a stator lead. That means the stator lead is shorted to ground. The winding insulation likely failed. That’s a bad stator.
- No light on any stator output wire. That means no direct short to ground on those windings. That’s what you want.
I’ve seen this save hours. A stator can look okay and still be grounded on one leg. The test light tells the truth in seconds. If you prefer a homemade continuity tester, you can wire a small bulb between battery positive and the stator lead. If it lights, that lead has continuity to ground.
Method 4: The spark test for ignition stators and pickup coils
Purpose: Check if the ignition system produces a spark. This test doesn’t prove the stator is perfect. It tells you the ignition side is alive enough to spark.
Materials: Spark plug wrench. Insulated pliers.
Setup and steps:
Interpreting results:
- Bright blue snap means the ignition system works at least at cranking RPM. The ignition stator and pickup coil likely function. The CDI and ignition coil also play roles, so don’t declare victory too fast.
- Weak orange spark or no spark points to trouble. It could be a bad ignition stator, a failed pickup coil, a bad CDI, a weak ignition coil, or a wiring issue.
What I add:
- If you have a kill switch or a side-stand switch, verify they’re not killing spark. I’ve embarrassed myself more than once on that one.
- Pickup coils can fail when hot. A cold spark test passes. The bike dies after 10 minutes and loses spark. Let it heat soak and test again if the symptom is temperature based.
Method 5: The screwdriver magnet test on the flywheel
Purpose: Roughly judge the strength of the flywheel magnets. Weak or demagnetized magnets produce weak stator output.
Materials: A medium flathead screwdriver.
Setup and steps:
Interpreting results:
- Strong magnetic pull means magnets are likely good. You’ll feel it grab the screwdriver hard enough that you need a firm tug to free it.
- Weak or no pull suggests trouble. I’ve seen magnets crack, slip, or lose strength from heat or past damage. That cuts stator output quickly.
Note this test is crude. It costs nothing and it’s saved me twice. If the magnets barely hold a screwdriver, I don’t expect the stator to light a bulb bright across phases.
Bonus no-meter checks that help narrow things down
Sometimes the stator tests come back mixed. I add these quick checks to build confidence in the diagnosis.
- Test spark plug visually while cranking. A bright blue spark says the ignition side works at least at cranking speed.
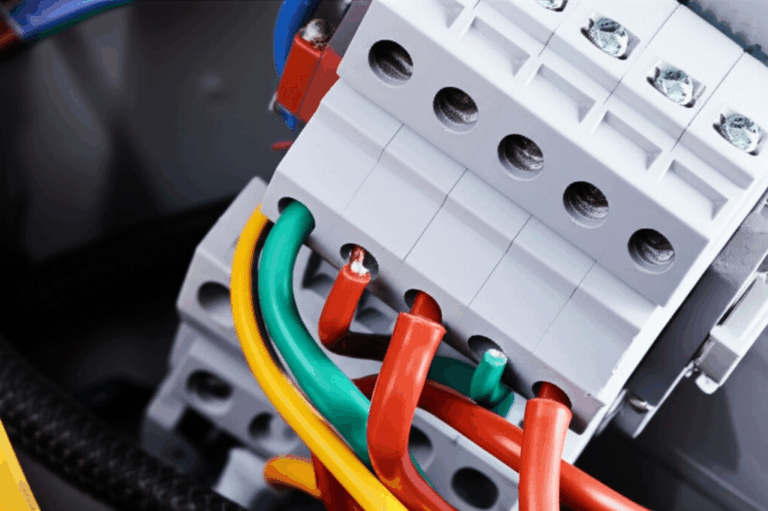
- Check charging system wiring for damage. Pay attention where the harness bends near the engine. Heat and vibration chew insulation.
- Inspect the regulator/rectifier. If it smells burnt or shows melted resin, suspect it. Overcharging symptoms like boiling battery fluid often point at a bad R/R. That’s not a stator failure.
- Check battery condition without equipment. Headlights bright with engine off suggests a surface charge. Turn the key on and hit the starter. If it dies instantly the battery might be weak. This is a rough battery load test without equipment.
- Use a test light to look for shorts. Disconnect the battery negative. Clip a test light between the negative cable and the negative battery post. If the light glows with the key off you have a draw. Pull fuses one by one to isolate. Shorts can run through the stator circuit if the insulation failed.
- Verify fuses and grounds. A blown main fuse tells a story. Loose grounds can mimic all sorts of electrical demons.
What to do if the stator fails these tests
When I find a grounded stator lead or a dead phase on the light bulb test, I stop guessing. The stator needs attention.
Confirm the diagnosis:
- If you can borrow a multimeter, check resistance between stator leads and to ground. It will confirm what your light bulb showed.
- Have a shop bench test the stator. They can measure coil resistance and insulation with a megohmmeter. This is optional when the failure is obvious.
Replacement options:
- New OEM or quality aftermarket stator. You pay more. You get drop-in fit and predictable life.
- Rewind the stator. A reputable rewinder can restore the windings and insulation. I’ve had this work well for older bikes.
- Check the flywheel magnets. Strong magnets matter. Replace or repair if they’re loose or damaged.
Check related components:
- Replace or test the regulator/rectifier. A shorted R/R can burn a good stator. A weak R/R can overheat it or undercharge the battery.
- Inspect connectors and the wiring harness. Fix loose, corroded, or overheated terminals. Clean and grease with dielectric to slow future corrosion.
- Verify battery health. A dead battery can stress the system and mask your results.
Costs vary. Stator replacement ranges from affordable on small scooters to pricey on certain motorcycles and boats. The cost of stator replacement often looks lighter than the cost of repeated breakdowns. Reliability buys peace of mind.
Limits of no-multimeter methods
I’ll be straight with you. These DIY stator test methods without a meter have limits.
- You get no precise measurements. You can’t see resistance or actual AC voltage. You only infer output by lamp brightness and presence or absence of light.
- Intermittent faults may slip past. Heat-related shorts can hide during a brief test.
- You can’t separate subtle issues like a slight undercharging condition that only shows at a specific RPM.
- The tests can’t identify specific coil resistance problems or pinpoint a single shorted turn. They only catch big faults like open circuits or ground faults.
For deep diagnosis I grab a multimeter. I measure stator coil resistance. I check stator AC output voltage at idle and a fixed RPM. I test the R/R DC output. Without those numbers you lean on symptoms and simple indicators.
My quick-reference checklist
I keep a mental checklist for how to check a stator without a meter. It keeps me from skipping steps.
Charging stator checklist:
- Battery charged enough to start or crank
- Visual check: burnt smell, melted plugs, cracked insulation, loose connectors
- Unplug stator from R/R
- Light bulb across stator leads
- Single phase: bulb across the two leads
- Three phase: test A-B, B-C, A-C
- Brightness increases with RPM on all pairs
- Ground test with test light
- Clip test light to battery positive
- Probe each stator lead. No light means no ground fault
- Screwdriver magnet test on flywheel. Strong pull is good
- Inspect R/R and harness if stator looks OK yet charging fails
Ignition stator and pickup checklist:
- Spark test with grounded plug while cranking
- Check switches and safety interlocks
- Warm test if symptom is heat related
- Visual on pickup coil gap if accessible
A few case notes from my bench
- Motorcycle with dead battery and dim headlights. Light bulb test across three-phase stator produced a bright bulb on two pairs and a dead bulb on one. Ground test lit the test light on that phase. The stator had a ground fault. Replaced stator and the problem disappeared.
- ATV that misfired at high RPM and flickered lights. Light bulb test showed all three pairs lit but one pair looked notably dim and flickered more. Magnets felt weak on screwdriver test. The flywheel had shifted magnets. New flywheel fixed charging and misfire.
- Generator with no output. Visual showed cooked windings. The bulb test never lit across the charging leads. That stator was done. Rewind brought it back to life.
Frequently asked questions I get
- Can I test a stator without a test light? Yes. Use a 12V bulb with two wires. It works as a basic homemade continuity tester and a rough AC indicator.
- Do I need to disconnect the regulator/rectifier? Yes. If you leave it connected, the R/R will shunt or rectify the AC. That hides the stator’s raw behavior.
- How bright should the bulb be? Bright enough to look like a tail light at idle. Brighter with RPM. All phases should look similar on a three-phase stator.
- Will this work on single-phase and three-phase? Yes. Bridge the two leads on single-phase. Test every pair on three-phase.
- What about scooters with combined ignition and charging coils? You can still use the ground test to hunt for shorts. For output, use the bulb on the charging leads only. Don’t load ignition trigger leads with a bulb.
Troubleshooting edge cases
- Dim headlights yet the bulb test looks fine. Suspect the regulator/rectifier or a poor ground. Check for voltage drop across connectors and grounds if you later get a meter.
- Battery boils. Likely a bad regulator/rectifier. The stator could be fine. Replace the R/R or bench test it.
- Engine hard to start with weak spark. Could be a weak source coil on the ignition stator. The spark test shows weak orange instead of blue. Heat makes it worse. A meter would help but your symptoms still point to a failing ignition side.
- Fuses keep blowing when you reconnect the stator. That screams short to ground on a stator lead or harness. The ground test will light your test light on the guilty lead.
A quick word about construction quality
Over the years I’ve developed a feel for stator longevity. Better cores, tighter windings, and good insulation last. Poor materials overheat. Laminations matter because they cut eddy currents and keep heat in check. You saw earlier how laminations, electrical steel, and rotor designs play roles in performance. That’s not academic. It’s why some stators live for decades and others cook in a season.
When to call in a pro
I turn to a professional when:
- The no-meter tests are inconclusive and symptoms are odd or intermittent
- The stator passes yet the battery still doesn’t charge
- The ignition spark disappears only when hot
- I suspect a complex wiring or ECU interaction
A good shop can measure resistance, insulation, and loaded output. They can also road test for intermittent failures.
Bringing it all together
Here’s how I’d handle a “battery not charging” motorcycle in my driveway with no meter:
If your engine won’t start and you suspect ignition:
Final thought
You can test a stator without a multimeter and still make a smart call. Use a light bulb for output. Use a test light for ground faults. Use your eyes and nose for burnt signs. Use a screwdriver to assess magnets. Keep your fingers safe. Keep your process tight. You’ll either confirm a bad stator or clear it and move on to the regulator/rectifier, the battery, or the wiring. That’s how I do it in the real world when time is short and tools are limited.