How to Test a Harley Davidson Stator: A Step-by-Step DIY Guide to Diagnose Charging Issues
Table of Contents
- Introduction: Why I Test the Stator First
- Safety First
- Understanding the Harley Charging System in Plain English
- Section 1: Preliminary Checks Before Touching the Stator
- Battery Health Check
- Wiring, Fuses, and Connectors
- Section 2: Tools I Use for Accurate Stator Testing
- Multimeter Setup and Tips
- Basic Hand Tools
- The Service Manual
- Section 3: Step-by-Step Harley Stator Test Procedure
- Step 1: Access and Disconnect the Stator Wires
- Step 2: Stator Resistance (Ohm) Test
- Step 3: Stator Ground Fault Test
- Step 4: Stator AC Voltage Output Test
- Section 4: How I Interpret the Results
- Section 5: If the Stator Tests Good, What’s Next
- Testing the Regulator/Rectifier
- Battery Load Testing
- Wiring Harness Inspection and Voltage Drop Tests
- Section 6: Why Stators Fail on Harleys and What I’ve Seen
- Heat, Oil, and Vibration
- Rotor Magnet Problems
- Aftermarket vs OEM Notes
- Section 7: Model-Specific Notes and Practical Tips
- Section 8: Preventative Maintenance and Upgrades I Recommend
- FAQ
- Final Thoughts
Introduction: Why I Test the Stator First
I learned to respect Harley charging systems the hard way. On my first Dyna I chased a dying battery for weeks. The headlight dimmed at idle. The battery warning light flickered on a night ride. I swapped a battery that didn’t need swapping. The real culprit was a stator with one phase shorted to ground. Since then I always start with a methodical diagnostic plan. I check the stator with a multimeter before I buy parts. It saves time and money.
In this guide I’ll walk you through exactly how I test a Harley Davidson stator. You’ll see how I use a multimeter for the resistance test, a ground fault check, and an AC voltage output test with the engine running. I’ll also show you how to confirm if the regulator/rectifier or wiring is to blame when the stator checks out. I’ll share real numbers, common failure signs, and the little details that help you avoid false readings.
You don’t need to be an electrical engineer. You just need patience, a digital multimeter, and your Harley’s service manual. We’ll keep the language simple and the steps clear.
Safety First
You’re working around live circuits, spinning parts, and hot engines. I follow these safety rules every time.
- Work in a well-lit area and keep loose clothing and hair away from moving parts.
- For resistance and ground tests I turn the engine off and disconnect the battery negative terminal.
- When measuring stator AC output I reconnect the battery and keep my hands and test leads clear of the primary and belt or chain.
- I wear eye protection and gloves.
- I never let the probes slip between stator pins while the engine runs.
Understanding the Harley Charging System in Plain English
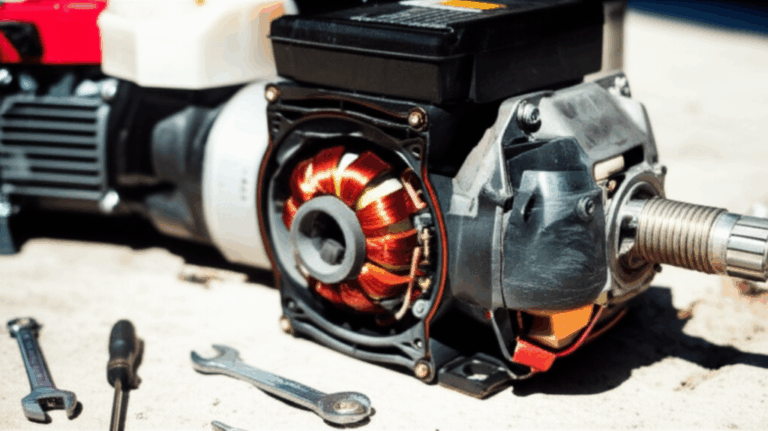
Most modern Harleys use a permanent magnet alternator. The rotor carries strong magnets. The stator is fixed to the engine case and wound with coils. As the engine spins the rotor magnets past the stator coils they generate AC voltage. The regulator/rectifier converts that AC to DC and regulates it to charge your battery and run the bike.
Key pieces:
- Stator and rotor inside or behind the primary on Big Twins and in the left engine case on many Sportsters.
- Regulator/rectifier mounted up front near the frame downtubes on many models.
- Battery in the usual spot depending on Sportster, Dyna, Softail, Touring, or V-Rod.
When something fails the symptoms look similar. The battery doesn’t charge. The headlight dims at idle. The bike stalls in traffic. Your Harley Davidson battery warning light comes on. You may see low DC volts at the battery or hear the starter struggle.
That’s why you test in a sequence. You confirm battery health then you test the stator then the regulator/rectifier and wiring.
Section 1: Preliminary Checks Before Touching the Stator
Battery Health Check
I start at the battery because a weak battery throws off every other test.
- Measure static battery voltage with the bike off. A healthy, fully charged 12 V battery should read about 12.6 V to 12.8 V. If you get 12.2 V you’re already low. Under 12.0 V means the battery is almost discharged.
- Inspect the terminals. Clean any corrosion and tighten the connections. Loose battery terminals mimic charging problems.
- If the static voltage looks questionable I use a load tester. You can also watch voltage drop while cranking. If it dives under about 9.6 V during crank you may have a weak battery.
Wiring, Fuses, and Connectors
Next I walk the charging circuit.
- Check fuses related to the charging and main circuits. Replace any blown fuses and ask why they blew.
- Follow the stator wiring from the primary to the regulator. Look for burnt sections, chafed insulation, melted connectors, oil intrusion, or green corrosion at the pins.
- Unplug the main stator connector to inspect for heat damage. I’ve found more than one Harley Davidson charging system failure caused by a cooked connector rather than a bad stator.
If the battery and wiring pass a quick visual I move on to the stator tests.
Section 2: Tools I Use for Accurate Stator Testing
Multimeter Setup and Tips
You need a digital multimeter with:
- AC Volts (VAC) for the output test
- Ohms (Ω) for resistance and ground fault tests
- Continuity mode is helpful for fast ground checks
Set the meter to a low ohm range for resistance tests. Some meters have relative or zeroing features to subtract lead resistance. That helps because we’re measuring low values like 0.1–0.5 Ω.
For AC testing pick a range that allows up to at least 100 VAC. Many Harleys produce 40–70+ VAC at 2,000–3,000 RPM on a healthy stator.
Basic Hand Tools
You’ll need:
- Screwdrivers and wrenches to access side covers or pull back a side panel to reach the connector
- A good light
- Dielectric grease to protect connectors after testing
The Service Manual
The service manual is gold. It lists the stator resistance specifications, the correct test points, and the model-specific AC voltage recommendations. It also shows the Harley Davidson wiring color codes and connector diagrams. Use it to confirm your readings for your exact Sportster, Dyna, Softail, Touring, or V-Rod model.
Section 3: Step-by-Step Harley Stator Test Procedure
Step 1: Access and Disconnect the Stator Wires
- Find the stator connector. On Big Twin bikes it usually exits the primary and runs forward to the regulator. On Sportsters it often sits near the left engine case or behind the sprocket cover.
- Safely disconnect the stator plug. Some are two-wire single-phase systems. Many later models use three-phase with three identical wires.
- For resistance and ground tests turn the engine OFF and disconnect the battery negative cable.
Tip: Take photos before you unplug anything. It saves headaches later.
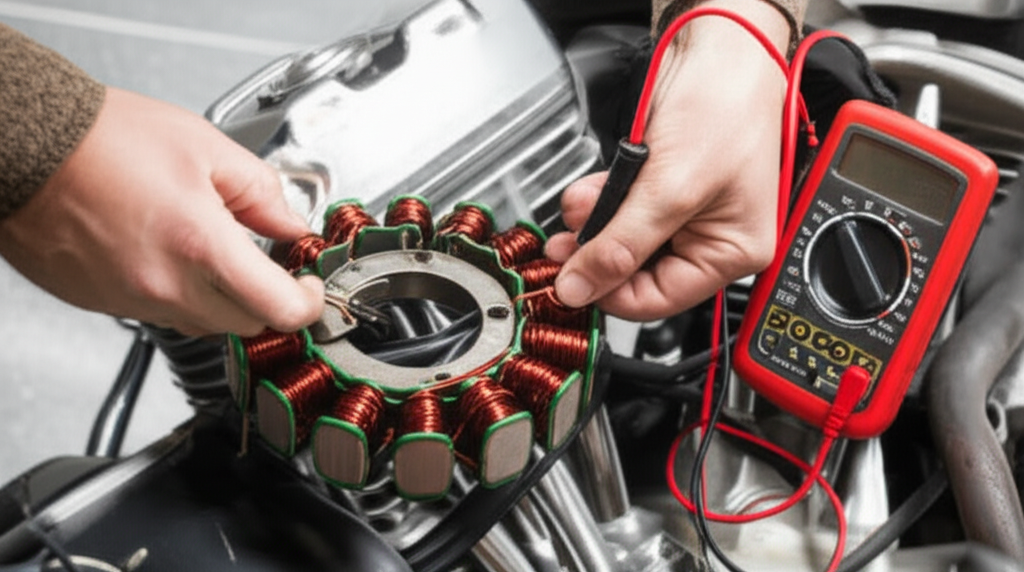
Step 2: Stator Resistance (Ohm) Test
Purpose: Check for internal breaks (open circuits) or shorts between phases.
Meter setting: Ohms (Ω) on a low range.
Procedure:
- For a 3-wire stator measure between each pair: wire A to B, A to C, and B to C.
- For a 2-wire stator measure between the two pins.
What I look for:
- Good stator: very low, consistent resistance across all pairs. I often see roughly 0.1–0.5 Ω. Your service manual trumps my example.
- Open circuit: infinite resistance, often shown as “OL” or “1” on the screen. That phase is dead.
- Shorted: 0.0 Ω or a reading much lower than spec.
Pro tip: Touch your meter leads together first. Note the lead resistance. Subtract that from your stator reading if your meter doesn’t auto-zero.
Step 3: Stator Ground Fault Test
Purpose: Check if any stator coil is shorted to ground.
Meter setting: Ohms (Ω) or Continuity.
Procedure:
- Keep the stator unplugged.
- Place one probe on a clean, unpainted engine ground or the engine case.
- Touch the other probe to each stator wire, one at a time.
What I look for:
- Good stator: infinite resistance to ground on every wire. No continuity beep.
- Ground fault: any measurable resistance to ground or a beep. That stator needs replacement.
This is the test that nailed the fault on my Dyna. Two phases looked fine on resistance. One phase showed continuity to the case. Game over for that stator.
Step 4: Stator AC Voltage Output Test
Critical safety note: This test uses a running engine. Keep your hands and leads clear of rotating parts. Tie back long hair. Don’t wear loose sleeves.
Purpose: Confirm the stator’s real AC output under operating conditions.
Setup:
- Reconnect the battery.
- Leave the stator disconnected from the regulator for this test.
- Meter setting: AC Volts (VAC). Pick a range that covers at least 100 VAC.
Procedure:
- Start the engine and let it warm up to a normal idle.
- Test between each pair of stator wires, the same pairs you used for the resistance test.
- Record the AC voltage at idle around 1,000 RPM.
- Raise engine speed to 2,000–3,000 RPM and record again.
What I expect to see:
- Even readings across all pairs.
- Voltage that rises with RPM. Many healthy Harley stators show roughly 20–30 VAC at idle that climbs to 40–70+ VAC by 2,000–3,000 RPM. Always check your service manual for your model’s specs.
- Bad stator signs: low or no AC output on one or more pairs or one pair way lower than the others.
If the AC output looks strong your stator likely passes. If it’s weak or uneven the stator is suspect.
Section 4: How I Interpret the Results
Here’s how I put the three tests together.
- Resistance good + no ground fault + strong AC output: The stator looks healthy. Look at the regulator/rectifier and wiring next.
- Resistance open on any pair: Stator has an open circuit. Replace it.
- Any wire shows continuity to ground: The stator has a ground fault. Replace it.
- Resistance seems fine yet AC output is low: Stator could be weak under heat or load. Re-test warm. If it stays low the stator is failing.
- AC output strong yet the battery still doesn’t charge: Suspect the regulator/rectifier or a wiring issue like a poor ground or a voltage drop.
I also watch for intermittent issues. If a bike charges cold then quits hot the stator might have insulation breakdown that shows up when oil thins and the engine heats up. A repeat AC test when hot can reveal a marginal stator.
Section 5: If the Stator Tests Good, What’s Next
Testing the Regulator/Rectifier
DC charging voltage test:
- Reconnect the stator to the regulator.
- Start the engine.
- Measure DC voltage at the battery posts.
- At idle you might see 12.8–13.2 V. At 2,000–3,000 RPM most Harleys live around 13.8–14.6 V. If you see 12.4 V at 3,000 RPM the system isn’t charging. If you see over 15 V the regulator may be overcharging.
Diode test:
- Many digital meters have a diode check mode. With the regulator unplugged you can test the rectifier diodes per your service manual’s pin chart. You want current flow one way and none the other. If it conducts both ways or not at all the rectifier section failed.
Regulator grounds:
- The regulator body usually grounds through its mounting. Clean the mounting points. Rust or paint under the bracket can cause a voltage drop. I’ve fixed charging complaints with a wire brush and star washers.
Battery Load Testing
A new stator and regulator won’t save a failing battery. Load test it. Confirm it can deliver current without dropping under spec. I treat the battery as its own suspect until it proves itself.
Wiring Harness Inspection and Voltage Drop Tests
If both stator and regulator look good I chase the wires. I wiggle test the harness while watching battery voltage. I measure voltage drop from the regulator output to the battery positive with the engine revved and lights on. Anything over a few tenths suggests a bad connection or corroded splice. I check grounds the same way.
Section 6: Why Stators Fail on Harleys and What I’ve Seen
Heat, Oil, and Vibration
Heat is the stator’s nemesis. The windings soak in hot oil. The engine bakes the primary area on summer rides. Over time insulation breaks down. I’ve pulled primary covers and found stator windings dark brown or black. Burnt windings point to overload or poor cooling. Poor connections at the stator plug also create heat and that heat cooks the connector and the windings.
The quality of the stator core lamination matters too. Laminations reduce eddy current losses. Better laminations mean less heat and better efficiency which helps the stator live longer.
Rotor Magnet Problems
A cracked rotor magnet or a rotor that sheds magnet material can shred a stator. I always inspect the rotor surface for chips or magnet shift. If the rotor has damage replace it with the stator or you’ll toast the new stator quickly. The rotor’s magnetic circuit relies on sound laminations too. If you care about the guts the design and materials behind rotor core lamination influence performance and longevity.
Aftermarket vs OEM Notes
I’ve used both OEM and quality aftermarket stators from reputable brands like Cycle Electric or Rick’s Motorsport Electrics. The key is build quality. Windings should be tight. Epoxy potting should be uniform. Connectors should match the OEM fit. Cheap units often cut corners on copper and insulation which run hotter.
Behind the scenes stators and rotors use specialized steels. High quality electrical steel laminations reduce losses and keep temperatures in check. If you ride loaded and cross-country you want parts built with proper materials. It’s not just marketing. It shows up in real-world reliability.
Section 7: Model-Specific Notes and Practical Tips
- Sportster charging problem diagnosis: The connector often hides near the left side behind the sprocket cover. Give yourself space to test without letting the leads touch ground.
- Dyna and Softail models: The stator pigtail runs from the primary to the front of the frame where the regulator mounts. Heat from the front cylinder can cook the plug. Check for heat discoloration.
- Touring models: Long harness runs mean more places for voltage drops and rubbed insulation. Do a careful harness inspection around the steering neck and fairing if equipped.
- V-Rod: Tight packaging can make access tricky. Follow the service manual for connector locations and specs.
- Single-phase vs three-phase: Many newer Harleys use three-phase systems. Three measurements at the stator and three pairs of AC readings make diagnostics straightforward. All three should match closely.
- Don’t pressure wash connectors. Water intrusion causes hidden corrosion that leads to intermittent undercharge.
- Use a battery tender if the bike sits. A healthy battery helps the whole charging system.
Section 8: Preventative Maintenance and Upgrades I Recommend
- Clean and protect. Unplug the stator and regulator connectors once a season. Clean the pins. Add a thin layer of dielectric grease to keep moisture out.
- Route and secure. Make sure the stator harness doesn’t rub sharp edges. Use proper clips and slack to accommodate engine movement.
- Check charging voltage at every oil change. A quick DC check at the battery takes 30 seconds and can save a road-side surprise.
- Consider quality upgrades when parts fail. A well-built stator with robust windings and sound motor core laminations paired with a solid regulator pays you back in reliability.
FAQ
How long do Harley Davidson stators typically last?
In my experience a well-built stator in a healthy system often lasts many tens of thousands of miles. Heat, lots of low-speed riding, and poor connections shorten life. I’ve seen stators fail early after a connector meltdown or after a rotor magnet incident.
Can a bad regulator damage a new stator?
Yes. A shorted or failing regulator/rectifier can overload the stator and create excess heat. Fix the root cause. If you’re replacing the stator after a failure test the regulator carefully. Replace both if in doubt.
What’s the difference between a stator and an alternator?
On a Harley the stator is the stationary coil assembly. The rotor spins around it with magnets. Together they are the alternator. The regulator/rectifier turns that AC into DC and regulates the charging voltage.
Are aftermarket stators reliable for Harleys?
Some are excellent. I look for reputable brands, heavy-gauge windings, quality insulation, and correct connectors. Cheap units often run hotter and fail sooner. Read forums and real owner feedback before you buy.
What are the signs of a bad regulator/rectifier vs a bad stator?
- Bad stator signs: Low or no AC voltage output. Resistance readings not equal across phases. Continuity to ground on a stator wire. Burnt windings when inspected.
- Bad regulator signs: Good stator AC output yet low battery charging voltage. DC voltage too high at the battery. Failed diode tests. Bike charges cold then stops when hot even though stator AC still looks good.
Final Thoughts
When your Harley’s battery dies it’s tempting to throw parts at the problem. I’ve done it, and I paid for it. A clear test plan beats guesswork every time.
- Start with the battery and connections.
- Test the stator resistance, check for a ground fault, then verify AC output at idle and at RPM.
- If the stator passes look at the regulator/rectifier and wiring with voltage drop tests and diode checks.
Use your service manual for model-specific numbers. Keep your hands safe around moving parts. Take your time. With a multimeter and a method you can diagnose Harley Davidson charging issues with confidence and fix the right thing the first time.
If you decide to replace parts choose quality components built with good copper, sound insulation, and proper laminations. That engineering detail matters on the road.
Ride safe and keep that battery happy.