How to Safely Remove a Stubborn Stuck Squirrel Cage from Your Blower Motor (HVAC & Automotive)
Table of contents
- Introduction: The stubborn blower cage challenge
- Safety first: Crucial precautions before you start
- Essential tools and materials
- Accessing your blower motor and squirrel cage
- HVAC systems
- Automotive systems
- Diagnosing why the squirrel cage is stuck
- Step-by-step removal techniques from least to most aggressive
- Method 1: Set screw and penetrating oil combo
- Method 2: Using a fan or gear puller
- Method 3: Strategic heat application
- Method 4: Gentle prying and wedging
- Method 5: Last resort cutting or grinding
- Post-removal: Cleaning, inspection, and prevention
- Reassembly and testing
- Troubleshooting common issues
- When to call a professional
- Quick data-backed insights I rely on
- Conclusion: Keep your air moving
Introduction: The stubborn blower cage challenge
I still remember the first time I tried to remove a stuck squirrel cage from a furnace blower motor. It looked simple. Back out a set screw. Slide the blower wheel off the shaft. Job done. Then reality hit. Rust. A seized set screw. A blower wheel hub that clung to the shaft like a barnacle. I lost a Saturday to that fight and I learned a lot.
If your HVAC blower wheel is stuck or your automotive heater fan refuses to budge you’re in the right place. I’ll show you how I remove seized squirrel cages without trashing the motor or bending the wheel. I’ll share what actually works in the field. I’ll also flag what to avoid so you don’t create a bigger problem.
Why do blower cages get stuck
- Rust and corrosion around the hub and shaft
- A seized or stripped set screw
- Dust and debris baking onto the shaft over time
- Misalignment or a tiny burr on the shaft
- Moisture from condensate or leaks that encourages corrosion
What this guide covers
- Step-by-step techniques from gentle to aggressive
- The tools I lean on including fan pullers and penetrating oil
- Power and shop safety you should not skip
- HVAC and automotive access tips
- Prevention so the cage doesn’t seize again
When should you call a pro
- If the shaft or cage looks warped or cracked
- If you don’t have a puller or safe access
- If you see scorched wiring or electrical issues
- If the motor or blower wheel is rare or expensive and you can’t risk damage
Safety first: Crucial precautions before you start
I start every blower motor fan removal the same way. I make it safe.
Power disconnection
- HVAC: Turn off the furnace or air handler at the service switch. Then pull the breaker. Verify with a voltage tester at the control board or disconnect.
- Automotive: Disconnect the negative battery terminal. You’ll be upside down under the dash and you don’t want a live circuit. Capacitors on some HVAC units can also hold a charge so discharge or leave them alone until power is confirmed off.
Personal protective equipment
- Safety glasses or face shield. Metal flakes and rust fall right into your face
- Gloves you can still feel with. I use nitrile coated mechanics gloves
- Respirator or dust mask if the blower wheel is caked in dust and lint
Workspace preparation
- Bright lighting and a headlamp. I want to see set screws and keyways clearly
- Good ventilation if you’ll use penetrating oil or heat
- A stable surface to set the blower housing. I lay down cardboard to protect fins and wiring
Important cautions I live by
- No open flame near refrigerant lines or fuel sources
- No heat anywhere near plastic cages or wire insulation
- No hammering on motor shafts without support behind the shaft. You can mushroom the end or trash bearings
- No power reconnect until all tools are out of the housing and panels are back on
Essential tools and materials
I don’t need every tool on every job but these make stubborn cages manageable.
Basic hand tools
- Screwdrivers: flathead and Phillips for panels and retaining tabs
- Hex or Allen wrenches for set screws
- Nut drivers or sockets for motor mounts and blower housing screws
- Pliers and vice grips for stubborn fasteners
- A small hammer or mallet for controlled tapping
Specialty helpers
- Fan puller or three-jaw gear puller sized for blower wheels
- Wire brush for cleaning rust off the hub and shaft
- A drift or punch for gentle tapping on hub faces
- Vice or blocks to support the motor while applying force
Chemical aids
- Penetrating oil: I reach for PB Blaster, Liquid Wrench, or WD-40 Specialist Penetrant
- Degreaser or isopropyl alcohol to clean surfaces before reassembly
- Anti-seize or light lithium grease for the shaft during reassembly
Optional aggressive tools
- Heat gun or a small propane torch for focused heat on metal hubs
- Bolt extractor for stripped set screws
- Rotary tool or angle grinder with thin cutting disks for last-resort hub cuts
- Impact driver for stubborn set screws if access allows
Cleaning supplies
- Shop vacuum for dust and debris
- Rags and cotton swabs
- Fine sandpaper or Scotch-Brite pad to polish the shaft lightly
Accessing your blower motor and squirrel cage
The removal technique won’t matter if you can’t reach the hub and set screw. Clear access saves time.
HVAC systems
How I get in
1) Locate the blower compartment. On furnaces or air handlers it’s usually the lower panel for upflow units or the side for horizontals.
2) Remove access panels. Keep screws sorted. I snap a quick photo of wiring before I touch it.
3) Disconnect wires or unplug harnesses. Label them if the connector isn’t keyed.
4) Loosen the blower housing screws and slide the entire blower assembly out. Some furnaces have rails. Some require loosening the control board bracket for space.
What helps
- Look for a wiring harness plug at the motor. Unplug and avoid undoing individual spade terminals
- Rotate the housing to expose the set screw on the hub. Sometimes it hides on the underside
- Watch for the capacitor. Discharge or keep your hands off the terminals
Automotive systems
Where to look
- Most blower motors sit under the passenger side dash in the footwell
- Remove trim panels. Then remove the motor’s retaining screws
- Disconnect the electrical connector and lower the motor and cage as one assembly
Tips from the trenches
- Some vehicles use plastic cages that are one piece with the motor shaft. Those usually get replaced as a unit
- Tight spaces make pullers tricky. I sometimes remove the motor from its bracket to gain room on the hub
Diagnosing why the squirrel cage is stuck
Before I touch a puller I figure out what’s holding it.
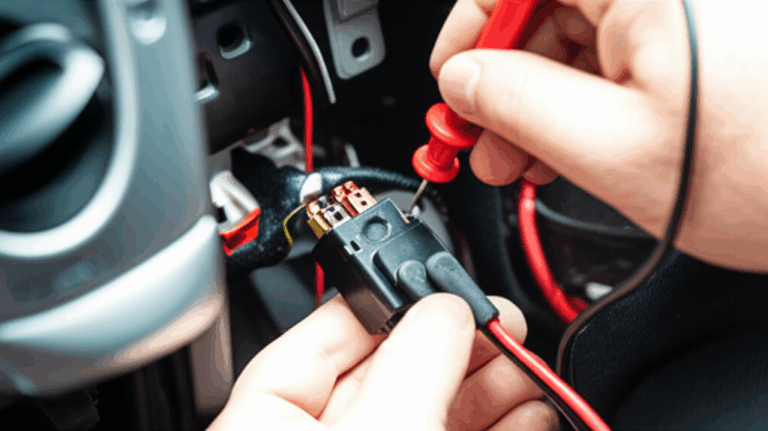
Check the set screw
- Find it on the hub. It may sit under dust so brush the area clean
- If the hex socket is rounded use a fresh wrench with tight fit. Tap it in lightly
- If stripped use a screw extractor bit or a Torx that bites. Worst case drill and extract
Look for rust and corrosion
- Inspect the hub to shaft interface. Orange rust or white corrosion tells me I’ll need penetrating oil and patience
- If the set screw uses a keyway expect the key to bind. Soak that area well
Clear debris
- Lint, dust, and pet hair can pack into the hub region
- Clean inside the cage so you can see and reach the hub
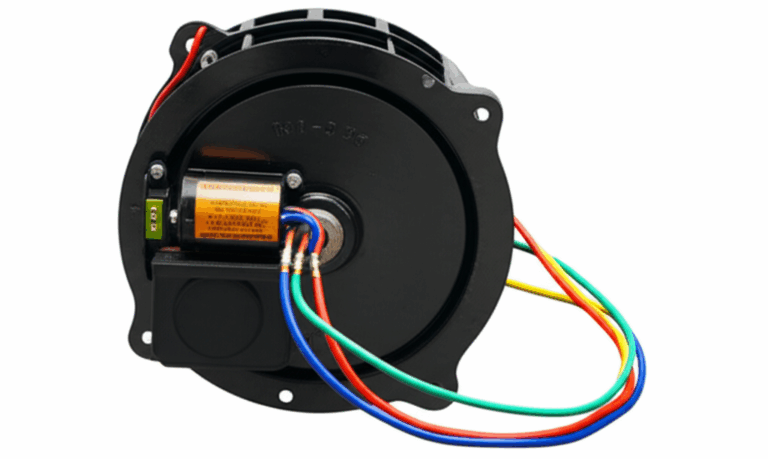
Assess the cage and shaft
- Plastic vs metal. Plastic hubs deform with heat and crack with force. I avoid heat on plastics
- Check for cracks or bent fan blades. If the wheel is already damaged I plan on replacing it which changes my risk tolerance
- Spin the shaft. If bearings grind the motor might be on its last legs anyway
Step-by-step removal techniques from least to most aggressive
I always start gentle then escalate. You can’t un-bend a cage or un-mushroom a shaft.
Method 1: Set screw and penetrating oil combo
This is my first attempt on almost every job. It solves a surprising number of stuck fan cage removal cases.
1) Clean the set screw area
- Use a wire brush to remove rust and dust from the hub
- This lets the hex key seat fully and allows oil to reach the threads
2) Soak with penetrating oil
- Shoot PB Blaster or WD-40 Specialist Penetrant into the set screw hole and around the hub
- Rotate the wheel to pull oil around the shaft
- Reapply a few times over several hours. I’ll soak overnight if I can
3) Break the set screw free
- Seat the correct hex wrench. Tap the end of the wrench lightly with a mallet to shock the threads
- Use steady pressure. If it fights back stop. Don’t strip it
- An impact driver on low can help but only if the hex isn’t sloppy
4) Loosen or remove the set screw
- Back it out fully if possible
- If it only loosens a bit add more oil and work it back and forth
5) Persuade the hub
- Support the motor. Then tap the hub face not the blade tips. I use a small hammer with a drift to avoid denting the hub
- Rotate and tap evenly around the hub. The goal is micro movement not brute force
If the cage wiggles even a hair keep working oil in and tapping. Movement opens a path for oil and that’s the turning point.
Method 2: Using a fan or gear puller
A gear puller saves the day on many HVAC blower wheel stuck situations. The trick is positioning.
Choosing the right puller
- A three-jaw puller sized to catch the hub or the strongest points of the wheel
- Some blower wheels accept a dedicated fan puller with arms that grab the hub lip
Positioning matters
- The puller’s center screw must push on the motor shaft’s end not the motor housing
- Protect the shaft end with a small steel cap or a sacrificial coin if the shaft has a drilled recess
- Catch solid parts. If you grab thin blades you’ll bend them
Apply gradual pressure
- Turn the puller screw until it’s snug. Then add a half turn
- Tap the hub lightly with a hammer to relieve binding. Add a bit more oil
- Walk away for five minutes. Let the tension and oil do their thing. Come back and give another half turn
Combine methods
- Keep oiling the joint as pressure increases
- Alternate pressure and tapping. Slow and steady wins here
- If the wheel still laughs at you release pressure and reset the jaws. Reposition can make a huge difference
Watch for trouble
- If blades start to bend back off. Reassess your grip points
- If the shaft mushrooms stop. Dress the end flat before continuing
Method 3: Strategic heat application
Heat breaks rust bonds. It also melts plastic and cooks motors if you get careless. I only use heat on metal hubs with clear space away from insulation, wires, and plastic parts.
When I add heat
- Rusted steel hub on a steel shaft that won’t move after puller and oil
- Set screw removed or backed out fully
- Plenty of ventilation and a fire extinguisher on hand
How I apply heat
- Heat the hub not the shaft. The goal is differential expansion so the hub grows a bit
- A heat gun is safer near wiring. A mini propane torch works when space allows
- Keep the flame moving. Focus on the hub circumference. Avoid the motor face
The rhythm
- Heat for 20 to 40 seconds. Then remove heat and add penetrating oil sparingly. It may smoke
- Tap the hub and add puller pressure
- Repeat once or twice. Don’t roast the assembly
Avoid overheating
- If you see plastic softening or smell wire insulation stop
- Excess heat can damage motor windings, bearing grease, and varnish. It can also affect the internal stator core lamination and the rotor core lamination stack which rely on tight tolerances and stable insulation layers
- Motors use electrical steel laminations to cut eddy currents. Overheating can degrade their insulation and performance
Heat works best with puller tension already applied. The moment the hub expands the puller takes it up and the wheel pops loose with a sigh you can almost hear.
Method 4: Gentle prying and wedging
I use prying sparingly. It can warp blades and put side load on bearings.
How to pry if you must
- Protect the motor housing with wood shims
- Use two flat pry bars or sturdy wedges positioned opposite each other on the hub. Apply even pressure so you don’t twist the wheel
- Move in tiny increments. Pry a hair then release and rotate. Add oil and repeat
Risk check
- If the cage deforms stop and regroup
- If the shaft moves in the motor housing stop. You could be pushing the shaft through the bearing which scars it
Method 5: Last resort cutting or grinding
Sometimes the hub is fused to the shaft. I’ve had hubs that looked like they grew there. When the wheel is damaged or you already planned a replacement cutting saves time.
When I choose to cut
- The cage is cracked or bent beyond salvage
- Replacement parts are available at a sane price
- All other methods failed after thorough attempts
How I cut with caution
- Use a rotary tool or angle grinder with a thin cutoff wheel
- Cut along one side of the hub from the outside toward the bore. Stop short of the shaft
- Use a cold chisel to split the hub along the cut. It should relax and release
- Shield the motor with metal flashing and rags. Vacuum metal dust often
Watch the sparks
- Sparks travel far. Protect wiring, insulation, and anything flammable
- Grinding dust can enter bearings. Keep the motor horizontal and covered. Clean thoroughly afterward
Expect to replace the blower wheel if you cut. That is the trade you accept to save the motor and shaft.
Post-removal: Cleaning, inspection, and prevention
Once the cage is off I slow down. This is where you prevent the next seizure.
Thorough cleaning
- Wipe the motor shaft with degreaser or isopropyl alcohol
- Use a Scotch-Brite pad lightly to remove rust and burrs. Don’t reduce the diameter
- Clean the hub bore if you plan to reuse the wheel. A bottle brush or rolled sandpaper helps
Inspect shaft and bearings
- The shaft end should be smooth and round. Dress any mushrooming carefully
- Spin the motor by hand. Listen for bearing roughness or hum. If it grinds or wobbles the motor may be on borrowed time
Inspect the cage
- Look for cracks at the hub and along the fan blades
- Check balance weights. Any missing clips will cause vibration and noise
- Clean dust, lint, and debris. A shop vac and a soft brush work well
Lubrication and protection
- A tiny smear of anti-seize on the shaft prevents rust bonding. Don’t overdo it or you’ll sling grease into the housing
- Replace a chewed-up set screw. Consider a stainless or treated fastener
- If the set screw uses a keyway clean and lightly lube the key too
Prevention checklist
- Fix condensate leaks and moisture sources near the blower
- Schedule seasonal HVAC checks. Dust and debris build up faster than you think
- Keep the blower wheel balanced. Bent blades hurt bearings and performance
Reassembly and testing
I reassemble the way I disassembled but with alignment and quietness in mind.
Sliding the cage back on
- Confirm orientation. The curved blades must face the correct airflow direction
- Align any keyways and insert the key
- Slide the hub to the original depth. Most wheels sit with the hub flush to the end of the shaft or spaced to center in the housing. Use your photos or witness marks
Tighten the set screw
- Snug it down. Don’t gorilla it. Stripped set screws are future pain
- Align flat on the shaft if present. That tangibly increases grip
Reinstall the blower assembly
- Set the housing back in the cabinet or under the dash
- Route wiring cleanly. Reconnect the motor capacitor if equipped. Double check connectors and grounds
Test run
- Restore power or reconnect the battery
- Run the blower at low speed first. Listen for scraping, rubbing, or wobble
- Ramp to higher speeds. Any vibration means the wheel is out of balance or misaligned
- If it hums but won’t spin check the capacitor and wiring
Troubleshooting common issues
Still stuck after all that
- Repeat oil and puller cycles with longer soak time. I’ve had hubs that only gave up after an overnight soak with three tension cycles
- Switch to heat if the hub is metal and safe to heat
- Consider a last-resort cut if replacement parts are available
Fan wobbles on startup
- Recheck set screw alignment to the flat. Verify hub depth and blade clearance to the housing
- Inspect for bent blades or missing balance clips
- If the shaft itself is bent you’ll never balance the wheel. Replace the motor
Motor noise after reassembly
- Bearing rumble points to worn bearings. Plan for motor replacement
- Scraping sounds signal the wheel is off-center. Adjust the depth and retighten the set screw
- Electrical hum with no spin often means a failed capacitor in HVAC units
Stripped set screw won’t budge
- Use a high-quality extractor. Drill straight and shallow. Then back it out slowly
- If extraction fails drill out the screw body and re-tap the hub. Replace with a new set screw
Plastic squirrel cage issues
- Avoid heat. Plastic hubs soften and deform
- Puller arms can crack plastic hubs. If it is brittle plan to replace the wheel if it resists removal
When to call a professional
I love DIY. I also know when to phone a friend.
Call a pro if
- You lack a proper puller or safe access to the hub
- You see burned wiring, melted insulation, or water damage
- The blower wheel is rare, expensive, or proprietary and you can’t risk it
- The motor shaft is bent or the bearings are failing
- You’re not comfortable using heat or cutting tools near the motor
A good tech brings experience, spares, and the right tools. They can also spot upstream problems like a failing capacitor, a control board issue, or poor airflow from clogged coils that strain the blower.
Quick data-backed insights I rely on
These aren’t lab stats. They’re patterns I’ve seen echoed across HVAC forums, service manuals, and seasoned tech advice. They line up with my own experience.
Primary causes of stuck blower wheels
- Rust and corrosion are the usual suspects especially in humid spaces or around condensate. I’d peg it at most cases
- Seized or over-tightened set screws are next
- Dust and debris rarely seize a hub fully but they do bind movement
What works first
- Penetrating oil plus time solves a big chunk of cases. Apply. Wait. Reapply
- Patience beats brute force. Rushing bends cages
Pullers change the game
- A properly sized puller with steady pressure works on many stubborn hubs
- Poor puller placement bends blades or mushrooms shafts
Heat is powerful and risky
- Heat can break the bond on rust-fused metal hubs when used sparingly
- Overheating risks the windings, bearings, and the motor’s laminated cores. If you care about long service life and efficiency you care about the health of the motor core laminations
Last resort cutting
- Cutting the hub is a small fraction of jobs. It is decisive when you’re replacing the wheel anyway
- Protect the motor from dust and sparks. Clean carefully afterward
Prevention pays
- Clean the blower wheel and housing during seasonal maintenance
- Apply a thin film of anti-seize on reassembly. Replace tired set screws
- Keep moisture away from the blower compartment
Time expectations
- Best case: 1 to 2 hours if the set screw frees and the hub slides
- Moderate: 2 to 6 hours with oil soaks, puller work, and careful tapping
- Worst case: A weekend project with soak cycles and a careful hub cut
Conclusion: Keep your air moving
A stuck squirrel cage tests your patience. I’ve been there with rusted hubs that wouldn’t move a millimeter. The pattern that works for me looks simple on paper. Make it safe. Clean and soak. Free the set screw. Add a puller and tension. Tap and wait. Use heat carefully only on metal hubs when needed. Pry when you must. Cut as a last resort. Then clean, inspect, lube, and reassemble so you never fight this same battle again.
If you remember one thing remember this. Patience and setup do the heavy lifting. Not brute force. Respect the motor. Keep heat away from windings and laminations. Motors rely on precise stacks of steel for efficiency and quiet performance. That’s why I’m careful around the stator core lamination, the rotor core lamination, and the electrical steel laminations inside the motor. Treat them well and your blower will run smoother and longer. If you want to dive deeper into how the lamination stack affects losses and heat soak you can also explore the fundamentals behind motor core laminations.
Take your time. Work methodically. Your airflow will thank you.