How to Meg a Motor: A Comprehensive Guide to Insulation Resistance Testing for Electric Motors
Table of Contents
- Introduction
- What Is “Megging” a Motor and Why Should You Care?
- How Does Motor Insulation Work?
- When Should You Meg a Motor?
- What Tools and PPE Do You Need?
- How Do You Prepare the Motor for an IR Test?
- How Do You Set Up the Megohmmeter the Right Way?
- Step-by-Step: How to Meg an Electric Motor
- How Do You Read and Judge Megger Numbers?
- What If Your Readings Look Wrong?
- Advanced Motor Tests You Can Use
- Safety First: LOTO, Arc Flash, and Risk
- Predictive Maintenance, ROI, and Motor Health
- Case Study: A Plant Cuts Downtime by 35%
- FAQs
- Key Takeaways
- References
You want your motor to run safe and strong. You also want to avoid costly stops. In this guide I show you how to “meg” a motor with a megohmmeter. I explain the steps in plain words. I share what numbers mean. I also show you how to keep people safe while you test. Read on to save money time and stress.
What Is “Megging” a Motor and Why Should You Care?
Here is the problem. Motors fail. Insulation breaks down. Moisture gets in. Contamination builds up. Heat and vibration take a toll. When the motor winding insulation fails you get a ground fault or a phase-to-phase short. The motor trips. Work stops. Costs soar.
Now let’s agitate the pain. A single stop can cost more than the motor. A fault can burn the stator or the rotor. It can hurt a worker. It can spark a fire. You cannot ignore weak dielectric strength. You must catch it early.
Here is the solution. You use a megohmmeter (often called a Megger) to do an insulation resistance test on the electric motor. We call that “megging.” The test drives a DC voltage into the windings and measures resistance in megohms or gigaohms. High resistance means dry clean insulation. Low resistance points to trouble. This simple insulation resistance test motor check helps you plan repairs. It keeps your team safe. It cuts motor downtime.
How Does Motor Insulation Work?
Motor windings have thin wire and layers of insulation. The job is simple. Keep current in the copper and away from ground and away from other phases. Good insulation gives the windings dielectric strength.
The stator insulation surrounds the coils in the frame. The rotor insulation protects bars or coils inside the rotor. Better materials like varnish insulation and epoxy encapsulation help. So do strong steel cores. The quality of the stator core lamination and the rotor core lamination affects heat and loss which affects insulation life. Good electrical steel laminations run cooler so insulation lasts longer. See more on motor core laminations here: precision motor core laminations.
What breaks insulation down? Many things. Moisture ingress from leaks or humidity. Contamination like dirt oil or chemicals. Overheating from overload poor cooling or high ambient temp. Mechanical stress like vibration or loose coils. Age also plays a part. All these cause insulation resistance vs temperature swings and slow insulation resistance loss.
When Should You Meg a Motor?
You should test at many times. Test before a new install. Test during motor commissioning tests. Test on a motor maintenance schedule. Do it during scheduled motor inspections. Test before startup after storage. Test after repair. Test before you buy a used unit.
Use it for both AC motor insulation test and DC motor megger test. Do it for a three-phase motor insulation test or a single-phase motor. Make it part of predictive maintenance motor testing and preventative maintenance. Catch a problem early and you prevent motor failure modes that lead to big costs.
What Tools and PPE Do You Need?
You need the right tools. You also need safe habits. Here is a checklist you can trust.
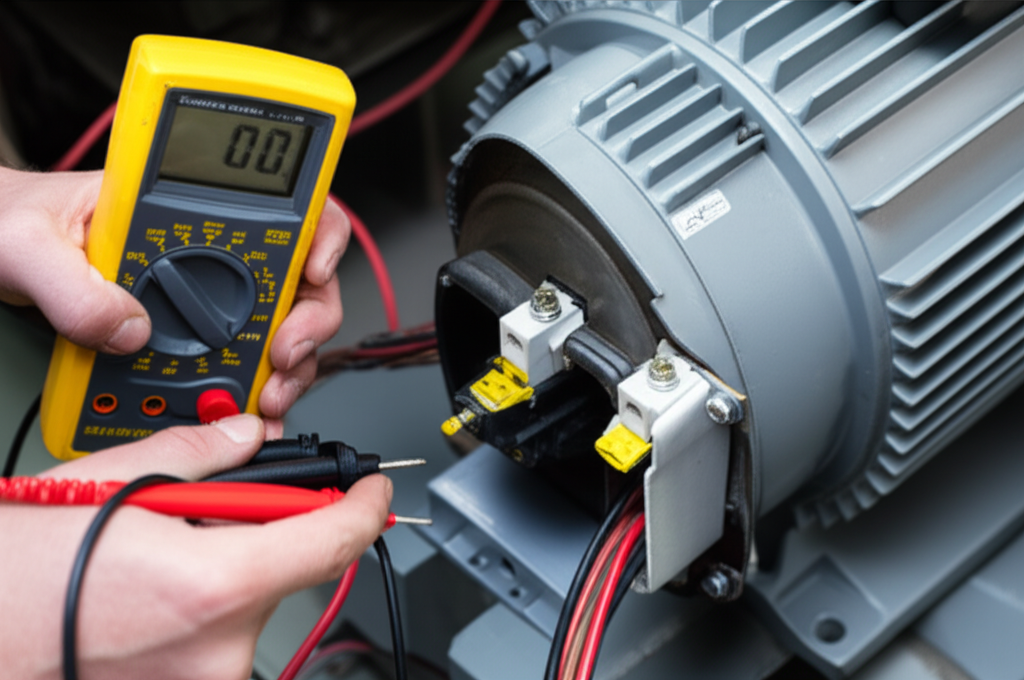
- Megohmmeter (Megger) or Insulation Resistance Tester. Digital or analog. Use digital megohmmeter vs analog as you prefer. Make sure it has the right Megger voltage selection like 500 V 1000 V 2500 V or 5000 V for high voltage insulation testing.
- Test leads. High-voltage rated test leads connection megger with clips that grip tight.
- Personal Protective Equipment (PPE). Rubber insulated gloves. Safety glasses. Arc-rated clothing if needed. Follow NFPA 70E and OSHA rules.
- Lockout/Tagout (LOTO) Kit. Locks tags and your energy control procedures. Do Lockout/Tagout (LOTO) every time.
- Multimeter. Verify zero volts first. Check continuity test motor paths too.
- Cleaning supplies. Isopropyl alcohol and lint-free cloths for cleaning motor connections.
- Motor documentation. Nameplate and schematics. Past test report or data logger trends help.
- Optional tools. Thermal imager to spot overheating motor insulation damage. Motor diagnostic tools for motor circuit analysis (MCA).
Keep your test area dry and clear. Wear the right PPE. Assign a standby person when you work in the Motor Control Center (MCC).
How Do You Prepare the Motor for an IR Test?
First kill the power. ALWAYS de-energize and LOTO. Lock and tag every energy source. Use your multimeter to verify zero voltage at the motor terminal box and the junction box. Open the circuit breaker. Pull fuses if needed. Then try start to confirm it will not spin. Follow OSHA and NFPA 70E.
Now isolate the motor. Disconnect from any Variable Frequency Drive (VFD). Take the motor leads off the terminal block. Label them T1 T2 T3 for a three-phase unit. Check the conduit and each splice for damage. Clean terminals with alcohol. Dry off any moisture. If the unit is hot wait. Allow to cool so you get stable numbers. If it is a big machine use a safe discharging motor windings method. Some windings hold a capacitive discharge motor charge for a while. Ground the leads to the frame to drain any stored energy.
If you can decouple the load do it. Remove a coupling so the shaft sits free. Vibration in the line can move your meter. You want clean data.
How Do You Set Up the Megohmmeter the Right Way?
Set the test voltage based on the motor voltage class and the IEEE 43 standard for insulation resistance. A common rule is 500 V to 1000 V for motors rated up to 1000 V. For higher voltage use 2500 V or 5000 V. Check the manual of your megohmmeter. Check the motor nameplate. Always selecting test voltage motor with care.
Hook up your leads. Clip one lead to the winding you want to test. Clip the other to a clean unpainted ground on the frame. Many meters have a Guard terminal. The guard helps bypass surface leakage across dirt or contamination. Use it when you know the surface is damp. Keep your hands clear of bare metal. Use high-voltage rated test leads.
On larger jobs I also test phase to phase. That means T1 to T2 T2 to T3 and T3 to T1. Keep the third lead isolated during that check. Record everything in a test report.
Step-by-Step: How to Meg an Electric Motor
Follow this short plan. It works in the field. It works in the shop.
1) Phase-to-ground test motor
- Test each winding lead to the frame. That is phase to ground test motor.
- Hold the test for at least 1 minute. That is your test duration megger test.
- Read the megohm scale interpretation. Write the value in megohms.
2) Phase-to-phase test
- Now check T1 to T2 T2 to T3 and T3 to T1.
- Make sure the third lead is open.
- Record values.
3) PI test and DAR test
- For a Polarization Index (PI) test motor run the test for 10 minutes. Take R(1 min) and R(10 min). PI = R(10 min) / R(1 min).
- For a Dielectric Absorption Ratio (DAR) test motor take readings at 30 seconds and 60 seconds. DAR = R(60 s) / R(30 s).
- The dielectric absorption curve should climb over time.
4) After each test discharge the windings
- Some energy stays in the windings.
- Use the meter’s discharge function or short to frame through a resistor.
- Do not touch until you confirm safe zero.
If you work on a DC motor repeat the same steps per winding set. If you test an AC motor the method is the same. For a three-phase motor test each phase. For a single-phase motor test start and run windings apart if you can.
How Do You Read and Judge Megger Numbers?
You want to know what is “good.” Interpreting megger readings takes context. Start with the IEEE 43 rule. For machines 1 kV and up the minimum insulation resistance motor is (kV + 1) in MΩ. Many techs use a simple rule of thumb for low voltage motors. Aim for 5 MΩ to 10 MΩ or higher. A new motor should be much higher.
Use this table to help you think:
| Item | Rule of Thumb |
|---|---|
| Minimum acceptable IR value | For < 1 kV many use ≥ 5 MΩ |
| IEEE 43 formula | IR = (kV + 1) MΩ for ≥ 1 kV |
| Good PI | Class B F H ≥ 2.0. Class A ≥ 1.5 |
| Good DAR | ≥ 1.25 often seen as acceptable |
| Ohms to megohms conversion | 1 MΩ = 1,000,000 Ω |
Many things affect your numbers. Temperature plays a big role. Insulation resistance vs temperature drops as heat goes up. A rough rule says IR halves for every 10°C rise. So you may need temperature correction for IR test. Humidity also lowers surface resistance. Larger motors may show lower numbers because of more surface area. Old winding age tends to read lower too.
What do bad results say
- Low insulation resistance troubleshooting. If you see less than 1 MΩ you likely have moisture ingress motor windings or heavy contamination or an active ground fault detection motor.
- Rapidly decreasing readings under test show insulation resistance breakdown under high voltage insulation testing stress.
- Inconsistent readings between phases point to a localized issue.
- Low PI/DAR values point to wet or dirty coils or end-of-life.
Make a habit of trending insulation resistance data. Keep a data logger or a simple sheet. Compare to past insulation resistance values chart for that motor. A drop from last year matters more than a single snapshot. I like to trend values with motor temperature and humidity.
What If Your Readings Look Wrong?
No reading or open circuit
- Check your lead clips. Clean the contact point. Try a different test lead.
- Confirm the motor is isolated. No other circuit should connect to the leads.
Unstable or jumping readings
- Check for wind. Rain. Dust. Move to a dry spot.
- Tighten all clips. Wiggle the wire to check for intermittent splice insulation integrity issues.
Inconsistent phase readings
- Focus on the low phase first. Inspect the motor lead wires test from box to terminal block. Check conduit insulation test paths. Look inside the junction box insulation test area.
If the motor is wet you can bake it dry in a shop oven or apply heat lamps. Then test again. If numbers stay low call a motor repair shop procedures expert for motor reconditioning electrical. They may add varnish or epoxy to seal the coil. They may test more with surge comparison testing or partial discharge testing.
Advanced Motor Tests You Can Use
You can go deeper than a basic IR test. Here are related tests used by an electrical engineer or a maintenance technician.
- Motor circuit analysis (MCA) looks at impedance imbalance and motor circuit analysis signature.
- Power factor testing motor checks losses in the insulation at low voltage AC.
- Surge comparison testing checks turn-to-turn strength.
- Partial discharge testing checks tiny discharges in high voltage machines.
- Impedance testing motor and continuity test motor help find open circuits.
- Stator insulation test and coil insulation testing find weak spots.
- Rotor insulation test checks bars or coils.
- Voltage drop motor checks connections.
- Motor efficiency testing and energy consumption motor checks help cut cost.
You can do bench testing motor insulation in a shop. You can also do field testing motor insulation in place. Use digital megohmmeter vs analog tools as you prefer. Document all results in a test report.
By the way the steel core matters too. Good laminations cut heat and stray loss. Better cores support long insulation life. If you build motors or repair them look into high-grade electrical steel laminations. You can also choose transformer lamination core in power gear like ei core or ui lamination core types and crgo lamination core or crngo lamination steel when you work beyond motors. Brushless motors use bldc stator core stacks too.
Safety First: LOTO, Arc Flash, and Risk
Safety comes first. Always. Do a risk assessment motor testing before you start. Lock out the source. Tag it. Wear PPE. Put on gloves and arc-rated clothing if your site requires it. Use NFPA 70E and OSHA rules. Stand on dry ground. Use one hand when possible. Keep a safe boundary.
Arc flash is real. Several such events happen every day in the U.S. A burn can cost a lot. It can change a life. Electrical arc flash safety is not a box to check. It is your plan to go home safe. Follow electrical safety procedures motor. Verify your LOTO. Discharging motor windings after a test prevents a shock. Do not skip it.
Predictive Maintenance, ROI, and Motor Health
A good predictive maintenance plan saves money. The return on investment (ROI) predictive maintenance can be 4 to 10 times. You cut downtime by 20% to 50%. You cut repair costs by 10% to 40%. You extend life by 20% to 40%. Add insulation resistance test motor checks to your plan. Use maintenance technician motor testing tasks on a set motor maintenance schedule.
Keep a list of preventative measures motor failure too
- Keep motors dry clean and cool.
- Balance the load to lower motor winding current and overheating.
- Fix vibration impact on motor insulation by aligning and checking bearing health.
- Improve cooling paths around the frame and stator.
- Watch voltage drop motor and feed quality from the MCC and VFD.
If you make or repair motors start with good cores. Better cores help the insulation stay cool. That extends life. Source good core lamination stacks and coils. Quality parts support motor life extension techniques and preventing motor downtime. You can get strong value with the right motor core laminations and tight stack control.
Case Study: A Plant Cuts Downtime by 35%
I worked with a large plant that wanted fewer stops. We built a program that used regular megging plus trending insulation resistance data. We set scheduled motor inspections by critical rank. We used a data logger and a simple chart.
In year one they found several motors with falling PI and DAR. They dried the windings. They fixed leaks. They added better PPE and LOTO habits on the floor. Over three years they cut unscheduled motor downtime by 35%. The team saved about $250,000 a year in lost output and emergency repairs. The plan worked because they caught insulation resistance drops early. They planned work for shutdowns. That is the value of predictive maintenance.
FAQs
Q: What test voltage should I use
A: For motors up to 1000 V use 500 V or 1000 V. For higher voltage use 2500 V or 5000 V. Check IEEE 43 and the motor maker.
Q: How long do I hold the test
A: At least 1 minute for an IR check. Ten minutes for a Polarization Index (PI) test. 60 seconds for a DAR test.
Q: What is a “good” number
A: Many use 5 MΩ to 10 MΩ or higher for low voltage motors. New motors should be much higher. Apply temperature correction when you compare.
Q: Can I test a motor on a VFD
A: Yes but isolate the motor. Disconnect from the VFD and the control circuit.
Q: Will megging harm a motor
A: Not when you choose the right test voltage. Follow the standard. Follow the maker’s rules.
Key Takeaways
- Always LOTO and verify zero before you touch a terminal.
- Test phase-to-ground and phase-to-phase. Record all megohms.
- Use PI and DAR for deeper insight.
- Correct for temperature and humidity when you trend.
- Low IR often means moisture or contamination. Dry clean and retest.
- Keep a test report. Use a data logger to see trends.
- Good cores and materials like quality laminations help insulation last.
- Make IR testing part of your predictive maintenance plan for real ROI.
References
- IEEE 43, Recommended Practice for Testing Insulation Resistance of Rotating Machines.
- NFPA 70E, Standard for Electrical Safety in the Workplace.
- OSHA, Control of Hazardous Energy (Lockout/Tagout).
- EASA and IEEE studies on motor failure analysis electrical causes.
- U.S. DOE and EPRI reports on predictive maintenance ROI.
Bonus: Quick Standards and Factors Tables
Insulation Resistance Standards and PI Targets
| Standard/Guide | What It Says |
|---|---|
| IEEE 43 minimum IR | IR = (kV + 1) MΩ for machines ≥ 1 kV |
| Low-voltage rule of thumb | Aim for ≥ 5 MΩ for most < 1 kV motors |
| PI targets | Class A ≥ 1.5. Class B F H ≥ 2.0 |
Temperature and Environment Impact
| Factor | Effect on IR |
|---|---|
| +10°C temperature | IR roughly halves |
| -10°C temperature | IR roughly doubles |
| High humidity | Surface leakage goes up so IR goes down |
| Clean dry windings | IR goes up and PI improves |
How This Helps You Today
You came here to learn how to “meg” a motor. You got a clear plan. You also saw why it matters. You saw how to avoid cost of motor failure and how to boost return on investment (ROI) with predictive maintenance. You now know the steps. You have the safety rules. You can test a three-phase motor or a single-phase motor. You can check AC or DC machines. You can spot ground faults, weak dielectric strength, and insulation degradation before they hit you.
If you build or repair motors remember this. Strong cores and good steel cut heat and loss. That protects your insulation. Explore precise stator core lamination and rugged rotor core lamination built from high-grade electrical steel laminations and matched motor core laminations. Better cores keep your windings cooler. That keeps your insulation resistance high. That keeps your line running.
Extra Field Notes and Terms You Will Use
- Megger test procedure and how to use a megohmmeter are core skills for every electrician, maintenance technician, and electrical engineer.
- Check test leads connection megger and clean the motor terminal box access points.
- Use guard to bypass surface contamination paths.
- After any test do proper grounding motor for test and safe capacitive discharge motor steps.
- Keep an insulation resistance values chart and use ohms to megohms conversion if needed.
- Consider dielectric strength test motor for deeper checks and safe high voltage insulation testing only with training.
- Watch environmental factors insulation resistance like dust water and heat.
- Track motor health monitoring with trending insulation resistance data and a data logger.
- Use good motor repair shop procedures for motor reconditioning electrical with varnish insulation motor and epoxy encapsulation motor where needed.
- Apply electrical code motor testing rules in your region.
- Assess risk assessment motor testing before you start.
- For special motors like bldc stator core machines you still test windings and to ground the same way.
- In controls check the circuit breaker motor test and MCC testing paths for clean terminations.
- Verify terminal block insulation and splice insulation integrity to avoid leakage.
- Plan preventing motor downtime with preventative measures motor failure and motor life extension techniques.
- Add related checks like impedance testing motor, continuity test motor, motor efficiency testing, energy consumption motor, and motor circuit analysis (MCA).
- Use surge comparison testing (related) and partial discharge testing (related) for big machines.
- For commissioning include motor commissioning tests and bench testing motor insulation before install then field testing motor insulation after.
You now have the knowledge and the steps. You can test with skill. You can read the results with confidence. You can keep your team safe and your motors strong.