How to Dispose of Stool Waste from a Motor Home
Table of Contents
- Introduction: The Unavoidable Task of RV Waste Management
- Understanding Your Motorhome’s Waste System
- Black Tank vs. Gray Tank
- Essential Components You’ll Use Every Time
- Step-by-Step Guide to Dumping Your Motorhome’s Black Tank
- Preparation is Key
- The Dumping Procedure
- Alternative and Supplementary Waste Disposal Methods
- Mobile RV Pump-Out Services
- Using an RV Macerator Pump
- Portable Waste Tanks (“Blue Boy” Tanks)
- Composting Toilets and Dry Flush Systems
- Essential Equipment for Safe and Sanitary Disposal
- Sewer Hoses and Fittings
- Protective Gear
- Tank Treatment Chemicals and Additives
- Black Tank Flushers and Rinsers
- Cleaning Supplies You’ll Actually Use
- Maintaining Your RV Waste System for Optimal Performance
- Preventing Clogs and Odors
- Sensor Cleaning and Calibration
- Winterizing Your Waste Tanks
- Environmental and Legal Considerations of RV Waste Disposal
- Why Proper Disposal Matters
- No-Dumping Zones and Regulations
- Septic System Compatibility
- Troubleshooting Common RV Waste Disposal Issues
- Clogged Black Tank
- Lingering Odors
- Leaky Valves or Connections
- Finding Dump Stations, Costs, and Practical Tips
- Conclusion: Responsible RVing Starts with Responsible Waste Management
Introduction: The Unavoidable Task of RV Waste Management
I still remember the first time I stood at a sani-dump station with my sewer hose in hand. My heart raced more than it should have for a chore like this. I didn’t want a mess. I didn’t want to break any rules. I wanted to do it right the first time. If that’s you today, you’re in the right place.
Properly disposing of stool waste from a motor home is one of those tasks you don’t brag about, yet it’s the backbone of clean, comfortable, and responsible RVing. Do it right and your RV life feels smooth and odorless. Do it wrong and you’ll chase clogs, smells, and fines. In this guide, I’ll walk you through the exact steps I follow, the gear I rely on, the common mistakes I avoid, and the legal and environmental guardrails I stick to. My goal is simple. Help you dump clean, safe, and legal every time.
Understanding Your Motorhome’s Waste System
Black Tank vs. Gray Tank
In an RV, the holding tanks work as the unsung heroes behind the walls. The black tank stores toilet waste. That’s stool, urine, and the water used to flush. The gray tank holds sink and shower water. It can still carry soap, grease, and food particles. I treat them differently because they behave differently. The black tank needs a robust dump and rinse routine. The gray tank usually rinses the hose after the black tank empties which keeps things cleaner.
Essential Components You’ll Use Every Time
When I set up to dump, I reach for the same gear:
- Sewer hose with a robust connector. I prefer one with a clear elbow so I can see when the water runs clear.
- Sewer adapter for different dump station inlets.
- Gate valves on the RV’s outlet. Separate black and gray tank valves.
- Black tank flush connection or a tank rinser wand.
- Disposable gloves and sometimes eye protection.
- A designated non-potable water hose for rinsing the sewer hose and flushing the tank. I never use my fresh water hose for this job.
Step-by-Step Guide to Dumping Your Motorhome’s Black Tank
Preparation is Key
Before I even pull into a dump station, I look for the signs and confirm it’s a legal RV dump. You can find these at RV parks, campgrounds, some truck stops like Pilot Flying J, Love’s Travel Stops, and TA Petro, and at municipal sites. Apps like Sanidumps.com, Allstays, iOverlander, and RV Dumps help me plan stops. I also check park rules at places like KOA, state parks, National Park Service campgrounds, and BLM lands. Rules change by location. Local ordinances matter.
I make sure I have:
- Gloves, sanitizer, and paper towels.
- Sewer hose with fittings and a clear elbow.
- A dedicated rinse hose.
- Tank treatment ready for after I finish.
I park with the RV’s sewer outlet close to the dump station inlet. Wheel chocks go down if needed and I set the parking brake. I try to keep the sewer hose as straight as possible because dips trap waste.
The Dumping Procedure
1) Safety first
I put on gloves. I keep sanitizer nearby. If the wind kicks hard I add sunglasses or light eye protection because you don’t want splashback.
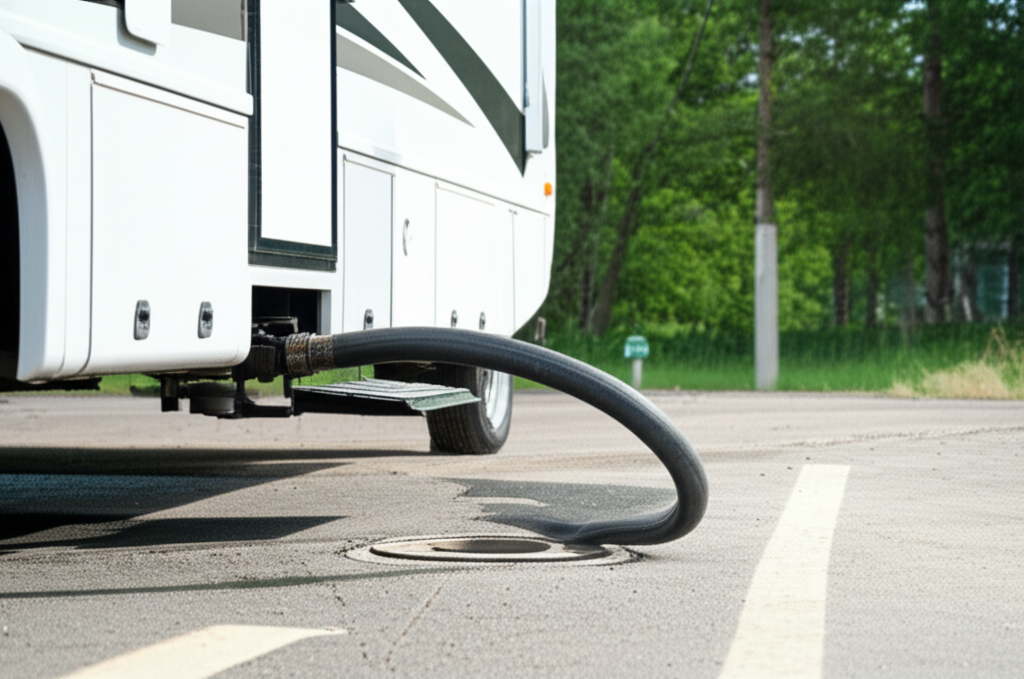
2) Connect the sewer hose
I attach the clear elbow to the dump station inlet and get a snug fit with the adapter if the opening is odd sized. I twist-lock the other end to the RV’s sewer outlet. I confirm both connections seat properly. A loose connection ruins your day.
3) Open the black tank valve
I open the black tank gate valve slowly. I watch the clear elbow. The flow starts strong then slows as the tank empties. I let it drain fully. I never yank the gray valve at the same time because I want maximum force from the black tank first.
4) Flush the black tank
If my RV has a built-in black tank flush connection, I hook the rinse hose to it and run clean water for a few minutes. I watch the clear elbow. I keep flushing until it runs nearly clear. No built-in flush on your rig? A tank rinser wand through the toilet works. I never use a potable water hose for this step because cross contamination is a serious health risk.
5) Close the black tank valve
Once the water runs clear, I shut the black valve tight. If I plan to sanitize the tank with a treatment, I wait to add chemicals until I have fresh water in the bowl or a few gallons in the tank.
6) Drain the gray tank
I open the gray tank valve next. The gray water rinses the inside of the sewer hose which helps keep it cleaner and less smelly. If you have two gray tanks, run both.
7) Close the gray valve
I close the valve and confirm both valves are fully shut. I listen and feel for a firm stop.
8) Disconnect and clean up
I disconnect the sewer hose at the RV side first then lift the hose in a gentle “walking” motion toward the dump inlet so gravity clears out remaining water. I rinse the hose with the non-potable rinse hose and spray the area if any drips escaped. I cap the RV outlet and store the hose in its designated compartment or tote. I remove gloves, sanitize my hands, and do a quick gear check.
That’s it. Clean. Simple. Legal.
Alternative and Supplementary Waste Disposal Methods
Mobile RV Pump-Out Services
Sometimes I don’t want to move the rig or the campground doesn’t have a dump station. In those cases a mobile RV pump-out service can save the day. I’ve used them during long stays and in urban areas where dump station access is limited. You can find services through campground offices, RV repair shops, and local listings. They connect to your outlet, pump the waste into a truck, and haul it to an approved wastewater treatment facility. It costs more than a standard dump, yet it’s worth it when moving the coach would be a hassle.
Using an RV Macerator Pump
A macerator pump grinds waste and pumps it through a smaller hose over longer distances and sometimes uphill. I use mine when the dump inlet sits far from the RV or when a gravity dump isn’t practical. A well built macerator helps with odor control and cleanliness because the hose is smaller and sealed with tight fittings. The downsides are flow rate and complexity. The pump moves waste slower than a gravity dump and it has moving parts that need power and maintenance. If you go this route, follow the manufacturer’s instructions and never run the pump dry.
Portable Waste Tanks (“Blue Boy” Tanks)
A portable waste tank lets me move waste from the RV to a distant dump station without breaking camp. I connect the blue boy to my outlet, transfer black or gray water, then tow the tank slowly to the dump station for disposal. I label the tank clearly and I never mix potable water gear with any waste equipment. After I dump the portable tank, I rinse it thoroughly with a designated hose.
Composting Toilets and Dry Flush Systems
I’ve used composting toilets in off-grid setups. They reduce black tank usage because they separate liquids and solids. You still need to dispose of liquids legally at a dump station or rest stop toilet and you’ll need to bag and dispose of composted solids following local regulations. Dry flush systems wrap waste in a sealed bag for later disposal which can be handy in extreme boondocking situations. These systems shine when you want to minimize black tank filling yet they require planning and strict adherence to local disposal laws.
Essential Equipment for Safe and Sanitary Disposal
Sewer Hoses and Fittings
I’ve tried cheap hoses. I don’t recommend them. A high quality RV sewer hose with reinforced walls and strong bayonet fittings lasts longer and leaks less. Length depends on your campsite habits. I carry two sections that total 15 to 20 feet with a 90-degree clear elbow, stepped adapters, and a tight sewer donut. I also keep a sewer cap with a built-in garden hose connection for a safe pre-rinse if needed.
Protective Gear
Disposable nitrile gloves live in my dump kit. I keep a few reusable gloves for cold weather. I add basic eye protection if I’m flushing aggressively. Some folks wear a mask when cleaning a clog which is not a bad idea in tight spaces.
Tank Treatment Chemicals and Additives
I’ve used enzymatic treatments, biological treatments, and traditional chemical treatments. Enzymatic or bacterial treatments help break down waste and tissue which keeps odors down and sensors cleaner. Many brands like Aqua-Kem, Happy Campers, and TankTechs Rx have loyal followings. What matters most is consistent use and enough water in the tank. I choose biodegradable RV tank treatments when possible because they play nicer with septic systems and wastewater plants.
Black Tank Flushers and Rinsers
Built-in black tank flush systems make life easy. If your RV doesn’t have one, a wand or external flusher helps. I like to see clear rinse water because it means fewer lingering solids and less odor. Pressurized tank rinse attachments work well and you can alternate soaking and draining to loosen stubborn buildup.
Cleaning Supplies You’ll Actually Use
Here’s my short list:
- A dedicated non-potable hose for flushing and rinsing gear.
- Disinfectant spray for fittings and gloves.
- A small bucket for drips and a place to soak fittings if needed.
- Paper towels and hand sanitizer.
- A storage tote for keeping dirty gear away from clean gear.
Maintaining Your RV Waste System for Optimal Performance
Preventing Clogs and Odors
I treat the black tank like a system that needs water and motion. A few rules keep me out of trouble:
- Use RV-safe toilet paper. It breaks down faster which reduces clogs and sensor gunk.
- Add plenty of water to the bowl before solid flushes. Water moves solids better than anything else.
- Keep the black tank valve closed while camping. An open valve lets liquids escape which leaves solids behind to pyramid and clog.
- After dumping, add a few gallons of fresh water plus treatment. An empty dry tank stinks and builds sludge fast.
- Try the “geo method” if you like DIY. A bit of mild detergent and water can help with cleaning though I still prefer treatments formulated for RVs.
- Do a deep clean with a black tank descaler if you inherit a neglected tank or your sensors refuse to read clean. I follow the product directions and give it time to work.
Sensor Cleaning and Calibration
Inaccurate tank sensors are the bane of RVers. False full readings usually mean residue on the sensor probes. Regular rinsing helps. So do enzymatic treatments and occasional long soaks. I also drive with a few gallons of water in the tank sometimes because sloshing action helps scrub the walls. If your system uses external sensors, verify the wiring and calibration. If the panel still lies, a thorough deep clean or a sensor upgrade might be in order.
Winterizing Your Waste Tanks
I never let my black or gray tanks freeze. Expansion can crack fittings and valves. Before winter storage I dump and flush both tanks thoroughly. I close valves and add a bit of RV antifreeze to the P-traps and valves. I never use automotive antifreeze in the plumbing system because it’s toxic and not meant for this purpose. If I camp in sub-freezing weather, I use tank heaters or insulating wraps and I keep the RV warm. I also protect the sewer hose or store it between dumps to prevent ice.
Environmental and Legal Considerations of RV Waste Disposal
Why Proper Disposal Matters
What goes down that hose carries pathogens, nutrients, and sometimes chemicals. Dumping outside a designated station pollutes waterways and soil. It spreads disease and creates a nightmare for the next camper. I remind myself that I share this land with wildlife and communities. Responsible RV travel includes responsible waste disposal.
No-Dumping Zones and Regulations
Laws vary by state and municipality. The EPA sets broad environmental standards and local ordinances enforce the rules. Federal lands managed by the National Park Service, the USDA Forest Service, BLM, and the Army Corps of Engineers have strict policies against dumping. Rangers do cite violators. I’ve seen fines that run from hundreds into the thousands for illegal dumping. It’s not worth the risk. Even gray water can draw penalties because soaps, detergents, and food waste harm ecosystems.
Septic System Compatibility
I sometimes stay on private property with a permitted residential septic system. Many RV-friendly tank treatments are septic-safe though I still check the label and ask the homeowner. I avoid harsh chemicals that can kill beneficial bacteria in septic tanks. If there’s any doubt, I skip chemicals until I can dump at a proper RV facility.
Troubleshooting Common RV Waste Disposal Issues
Clogged Black Tank
Symptoms include slow drains, a toilet that won’t flush, or a tank that reads full with poor outflow. Here’s my playbook:
- Don’t panic. Close the valve and add a generous amount of water through the toilet.
- Add an enzymatic cleaner or a black tank descaler. Let it soak for hours or overnight if you can.
- Use a tank rinser wand to agitate the clog.
- Gently rock the RV or drive a short distance to slosh the solution.
- Try a careful dump again with the black valve open. If the clog persists, consult an RV repair shop or a mobile tech. I avoid coat hangers or hard rods because they can puncture plumbing.
Lingering Odors
If the RV smells like a truck stop restroom, I check:
- Is the black tank valve closed when it should be? An open valve during camping is a common culprit.
- Are the tank vents clear? Mud daubers and debris can clog the roof vent which traps odors.
- Are P-traps dry? Pour a little water down each drain, then add a bit of RV antifreeze in cold conditions.
- Am I using enough water when flushing solids? Water matters more than chemicals.
- Do I need a different treatment? Sometimes a brand switch works wonders.
Leaky Valves or Connections
A drippy gate valve or cracked fitting can turn into a mess. I do a visual inspection around the outlet after dumps. If I spot a slow leak, I replace seals or the valve assembly before it fails completely. Valves, waste gate seals, and o-rings wear out. I keep spares on hand. When in doubt I call a pro because sewage leaks are no fun to troubleshoot mid trip.
Finding Dump Stations, Costs, and Practical Tips
I don’t drive blind when it comes to dumping. I plan my route with apps like Sanidumps.com, Allstays, and iOverlander. Many campgrounds, KOA locations, Good Sam affiliated parks, and RV repair shops offer dump services. Some travel centers like Pilot Flying J and Love’s have pay-per-use stations. Fees in my experience range from about five to twenty five dollars which feels like a bargain for clean, legal disposal. I’ve also found free dump stations at some state parks, municipalities, and water treatment facilities though availability changes.
A few tips I’ve learned the hard way:
- Never assume potable and non-potable spigots are interchangeable. Label your hoses and keep them separate for life.
- Carry a spare sewer hose and extra gaskets. One failure will convince you.
- Store sewer gear in a dedicated tote away from fresh water gear.
- Keep a headlamp in the dump kit because you’ll eventually dump in the dark.
- If you boondock with Harvest Hosts or Boondockers Welcome, confirm dumping options nearby ahead of time. These stays rarely include dump privileges.
- Respect campground quiet hours at dump stations. Noise travels and pumps hum.
Putting It All Together: Best Practices I Live By
Here’s how I keep things simple and sanitary every single time:
- I dump when the black tank is at least two thirds full because a full tank creates stronger flow which carries solids out better.
- I always dump black first then gray to rinse the hose.
- I flush the black tank until the water runs clear because that keeps odors down and sensors happy.
- I add a few gallons of fresh water and treatment to the black tank after dumping because an empty dry tank stinks.
- I stay legal. If I can’t find a dump station, I wait or I hire a pump-out service.
Brands, Components, and Supplies I Trust in the Field
I’m not tied to any brand yet I’ve had good luck with gear from Thetford, Valterra, Camco, Dometic, and Lippert for hoses, fittings, and sanitation supplies. For macerator pumps, names like Jabsco, Flojet, and Sani-Con are common. For treatments, pick what matches your nose and your conscience. Keep it RV safe and septic friendly when possible.
Health and Safety Reminders
You deal with human waste and that carries pathogens. The CDC offers general hygiene guidance that applies here. Wear gloves. Wash hands thoroughly. Disinfect gear after use. Avoid splashes and never cross contaminate by using potable water hoses for cleaning tanks. If you get waste on your skin, clean it promptly. If you experience illness after a messy incident, consult a healthcare professional.
Common Myths I’ve Heard and What Actually Works
- “Leave the black valve open at full hookup sites so you don’t have to dump.” Not a good idea. That’s how waste pyramids form because liquids escape while solids sit.
- “Chemicals do all the work.” They help though water and proper flushing matter more.
- “Gray water is harmless.” It’s not. Detergents and food waste pollute which is why many land managers forbid gray dumping on the ground.
- “Any toilet paper works.” Some do. RV safe paper breaks down faster which protects sensors and reduces clogs.
Planning for Cold or Hot Weather
In freezing weather I insulate exposed lines, use tank heaters if available, and keep hoses stored between dumps. I carry RV antifreeze for traps and valves. In extreme heat I keep more water in the tank and dump more frequently because high temperatures amplify odor. I also check roof vents for clear airflow because hot air rises and takes smells with it.
What To Do If You Make a Mess
It happens to everyone eventually. If I spill, I stay calm and clean it up immediately. I use my rinse hose to wash the area into the dump inlet. I disinfect my fittings and my hands. If the station provides a cleanup station, I use it and leave the area cleaner than I found it. Everyone appreciates that.
Environmental Stewardship as an RVer
I think of myself as a guest everywhere I camp. That mindset leads to simple habits. I use eco-friendly treatments when I can. I never dump on public lands. I follow local regulations. I learn the rules for state parks, NPS campgrounds, and BLM areas before I arrive. Responsible RV travel means I leave no waste behind, period.
Quick Reference Checklist
Before you dump:
- Gloves on. Hose and fittings ready. Rinse hose connected to non-potable spigot.
- Clear elbow attached to dump inlet. Hose connected to RV outlet.
- Black valve closed. Gray valve closed.
During the dump:
- Open black valve slowly. Let it drain fully.
- Flush black tank until water runs clear.
- Close black valve.
After the dump:
- Open gray valve to rinse hose. Close gray valve.
- Disconnect hose at RV. Drain hose toward inlet.
- Rinse hose and fittings. Cap RV outlet.
- Store gear in a dedicated tote. Sanitize hands.
Conclusion: Responsible RVing Starts with Responsible Waste Management
I didn’t start out confident with RV waste. I learned by doing and by cleaning up a few mistakes. You can skip the messy parts if you treat the system with respect. Dump at legal stations. Use the right gear. Flush the black tank thoroughly. Keep water in the tank and use treatments wisely. Plan your stops with trusted apps and campground resources. When in doubt, ask the campground host or hire a mobile pump-out service.
Do that and you’ll travel cleaner. You’ll avoid fines. You’ll keep your motorhome odor free and your mind at ease. If you’ve picked up a trick that saves time or keeps smells away, share it with other RVers. We all get better when we compare notes.
Safe travels. Clean dumps. Responsible trips from here on out.