How to Clean Stator Windings: A Comprehensive Guide for Optimal Motor Performance
Short summary: I show you how to clean stator windings in a safe, simple way. You learn the tools, the steps, and the tests. You also learn how to avoid common mistakes. This is worth reading because clean windings stop overheating and save your motor.
Table of Contents
- Why do clean stator windings matter?
- What is a stator winding and how does it work?
- What makes windings dirty and what are the risks?
- Is it safe to clean windings yourself?
- What tools and materials do you need?
- How do you disassemble and inspect the motor?
- How do you dry clean the stator?
- How do you wet clean sticky, oily windings?
- How do you dry the windings the right way?
- How do you test the motor after cleaning?
- What mistakes should you avoid?
- When should you call a pro?
- How do you keep windings clean longer?
- Special cases and extra tips
- References
- FAQ
- Key takeaways
Why do clean stator windings matter?
Problem: Dirty windings trap heat. Dust, oil, and carbon stick to the coils. The motor runs hot. The insulation gets weak. You face motor overheating causes like poor cooling and electrical insulation breakdown. Soon the motor fails. You lose time and money.
Agitate: I have seen this many times in industrial motor cleaning. The plant stops. People wait. Production drops. Costs of motor failure rise fast. You also risk fire hazard if dirt conducts and arcs. That is not fun.
Solution: Clean windings fix the problem. You improve electric motor maintenance. You get motor efficiency improvement. You extend motor life with preventative motor care. You reduce downtime industrial wide. You protect winding insulation cleaning. You also set a plan for scheduled motor maintenance. In short you win.
This guide covers motor winding cleaning, generator stator cleaning, DC motor winding cleaning, cleaning AC motor stator, alternator stator cleaning guide, and cleaning generator components. I keep it simple. I show you steps you can do with DIY motor winding cleaning. I also tell you when to call a motor repair shop for professional motor cleaning services.
What is a stator winding and how does it work?
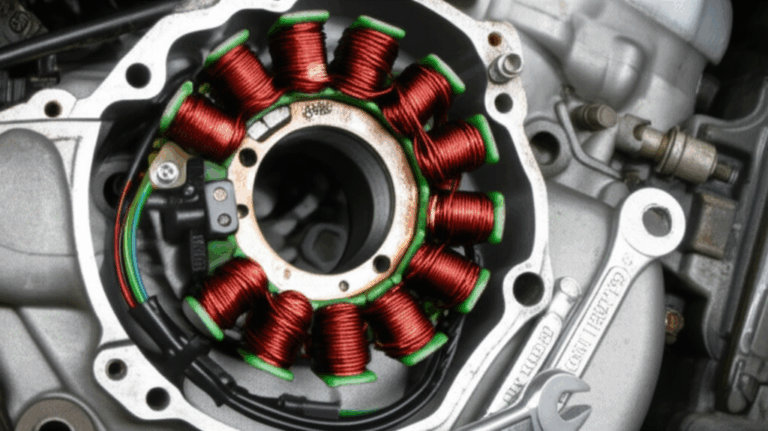
The stator holds the coils. We call them windings. They sit inside the motor housing around the rotor. The stator turns electrical energy into a magnetic field. The rotor spins inside that field.
The windings sit on the stator core. The core uses steel sheets called laminations. The quality of the stator core lamination matters a lot. Clean windings help the core stay cool. Clean coils reduce hotspots. Good coil end cleaning and good slot liner maintenance also help.
When windings get dirty they lose insulation resistance. The varnish and epoxy resin need to stay clean. Varnish degradation prevention keeps you safe. That is why you clean and test. You also check the air gap and do air gap inspection motor checks. You then reassemble with care so it runs smooth.
What makes windings dirty and what are the risks?
You see many types of motor contamination. Dust and dirt stick to oil and grease. Carbon buildup on stator comes from brushes in DC motors. Moisture finds a way in. Sometimes chemicals attack insulation. Sometimes metallic dust conducts. All of these reduce dielectric strength and heat transfer.
Dirty windings raise temperature. Insulation ages faster. For every 10°C rise the life of insulation drops a lot. You also see decreased efficiency and motor noise reduction needs. Contamination can cause tracking. It can short between coils. It can cause electrical shock risk during service.
Here are common contaminants and their sources:
- Dust, dirt, and sand from the shop floor
- Oil contamination motor stator from bearings or gearboxes
- Grease from maintenance work
- Carbon deposits from brushes and commutators
- Moisture from humidity or washdowns
- Chemical residues from process lines
Is it safe to clean windings yourself?
Yes it can be safe if you follow rules. Safety cleaning motor parts starts with lockout/tagout. Use Lockout/Tagout (LOTO). Disconnect power. Lock the switch. Tag it so no one turns it on. Always treat capacitors and the terminal box with care. There can be residual charge.
Wear Personal Protective Equipment (PPE). Use safety glasses, gloves like nitrile or chemical-resistant gloves, and a respirator mask when you spray solvents. Use protective clothing. Work with good ventilation. Open doors and use fans. Safe chemical handling motor work prevents harm.
Use non-conductive cleaning agents. Choose a dielectric cleaner for windings. Pick non-chlorinated and fast-drying types. Avoid corrosive cleaners. Follow environmental regulations cleaning. Collect waste. Handle hazardous waste motor cleaning with care.
What tools and materials do you need?
You do not need fancy gear to start. You can do a lot with a vacuum, a brush, and a good solvent. For bigger jobs you add more.
Cleaning agents:
- Dielectric cleaning solvents safe for electrical components
- Isopropyl Alcohol (IPA) for light contamination
- Degreasers that are non-conductive for solvent cleaning electric motor
- Cleaning solutions for electrical parts made for insulation
Cleaning tools:
- Compressed air motor cleaning with filtered, dry, low pressure
- Industrial vacuum cleaner with a HEPA filter for vacuum cleaning stator
- Soft brush for windings like nylon or natural bristle
- Lint-free cloths for motors
- Spray bottles or pump dispensers
Drying equipment:
- Heat gun for drying windings set on low
- Baking oven or a controlled low-heat baking motor windings setup
- A dehumidifier for moisture removal motor windings
Testing equipment:
- Megohmmeter (Megger) for insulation resistance testing
- Multimeter for continuity and basic checks
- Motor diagnostic tools for deeper checks
- Vibration meter for motor vibration analysis
- Clamp meter for motor current analysis
Other helpful items:
- Work light and protective sheeting
- Parts organizer for small screws
- Torque wrench for torque specifications motor bolts
- Electrical schematic reading motor guide
How do you disassemble and inspect the motor?
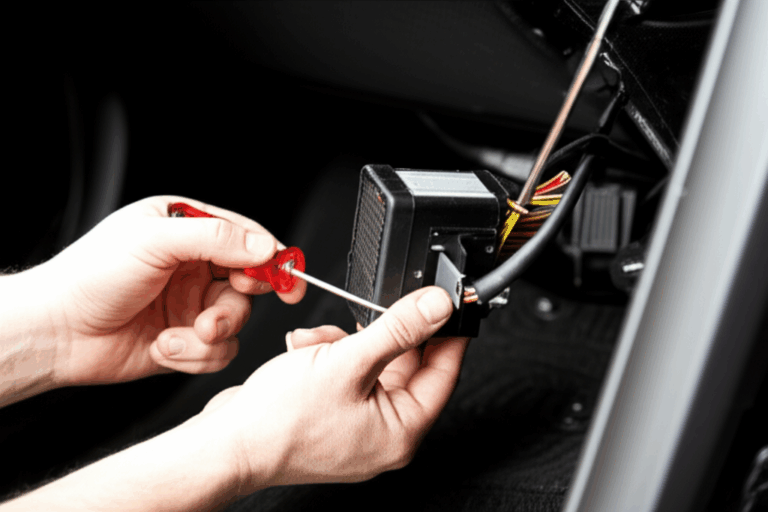
First do LOTO. Disconnect power and lock it. Confirm zero energy. Then remove covers. Take off the fan and shroud. Do fan and shroud cleaning while you are there. Open the terminal box. Do terminal box cleaning. Take pictures as you go. This helps during motor reassembly guide steps.
Pull the housing or end bells as needed. Do proper motor disassembly. Keep bearings covered. Do bearing maintenance motor work if you see problems. Remove the rotor only if you must. Rotor cleaning vs stator cleaning is a thing. Often you can clean the stator in place. If you do pull it note the rotor core lamination condition as well.
Now inspect the stator windings. Look for cracks, discoloration, or burns. Check coil ends and slot liners. Do a stator integrity check. Note oil paths and carbon tracks. Mark areas with heavy grime. Look for rust on steel. Removing rust from motor parts helps heat flow. Check motor housing cleaning needs too.
How do you dry clean the stator?
Start simple. Use dry methods for loose dirt. Vacuum first. Use a brush tip. Do not press hard on insulation. Vacuum pulls dust out of slots. Use a soft brush to lift dirt. This is armature winding cleaning on DC machines and field winding cleaning on generators too.
Then use compressed air. Keep pressure below 30 psi. Use dry air. Hold the nozzle back a bit. Blow from the inside out. Move slowly. Avoid blasting into bearings. Keep the air stream off insulation edges. Pair vacuum and air for best results.
Dry cleaning removes most dust. It helps cooling at once. It is safe for both high voltage motor cleaning and low voltage motor cleaning when you control pressure. It is a great first step for small motor cleaning tips and large industrial motor cleaning.
How do you wet clean sticky, oily windings?
When you see oil and grease you need solvent. Choose the right non-conductive solvent. Read the label. Use a dielectric cleaner safe for varnish. Test a small spot. Avoid acetone and harsh chemicals on varnish unless the maker says it is safe. If you must use mineral spirits or naphtha do so with care and great ventilation. Many techs use isopropyl alcohol for light oil films.
Apply solvent with a spray bottle or pump sprayer. Do not flood. Wet a lint-free cloth and wipe. Use a soft brush for windings to lift grime. Work on coil ends and around ties. Do targeted cleaning on carbon deposits and oil drips. Keep solvent off bearings if they are still in place.
Wipe again with clean cloths. Repeat until the grime is gone. Collect waste. Store rags in a safe bin. Solvents can be flammable. Follow fire safety rules. Keep a fire extinguisher close. Follow health and safety motor cleaning steps. Protect yourself and the shop.
How do you dry the windings the right way?
After wet cleaning you must dry the stator windings fully. Do not rush this. Moisture can cause low insulation resistance. That can cause flashover. That can cause failure.
Let the stator air dry in a warm, well-ventilated area. Run a dehumidifier if the room is damp. Use a heat gun on low. Keep it moving. Do not cook one spot. For big motors use a low-heat oven at 60 to 80°C. Follow motor insulation class and maker limits. Give it time.
Some shops use VPI (Vacuum Pressure Impregnation) to seal and protect windings after a deep clean or rewind. That is part of motor lifecycle management. It restores dielectric strength. It improves cooling. It makes future cleaning easier.
How do you test the motor after cleaning?
Now you test. Start with a visual check. Look for residue and lint. Make sure ties are tight. Check slot liners. Confirm coil end cleaning is complete. Check the air gap for debris.
Next do an insulation resistance test. Use a Megohmmeter (Megger) for the megger test after cleaning. Follow IEEE Std. 43 guidelines. Record the readings and compare to past records or maker specs. Good insulation resistance means the windings are dry and healthy.
Then use a multimeter for continuity and basic checks. If possible run a no-load test. Listen for noise. Check motor current analysis against nameplate. Watch for motor vibration analysis issues. Verify motor overload protection settings. See if power factor looks normal for power factor correction motor systems. If all looks good you are set.
What mistakes should you avoid?
- Do not use high-pressure air. You can lift insulation. You can push dirt deeper.
- Do not use non-dielectric or corrosive cleaners. You can damage varnish and epoxy resin.
- Do not skip drying. Moisture causes insulation resistance to drop. This can cause breakdown fast.
- Do not ignore safety protocols. Use LOTO. Wear PPE. Ventilate the area.
- Do not forget testing motor after cleaning. The megger test matters.
- Do not ignore signs of damage. Burn marks or severe corrosion need motor repair shop help.
- Do not mix rags with other trash. Handle hazardous waste motor cleaning right.
When should you call a pro?
Call a pro for:
- High-voltage motors or critical industrial equipment
- Severe contamination and burn marks
- Failed insulation resistance after drying
- Motors under warranty with motor warranty considerations
- Jobs that need ultrasonic cleaning motor parts or dry ice blasting windings or CO2 cleaning motor methods
- Jobs that need baking ovens or VPI systems
Pros follow motor cleaning standards by NEMA and IEEE. They know environmental considerations cleaning. They can follow motor diagnostic tools best practices. They can advise on motor rewind vs clean. They can do predictive maintenance motor programs. They can meet environmental regulations cleaning.
How do you keep windings clean longer?
You can avoid this work if you plan well. Use preventive maintenance.
- Set scheduled motor maintenance for general industrial motors every 1 to 3 years. In severe environments like foundries and cement plants clean every 6 to 12 months.
- Keep the area clean. Improve proper ventilation motor cleaning zones. Use proper filtration for cooling air.
- Fix oil leaks fast. Check bearings. Replace seals. Do bearing maintenance motor checks.
- Balance fans and rotors. Do balancing motor components to cut vibration and dust.
- Check the motor cooling system maintenance. Clean vents and ducts. Clean the fan and shroud.
- Use predictive maintenance motor tools. Do motor current analysis. Do motor vibration analysis. Use a motor troubleshooting guide for alarms.
- Store spare motors right. Use proper storage motor with covers and desiccant packs.
- Keep records. Track insulation resistance testing and power use. You will see trends.
Special cases and extra tips
- Alternators and generators: Do alternator stator cleaning guide steps much like motors. Also clean brush gear. Watch carbon dust. Do field winding cleaning with care.
- Small motors: Use small motor cleaning tips. Gentle vacuum and IPA wipes often do the job.
- Large motors: Large industrial motor cleaning may need scaffolds and teams. Plan the job. Use work orders and checklists.
- Marine motor cleaning: Salt and moisture demand extra drying. Use a dehumidifier and low heat longer.
- Automotive alternator cleaning: Keep solvents away from bearings and electronics. Light IPA wipes help.
- High voltage motor cleaning vs low voltage motor cleaning: Follow stricter test limits. Do more drying time for high voltage units.
- Rust: Removing rust from motor housings improves heat paths. Coat bare steel after cleaning.
- Components and cores: Clean windings protect the core. The core uses electrical steel. Good electrical steel laminations improve efficiency. If you rebuild a motor you can source new motor core laminations to boost performance and reliability.
- BLDC and special cores: Brushless DC motors use different cores. A high-grade BLDC stator core helps a lot. So do quality laminations in every design.
- If you must replace laminations: Pick low-loss silicon steel and precision stacks. This improves magnetic paths and cuts heat. It also makes cleaning easier next time.
Note: The stator and rotor work together. If you pull the rotor do a quick check. Clean rotor surfaces. Look at the rotor core lamination for damage. A clean rotor and a clean stator run cooler and quieter.
Simple table: Contaminant, impact, and best cleaning method
| Contaminant | Impact on motor | Best method | Tools and agents |
|---|---|---|---|
| Dust/Dirt | Blocks cooling and raises heat | Dry clean first | Vacuum with HEPA, soft brush, low-pressure compressed air |
| Oil/Grease | Attracts dust and harms insulation | Wet clean with dielectric solvent | Dielectric cleaner, IPA, lint-free cloths |
| Carbon Deposits | Can conduct and track | Targeted scrub and wipe | Soft brush, solvent, careful wiping |
| Moisture | Cuts insulation resistance | Dry and test | Dehumidifier, low heat, Megger test |
| Chemical Residue | Attacks varnish | Neutralize and rinse if approved | Approved cleaners, careful handling |
PAS in action: A short story from the floor
Problem: A cement plant called me about a big fan motor. It ran hot. It tripped on overload. The team worried. They saw dust and oil everywhere.
Agitate: The fan was vital. The line stopped each trip. People got mad. Heat rose in the building. The motor smelled like it would fail.
Solution: We did lockout. We used vacuum cleaning first. We did compressed air at low pressure. We then used a non-conductive solvent for targeted grease spots. We dried with low heat. We did an insulation resistance test. Readings improved. We reassembled with care. We set a plan for scheduled cleaning and better filters. The motor ran cool again. The plant saved money and time.
References
- IEEE Std. 43: Recommended Practice for Testing Insulation Resistance of Rotating Machinery
- IEEE Std. 1068: Guide for Cleaning Insulation and Evaluating Machines
- NEMA MG 1: Motors and Generators
- EASA (Electrical Apparatus Service Association) service best practices
- ASTM materials guidance for insulation and varnish
These sources guide motor electrical testing, insulation resistance testing, and motor cleaning standards. They help you follow best practices motor care and preventing electrical fires.
FAQ
Q: Can I use water to clean windings?
A: Do not use water on windings unless a maker approves a special wash process. Moisture can stay trapped. It can drop insulation resistance. Use a dielectric cleaner instead.
Q: How often should I clean windings?
A: Many plants clean every 1 to 3 years. In harsh places like cement or foundries clean every 6 to 12 months. Use predictive maintenance motor checks to decide.
Q: Do I need to bake windings after wet cleaning?
A: Not always. If readings are low after air drying you can use low heat. Follow insulation class and maker limits. Use a Megger to check.
Q: Should I rewind or clean?
A: If insulation is good and dirt is the issue then clean. If insulation is weak and coils are burned then a rewind may be better. Compare cost and downtime. Think motor lifecycle management too.
Key takeaways
- Lock out power with LOTO before you touch the motor.
- Use PPE like safety glasses, gloves, and a respirator.
- Start with dry cleaning. Vacuum and low-pressure air do a lot.
- Use a dielectric cleaner for oily spots. Wipe with lint-free cloths.
- Dry the windings fully. Use low heat and time.
- Test with a Megger. Record insulation resistance results.
- Avoid high-pressure air and harsh solvents.
- Set scheduled motor maintenance and predictive checks.
- Clean fans, shrouds, terminal boxes, and the motor housing.
- Watch bearings and seals. Fix leaks fast.
- Keep good records. They guide good decisions.
- For rebuilds choose quality laminations and parts. Good stator core lamination and precise stacks help efficiency and cooling.