How to Change a Blower Motor: Your Complete DIY Replacement Guide
Every engineer hits this moment. Air stops moving. Your car AC fan hums but no air comes out. The furnace runs yet your home HVAC blower motor refuses to push air through the vents. You want a reliable, step‑by‑step plan to change the blower motor. You also want to understand the engineering beneath it because that knowledge lets you fix today’s problem and design better systems tomorrow.
Here’s the good news. You can diagnose and replace most automotive and home HVAC blower motors with basic tools and a methodical process. Even better, when you understand what’s going on inside the motor core—especially the stator and rotor laminations—you make smarter decisions about parts, performance, and long‑term reliability.
We’ll solve the immediate problem first. Then we’ll explain the engineering fundamentals that drive blower motor efficiency and life. Finally we’ll guide you through material and manufacturing options for laminations so you can spec parts with confidence and have a productive conversation with your supplier.
IN THIS ARTICLE
- What is a Blower Motor and Why is it Important?
- Signs and Symptoms of a Failing Blower Motor
- Essential Troubleshooting Before You Replace Your Blower Motor
- Tools and Materials You’ll Need for the Job
- Safety First: Important Precautions
- Step-by-Step Guide: How to Change a Car Blower Motor
- Step-by-Step Guide: How to Change a Home HVAC Blower Motor
- Common Mistakes to Avoid During Replacement
- DIY vs. Professional: When to Call an Expert
- Cost Analysis: DIY vs. Professional Blower Motor Replacement
- Extend Your Blower Motor’s Lifespan: Maintenance Tips
- Engineering Fundamentals: Motor Laminations 101
- Lamination Materials and Manufacturing: Your Options Explained
- Which Application Is This For? Picking the Best Fit
- Your Engineering Takeaway
What is a Blower Motor and Why is it Important?
A blower motor is the electric motor that moves air through an HVAC system. In a car it drives the cabin fan that sends air through the dashboard vents for heating, cooling, and defrost. In home HVAC it sits inside the furnace or air handler and pushes air across the evaporator or heater core and out to the ductwork.
You need it for:
- Heating and cooling performance
- Defrost and defog safety
- Air circulation and filtration
- Comfort and system efficiency
Automotive blower motors can be brushed DC or brushless (ECM/BLDC). Many newer vehicles use a control module for variable speed. Residential systems typically use permanent split capacitor (PSC) AC motors or electronically commutated motors (ECMs) that are variable speed and more efficient.
Under the hood—literally and figuratively—the quality of the stator and rotor stack of electrical steel laminations largely determines motor efficiency, heat, and noise. We will come back to laminations after we handle the practical how‑to.
Signs and Symptoms of a Failing Blower Motor
Use symptoms to narrow the fault before you order parts.
- No airflow: You select any fan speed and no air blows from vents. You may hear nothing from under the dash or inside the furnace. Could be a fuse, relay, resistor/module, wiring harness fault, or the motor itself.
- Weak airflow: Air feels weak even on high speed. A clogged cabin air filter or airflow blockage can cause this. So can worn bearings, a failing capacitor on a PSC motor, or debris in the squirrel cage fan.
- Inconsistent airflow: Fan cuts in and out. Intermittent blower motor operation often points to worn brushes, failing bearings, heat‑soaked electronics in an ECM, or a loose electrical connector.
- Unusual noises: Squealing, squeaking, grinding, rattling, or thumping. Think motor bearing noise, debris in the fan cage, or a cracked squirrel cage fan.
- Works only on high speed: Classic sign of a failed blower motor resistor or speed control module in vehicles. Many people confuse this with a bad motor.
- Burning smell: Overheated windings, a short circuit in wiring, or melted insulation. Stop and disconnect power.
Essential Troubleshooting Before You Replace Your Blower Motor
You save time and money when you confirm the failure. Work through this checklist.
- Check fuses and relays:
- Car: Inspect the fuse for blower motor and the blower relay in the under‑dash or under‑hood panel. Replace any blown fuses. Swap relays for testing if you have an identical spare.
- Home HVAC: Turn off power at the breaker. Inspect the service panel for proper breaker and fuse status.
- Inspect the blower motor resistor or control module:
- Vehicles with resistors: If the fan only works on high speed the resistor likely failed. Resistors drop voltage for lower speeds. Replace it and test again.
- Vehicles with control modules: Variable speed modules can fail. They mimic motor failure. Some modules sit between the wiring harness and the motor. Test power and ground into the module and output to the motor.
- Home ECM blower: The integrated control can fail. Diagnosing requires following the manufacturer’s service chart and testing low voltage signals or checking diagnostic trouble codes if available on an HVAC control.
- Test blower motor electrical connections:
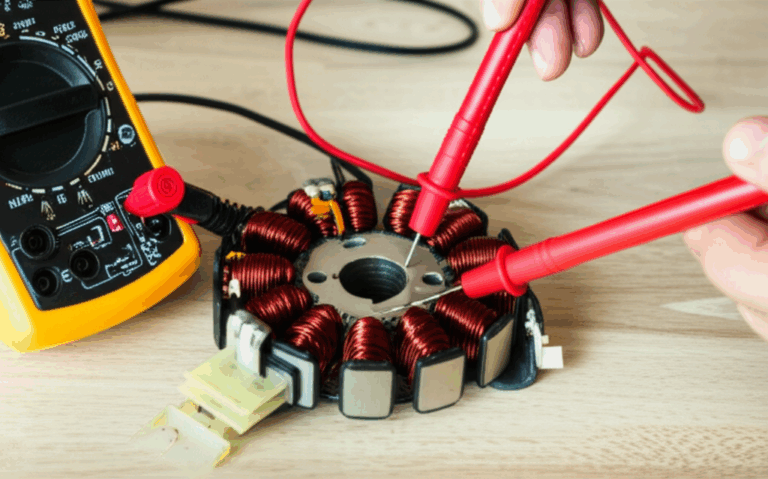
- Voltage test: With a multimeter check for battery voltage (car) or line voltage (home) at the motor connector while the fan is commanded on. Also verify a solid ground.
- Continuity test: With power disconnected perform a continuity test of the motor windings if accessible. An open circuit suggests a failed winding or an internal thermal fuse.
- Blower motor resistance test: Compare measured resistance to expected values in the repair manual. Varies by design.
- Look for obstructions:
- Remove the cabin air filter. Replace a clogged filter.
- Inspect the squirrel cage fan for leaves, dust accumulation, or foreign objects.
- Capacitor check on PSC motors:
- A bad run capacitor causes the motor to hum but not spin. Replace the capacitor if it tests out of spec. Use a proper capacitor tester or a multimeter with capacitance mode.
If you command fan speed and the motor has voltage and ground yet it will not spin the motor is suspect. If it spins only when you nudge it the capacitor or bearings likely failed.
Tools and Materials You’ll Need for the Job
You don’t need an exotic toolkit for most blower motor jobs. Here’s the list.
- Replacement blower motor:
- OEM vs aftermarket: OEM tends to fit perfectly and match airflow and noise. Aftermarket can cost less. Check reviews and specs. For ECMs ensure compatibility with your system.
- Specific model blower motor: Always match part numbers by vehicle make and model or furnace/air handler model.
- Basic hand tools:
- Screwdriver set: Phillips and flathead
- Socket wrench set: Metric for cars, SAE for some home systems
- Pliers and nut drivers
- Plastic trim removal tools for dash panels
- Electrical tools:
- Multimeter to perform a blower motor voltage test and continuity test
- Wire cutters/strippers if repairs are needed
- Electrical tape or heat shrink for harness repairs
- Safety gear:
- Safety glasses and gloves
- Other:
- Flashlight
- Shop rags
- Owner’s Manual or repair manual for diagrams and torque specifications
Safety First: Important Precautions
Treat power with respect.
- Disconnect power:
- Car: Disconnect the negative battery terminal before you unplug anything under the dash.
- Home HVAC: Turn off the circuit breaker to the furnace/air handler. Confirm power is off with a non‑contact tester.
- Capacitors can hold charge:
- PSC motors use capacitors. Discharge them safely using a resistor across the terminals or follow the manufacturer’s method.
- Work in a well‑lit area:
- Keep screws and parts organized. Take photos before unplugging the wiring harness.
Step-by-Step Guide: How to Change a Car Blower Motor
The general process is similar across cars and trucks. Access differs by model. Use a repair manual or a forum guide for vehicle specific steps.
1) Locate the blower motor
- Most cars place it under the passenger side dashboard behind or below the glove box. Some require dash removal. Others sit behind an access panel.
2) Gain access
- Remove the glove box if needed. Many glove boxes have side tabs that you can pinch inward to drop the box down.
- Remove lower dash trim panels or an access panel. Use plastic trim tools to avoid damage.
3) Disconnect electrical
- Unplug the main electrical connector for the blower motor. Some have a separate connector for a resistor or control module.
4) Remove mounting screws
- Remove the mounting screws or bolts that secure the motor. Keep them in a labeled cup.
5) Extract the old blower motor
- Twist or pull the motor down and out. Be patient in tight spaces. Avoid forcing the fan cage through the opening.
6) Inspect related parts
- Check the cabin air filter. Replace if dirty.
- Inspect the blower motor resistor or module. If it looks scorched replace it.
- Look for debris in the duct or fan cage.
7) Install the new blower motor
- Align the new motor. Slide it into place. Make sure the foam seal seats properly to prevent whistling.
8) Secure the new motor
- Reinstall the mounting screws. Do not over tighten into plastic housings.
9) Reconnect electrical
- Plug in the connector. Confirm a positive click.
10) Test the new motor
- Reconnect the battery. Turn the key on. Test all fan speeds and modes. Listen for unusual noises or vibration.
11) Reassemble components
- Reinstall the glove box, trim, and any covers. Confirm everything opens and closes smoothly.
Tip: If the fan only works on high after replacement you likely still have a bad resistor or speed control module. Replace that part and retest.
Step-by-Step Guide: How to Change a Home HVAC Blower Motor
Residential air handlers and furnaces follow a consistent layout. The blower assembly usually slides out as a single unit.
1) Locate the blower motor
- It sits inside the furnace or air handler. You access it through the lower service panel.
2) Disconnect power
- Turn off the HVAC breaker. Lock it out if possible. Confirm power is off.
3) Access the blower compartment
- Remove the service panel screws. Set the panel aside.
4) Document and disconnect wiring
- Take photos of the wiring harness connections. Include wire colors and terminal markings. Label wires if needed.
- Disconnect the motor wires. Disconnect the capacitor if present.
5) Remove the blower assembly
- The blower assembly sits on rails or tabs. Loosen the mounting screws. Slide the entire assembly out.
- Avoid bending the evaporator coil above the blower.
6) Replace the motor or the entire assembly
- Remove the squirrel cage fan from the old motor shaft. Loosen the set screw and slide the wheel off.
- Mount the new motor. Align the shaft and secure the fan wheel at the same depth. A misaligned wheel causes noise and poor airflow.
- If you have an ECM motor with a failed module consider replacing the complete assembly if available. It saves time and avoids balancing issues.
7) Reinstall the blower assembly
- Slide it back on the rails. Tighten the mounting screws.
8) Reconnect wiring
- Use your photos to restore wiring. Connect the capacitor if the motor is PSC. Confirm the correct speed taps for heating and cooling if applicable.
9) Reinstall service panel
- Secure the panel. Some furnaces use a door switch that must be engaged for the blower to run.
10) Restore power and test
- Turn the breaker on. Command fan modes at the thermostat. Test all speeds and modes. Listen for vibration and check airflow at floor vents, face vents, and defroster vents if applicable to your configuration.
Tip: If the motor hums but does not spin replace the capacitor first. It’s a common failure and a low‑cost fix compared to a new motor.
Common Mistakes to Avoid During Replacement
- Forgetting to disconnect power
- Stripping screws or breaking plastic trim
- Damaging electrical connectors during removal
- Forcing parts into place instead of realigning
- Not testing before you button up the dash or panel
- Ignoring related issues like a failed resistor, bad relay, or blown fuse
- Skipping a clogged cabin air filter that starves airflow
DIY vs. Professional: When to Call an Expert
DIY makes sense when:
- You have basic mechanical skills
- Access is straightforward like a motor under the glove box or a blower assembly on rails
- The problem is clear and you confirmed voltage and ground
Call a professional when:
- The job requires complex dash removal
- Your HVAC unit uses an ECM that throws diagnostic codes and you are not comfortable with electrical troubleshooting
- You suspect a short circuit or wiring harness damage
- You lack time, tools, or a safe workspace
Cost Analysis: DIY vs. Professional Blower Motor Replacement
Typical ranges help you budget and decide.
Automotive:
- Part cost: $50 to $200 aftermarket or $150 to $400+ OEM
- Professional labor cost: $100 to $350 depending on 1 to 3 hours at $75 to $125 per hour
- Total professional cost: $150 to $550+ for easy access or $400 to $800+ if dash removal is required
- DIY time: 1 to 4 hours based on vehicle and access
- DIY savings: often 50 to 75 percent of the professional total
Home HVAC:
- Part cost: $100 to $400 for a motor only or $200 to $800+ with control module or capacitor
- Professional labor cost: $150 to $500 based on 1.5 to 4 hours at $100 to $150 per hour
- Total professional cost: $250 to $900+ for motor only or $500 to $1500+ with major components or full assembly
- DIY time: 1 to 3 hours for a motor replacement or 2 to 5 hours for the entire assembly
- DIY savings: often 40 to 60 percent of the professional total
Common failure causes:
- Worn bearings, debris, dust accumulation, or an airflow blockage in the fan
- Electrical shorts, resistor or relay failure in cars
- Capacitor failure, power surges, prolonged use in home HVAC
Lifespan:
- Automotive blower motors often last 5 to 10 years or 100,000 to 150,000 miles depending on duty cycle and quality
- Home HVAC blowers often run 10 to 20 years with proper maintenance
Extend Your Blower Motor’s Lifespan: Maintenance Tips
- Replace the cabin air filter or furnace filter on schedule
- Keep intake grilles and vents clear to prevent airflow blockage
- Address squealing noise or intermittent operation early
- Clean debris from the blower wheel during service
- Fix wiring issues promptly to prevent heat and arcing
Engineering Fundamentals: Motor Laminations 101
Now let’s look under the skin. Engineers often ask why lamination thickness or material grade matters so much in a seemingly simple blower motor. The answer comes down to core losses and magnetic performance.
What’s really going on?
- In any AC machine or a brushless DC motor that runs on a PWM waveform the magnetic field in the stator core flips back and forth. That change induces circulating currents in the steel called eddy currents. They behave like small unwanted whirlpools in a river. Those electrical whirlpools waste energy and create heat.
- Thinner laminations with insulating coatings break up those whirlpools. The insulation raises interlaminar resistance which chokes the eddies. Eddy current loss scales roughly with the square of lamination thickness, frequency squared, and magnetic flux density squared. So halving thickness can significantly reduce eddy losses at a given frequency.
- Hysteresis loss comes from flipping magnetic domains in the steel on each cycle. It depends on the material’s coercivity which is the resistance to being demagnetized. Materials with lower coercivity reduce hysteresis loss.
- Magnetic permeability measures how easily a material allows magnetic flux to pass. Think of it like a sponge soaking up water. Higher permeability makes it easier to establish flux for a given magnetizing force which boosts torque and efficiency for the same copper and current.
Where laminations matter in blower motors:
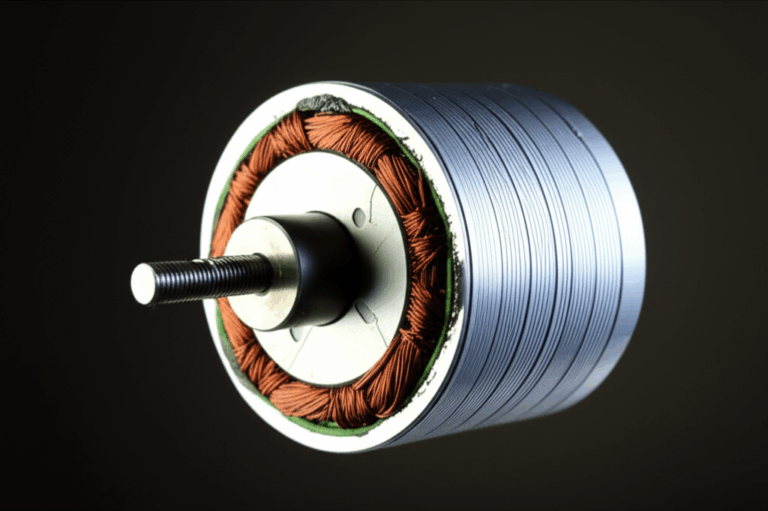
- Stator core: The stator stack guides magnetic flux and sets the path for the rotating field. The quality of the stator core lamination directly impacts torque production, temperature rise, and noise.
- Rotor core: On an induction or synchronous design the rotor core lamination influences rotor losses and balance. For ECMs and BLDCs the rotor may house permanent magnets while the laminated rotor core completes the magnetic circuit.
- Electrical steel selection: Non‑oriented silicon steel is common in motors due to its relatively isotropic properties. Grain‑oriented steels suit transformers and some axial flux applications with aligned flux paths.
Standards and test methods:
- IEC 60404 series covers magnetic materials including measurements of core loss and permeability
- ASTM A343/A343M provides test methods for alternating‑current magnetic properties
- Manufacturers publish grade data like core loss at specified induction and frequency along with thickness options and coating classes
In short, laminations are the core of the core. Get them right and you run cooler and quieter with higher efficiency.
Lamination Materials and Manufacturing: Your Options Explained
Material considerations:
- Silicon steels (M‑grades):
- Use: General purpose motors, fans, pumps, and transformers
- Pros: Cost effective, available in many thicknesses like 0.35 mm and 0.5 mm, stable properties
- Cons: Core loss rises at higher frequency, especially on thicker gauges
- Best for: PSC and standard induction blower motors in residential HVAC, automotive brushed DC blower motors with lower fundamental electrical frequency
- Cobalt alloys:
- Use: High power density motors and aerospace or high‑temperature environments
- Pros: Superior saturation flux density and lower losses at high frequency, better temperature capability
- Cons: Expensive, longer lead times
- Best for: Compact high‑speed blowers or specialty designs where power density trumps cost
- Advanced electrical steels:
- Non‑oriented grades with improved coatings for high frequency and low loss
- Consider for ECM/BLDC blower motors that operate with PWM switching and higher electrical frequency components
Manufacturing and assembly processes:
- Stamping:
- The workhorse for high volume. Progressive dies deliver tight repeatability and low cost per piece at scale.
- Watch for: Burrs and die wear which raise interlaminar shorts and core loss. Use deburring or post‑processing if needed. Consider stress relief annealing for demanding specs.
- Laser cutting:
- Ideal for prototyping and complex or low volume designs. Flexibility is excellent.
- Tradeoff: Heat affected zone can increase local loss. Use optimized parameters and consider post‑process annealing for best results.
- Wire EDM and waterjet:
- Used for prototype laminations with minimal burrs and small feature accuracy. Throughput is lower.
- Stacking and bonding:
- Interlocking laminations work like LEGO bricks. They create strong cores without welding. Minimal distortion and no weld heat makes magnetic properties more consistent.
- Welding provides robust mechanical strength. It can increase localized loss unless controlled carefully.
- Adhesive bonding and powder coating add damping which reduces noise and vibration. They also enhance interlaminar resistance and lower eddy currents.
- Insulation coatings:
- Choose coatings based on thermal class, interlaminar resistance, and punchability. Coating choice affects both stamping quality and core loss.
When you spec laminations for blower motors consider how the control strategy sets the electrical frequency content. A single speed PSC blower runs at line frequency. A variable speed ECM or BLDC blower sees a switching waveform. That means the material and thickness selection have a bigger impact on eddy losses and temperature rise.
For a quick overview of options and how they map to motor cores review these resources:
- Broad overview of electrical steel laminations
- System level perspective on motor core laminations
- Application details for stator core lamination
- Rotor selection guidance at rotor core lamination
Which Application Is This For? Picking the Best Fit
Matching the lamination approach to the application keeps cost in line and performance strong.
Automotive blower motors:
- Many late‑model vehicles use brushless ECMs for the HVAC blower. The ECM delivers variable speed and lower noise. Its stator often uses thin non‑oriented silicon steel laminations with an adhesive bond or interlocks to keep core loss low.
- For brushed DC blowers with two to four speeds the lamination thickness can be higher without a big penalty. The dominant losses shift toward copper and mechanical losses.
- Dash removal blower motor designs add service complexity. In those cases OEM or high‑quality aftermarket motors reduce risk because airflow and noise expectations are strict inside the cabin.
Home HVAC blower motors:
- PSC motors are simple and cost effective. They use single speed or multi‑speed taps. Lamination selection focuses on low loss at line frequency and stable performance across temperature.
- ECM motors shine in variable speed residential systems. They cut energy usage and keep noise down. The lamination stack should favor low core loss under PWM excitation. Proper bonding and coating improve acoustic damping and lower whine from high frequency components.
Prototyping vs production:
- Laser cutting is your friend for prototyping a new blower motor variant or testing a different lamination thickness. You get parts quickly and tweak geometry on the fly.
- High volume production with stamping keeps the unit cost low. Invest in good tooling and a robust deburr and inspection plan. You protect performance and avoid surprises in the field.
Be honest about limitations:
- Laser cut laminations offer stunning precision. For long runs with simple geometries stamping usually beats it on cost and throughput.
- Ultra thin laminations reduce eddy losses at high frequency. They can raise cost and complicate handling. Use them where the control strategy and performance targets justify the trade.
Bringing It Together: Diagnose, Replace, and Improve
Let’s tie the lamination fundamentals back to your day‑to‑day blower motor work.
- Diagnosis matters because misdiagnosis costs time and money. Replacing a motor when the resistor, relay, or capacitor failed helps no one.
- Replacing the blower motor is a straightforward mechanical task in many cars and furnaces. You just need the right tools and a safe process.
- When you choose a replacement part look beyond fitment. Consider motor type, control strategy, and lamination quality. A low cost motor that runs hot and noisy costs more over the life of the system.
- If you design or source blower motors put core laminations at the center of your spec. Material grade, thickness, coating, and stacking method dictate efficiency, temperature rise, and acoustic performance.
Practical Details: Troubleshooting Scenarios and Tips
- AC fan not working in a car:
- Check the fuse for blower motor and the blower relay first.
- If it only works on high speed replace the blower motor resistor.
- If the blower motor hums but no air blows and you can spin the fan by hand the bearings or the motor are failing.
- Heater not working in a car with weak airflow:
- Replace a clogged cabin filter.
- Inspect for debris in the dashboard fan motor area and the access panel behind the glove box.
- Home blower only starts sometimes:
- Intermittent operation often points to a failing capacitor or an ECM module overheating.
- Measure capacitor microfarads. Replace if out of spec.
- Burning smell from vents:
- Stop and disconnect power. Inspect the motor windings for discoloration and check wiring harness for a short circuit.
- Test sequence cheat sheet:
- Visual check, filter check, spin the fan cage
- Fuse and relay test
- Voltage and ground test at the motor connector
- Resistor/module test if applicable
- Continuity test of motor windings
- Capacitor test for PSC motors
Sourcing and Quality: OEM vs Aftermarket
- OEM blower motors usually match airflow curves and acoustic targets better. They often use the same lamination grade and stacking process as the factory part.
- Aftermarket motors vary. Many perform well and save money. Verify specs like airflow at each speed, current draw, and noise. Ask about lamination thickness and insulation class for ECMs and BLDCs when performance matters.
- For procurement managers, request data sheets that include:
- Core loss at specified induction and frequency
- Lamination thickness and coating type
- Stack assembly method
- Thermal class and expected life
- Test methods used per IEC 60404 or ASTM A343 where applicable
Glossary at a Glance
- Blower Motor Resistor: Drops voltage to provide lower fan speeds on many vehicles. When it fails the blower may only work on high.
- ECM: Electronically Commutated Motor. A brushless DC motor with an integrated control module for variable speed operation.
- PSC: Permanent Split Capacitor motor. A simple AC motor that uses a run capacitor to create a phase shift for the auxiliary winding.
- Eddy Currents: Circulating currents induced in conductive materials by changing magnetic fields. They create heat and waste energy.
- Hysteresis: Energy loss from flipping magnetic domains each cycle.
- Coercivity: A material’s resistance to demagnetization.
- Permeability: How easily a material allows magnetic flux to pass through it.
- Squirrel Cage Fan: The blower wheel attached to the blower motor shaft.
Engineering FAQs
- How difficult is blower motor replacement?
- Many car blower motors are accessible behind the glove box. Plan for one to three hours. Some models require dash removal which is more complex. Home HVAC blowers slide out with basic tools.
- How long does a blower motor last?
- Expect 5 to 10 years in vehicles depending on usage and environment. Home systems often run 10 to 20 years.
- What causes blower motor failure?
- Worn bearings, dust and debris, overheating from high resistance connections, failed capacitors in PSC designs, and electronics failure in ECMs.
- Can the resistor or relay mimic a bad motor?
- Yes. If it only works on high speed check the resistor. If it does not run at any speed check the relay, fuse, and power and ground at the connector.
Your Engineering Takeaway
- Confirm the fault before you replace:
- Check fuses, relays, blower motor resistor or module, and capacitors
- Test voltage and ground with a multimeter
- Replace with confidence:
- Follow a step‑by‑step process for access, removal, and installation
- Test before you reassemble trim or panels
- Design and sourcing matter:
- Lamination material, thickness, and stacking drive efficiency and temperature
- Match the lamination strategy to the motor type and control method
- Think total cost:
- High quality laminations reduce operational temperatures, noise, and energy use which pays back over the motor’s life
- Next step:
- If you need to specify or source laminations for blower motors talk with your supplier about material grades, thickness options, coatings, and assembly methods. Bring your duty cycle and control strategy so you can align the lamination stack to your real operating frequency content.
Ready to move from a fix to a long‑term solution? Review your lamination options and performance targets. Then pull your test data and airflow requirements. With that in hand you can have a productive technical consultation and select a motor or lamination stack that hits your efficiency, acoustic, and cost goals.
Empower yourself to solve today’s airflow problem and design the system that will not come back on a service ticket.
Safe wrenching and clear air ahead.