How to Build a Stator: A Comprehensive DIY Guide for Motors & Generators
Building a stator can feel big at first. I get it. In this guide I walk you through each step in simple words so you can make a safe strong stator for a motor or generator. You will see what to buy how to wind and how to test. You will also learn why each step matters so your project runs well and lasts long.
- Problem: You want power and motion but the stator feels complex.
- Agitate: Bad wire choice or poor insulation can cause shorts heat and failure. That wastes time and money.
- Solution: Follow these steps. Use the right materials. Test each phase. Your stator can work like a champ.
Table of Contents
- What is a stator and why does it matter?
- What materials and tools do I need?
- How do I prepare the stator core?
- How do poles slots turns and phases work?
- Which winding pattern should I choose?
- How do I calculate turns and wire gauge?
- How do I wind the coils step by step?
- How do I connect the windings?
- Why and how do I impregnate and cure?
- How do I test the finished stator?
- What common problems should I watch for?
- How can I boost performance and cooling?
- Can I build special stators for BLDC generators drones EVs and wind?
- Where do I get quality laminations and parts?
- Safety notes cost and time
- References
- Summary: Key takeaways
What is a stator and why does it matter?
A stator is the still part in an electric motor or generator. It holds the coil windings. When you feed the coils with voltage and current they make a magnetic field. That field pulls on the rotor and makes motion. In a generator the rotor moves past the stator and the electromagnetism in the coils makes voltage you can use.
Think of the stator as the heart of your machine. It sets the path for flux linkage. It guides the power of magnets and coils. Build it well and your motor runs cool quiet and strong. Build it poorly and you get heat noise and failure.
You see stators in many places. Induction motor drives. Brushless DC motor (BLDC) tools. Alternator and generator sets. Wind turbine projects and electric vehicle builds. Even drone (UAV) motors and RC hobbies. The design changes with each job but the core idea stays the same.
What materials and tools do I need?
You need a magnetic core strong wire good insulation and the right tools. The core uses lamination sheets made from electrical steel. Many builders pick silicon steel. You can use non-oriented electrical steel stator grades for motors that see many angles of flux. Some use grain-oriented electrical steel stator grades for certain shapes and low core loss. Core sheets come in thin sizes. You pick the stator lamination thickness to fit your speed and frequency needs.
Your wire should be magnet wire. Most folks use copper wire for stator because it has high conductivity. The enamel coat gives dielectric strength so turns do not short. Pick the wire gauge selection with AWG or SWG. Choose the insulation classes right for heat. Class B 130°C. Class F 155°C. Class H 180°C. Class C 200°C and up.
You also need slot insulation and inter-layer insulation. Use slot liners fish paper heat shrink and glass tape. For potting use varnish for stator windings or epoxy resin stator impregnation. For tools use a winding jig or stator coil winding machine or a homemade stator winding jig. You will also need pliers strippers a soldering iron a multimeter a continuity tester an insulation tester (Megger) a heat gun and safety gear. A simple mandrel helps form stator coil forming shapes.
How do I prepare the stator core?
First stack your core. You do stator lamination stacking so sheets line up. Keep the edges smooth. You can clamp stake or weld the pack depending on design. Good stacking cuts core losses in stator. Thin sheets help lower eddy current losses stator and hysteresis losses stator. That is key for high speed and high frequency work.
Next add insulating stator coils parts. Line each slot with a liner. Cover any sharp edges. This step is vital. It lowers the risk of shorted stator windings to the core. It also raises insulation resistance. Take your time here. Do not rush. A tiny nick can ruin a day.
How do poles slots turns and phases work?
Let’s keep it simple. Poles are north and south magnetic spots. More poles can give more torque at low speed. Slots are spaces in the core for coils. Turns are how many loops of wire each coil has. More turns give more back EMF in stator windings at a given speed. That means more voltage with less current. Fewer turns give less voltage and more current.
A motor can be single phase stator winding or three phase stator winding. A one phase design is simple. A three phase design gives smooth motion and better power. You will choose a winding pitch stator and pole pitch stator to fit your pole count and slot count. Use stator pole definition from your plan so you know where each coil sits.
Which winding pattern should I choose?
Patterns set how coils lay in slots. A distributed winding stator spreads coils around more slots. It makes smooth torque and low harmonics. A concentric winding stator stacks coils in compact groups. It can be easy to wind and can fit in small motors. In some designs you may pick lap winding stator or wave winding stator. These patterns change how coils connect and how phases overlap.
You also decide fractional slot winding or integral slot winding. A fractional slot design can reduce cogging and noise in some cases. An integral slot design can be easier to plan and draw. Choose what matches your winding data for stator and your test goals.
How do I calculate turns and wire gauge?
Use simple laws. Faraday’s Law of Induction tells you how changing flux makes voltage. More turns and more flux density make more voltage. Ohm’s Law helps you balance voltage current resistance. Lenz’s Law explains how the induced current fights change. That is why back EMF rises with speed.
To pick wire size check the needed current and the space. Use a slot fill factor calculation. In industry a 40% to 65% copper fill is common. Hand work often runs lower. If you push fill too high you risk damage bends and poor heat dissipation in stator. For high current use thicker wire or parallel winding stator strands. For high voltage use more turns with thinner wire in series. Keep an eye on temperature rise stator winding so you do not pass the insulation class rating.
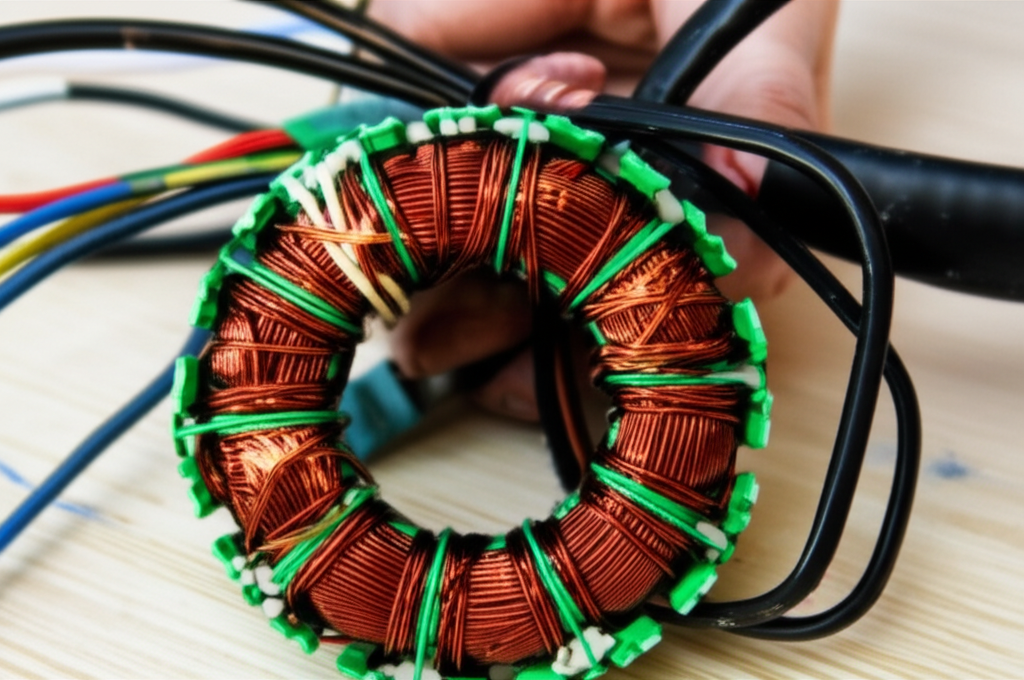
How do I wind the coils step by step?
- Plan your phases. Draw your stator connection diagrams. Mark each slot and tooth.
- Make or set a winding fixture for stators. A simple jig or a small winding machine works. Keep even tension so you avoid kinks or scrapes.
- Form each coil. Count calculating stator turns with care. Do not guess. Keep layers neat. Add inter-layer insulation between layers.
- Insert coils. Use smooth tools so you do not nick the enamel. Add wedges or shims if the slots need them.
- Tie coils. Use lacing or tape so coils stay put. Good tie work cuts stator vibration analysis issues later.
You can do hand winding electric motor methods for small builds. You can also try manual stator winding tools plus a simple counter. Shops use stator winding automation for speed and repeat work. For a prototype a careful hand can do fine work.
How do I connect the windings?
Connections change how your stator works. In a simple build you can try series winding stator or parallel winding stator inside each phase. Series gives higher voltage and lower current. Parallel gives lower voltage and higher current.
In a three phase build choose Star (Wye) vs. Delta connections. Star gives more voltage per phase and soft starts in some cases. Delta gives more current and can give more torque at low speed. Some drives start in star delta stator connection then switch. Solder your terminals with care. Use heat shrink for strain relief. Label each lead so you do not mix phases.
Why and how do I impregnate and cure?
Impregnation fills air gaps and locks coils in place. It boosts thermal conductivity to pull heat into the core. It also raises dielectric strength and blocks moisture. You can dip in varnish then oven cure. You can pour or brush epoxy resin. Some shops use Vacuum Pressure Impregnation (VPI) for a deep fill. At home you can do repeated dip and bake to get close.
Pick the right resin for your insulation classes and heat level. Follow the cure times. Air dry can work for small builds. A low temp oven helps resins set fast and strong. Good potting cuts noise reduction in stators and mechanical problems like buzz.
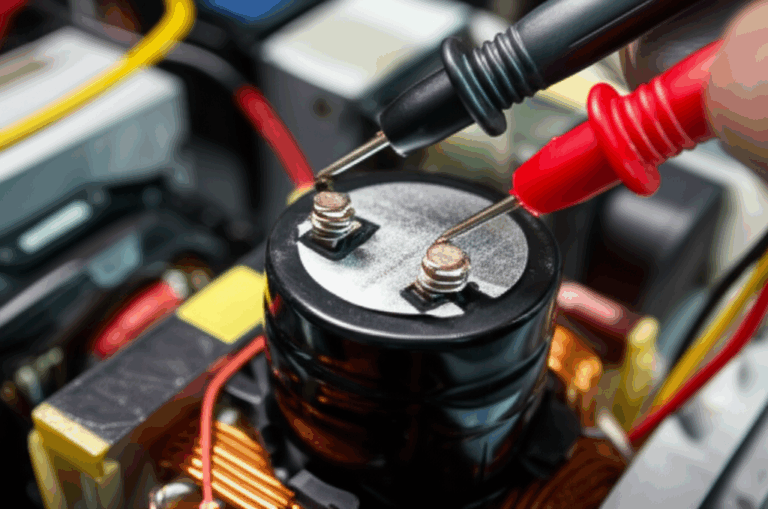
How do I test the finished stator?
Testing saves grief. Start with your eyes. Do a visual inspection for sharp edges loose ties or crushed wires. Next do a continuity test stator on each coil so you know each path is closed.
Then measure stator winding resistance measurement with a meter. Check phase balance so each phase in a three phase build reads the same. Use an insulation resistance test (Megger test) from coil to core. That tells you if you have a short to ground. For extra data you can do inductance testing on each coil. Balanced values signal even windings with no hidden faults.
What common problems should I watch for?
- Winding faults: A scrape on enamel can cause inter-turn shorts. Uneven turns can shift back EMF and cause rough run. Fix by careful handling and quality control stator winding checks.
- Electrical issues: Wrong ends tied can cause incorrect connections or shorts between phases. Use labeled leads and clear stator connection diagrams to avoid that.
- Mechanical problems: Loose windings can rattle. Poor potting can add vibration. Fix with better tie work and good impregnation.
- Heat: Too much temperature rise can cook insulation. Watch load and cooling. Design for reducing stator losses so the stator runs cool.
If a build fails you can plan a stator re-winding process. Check stator rewinding cost before you begin. Sometimes it pays to start fresh.
How can I boost performance and cooling?
You can raise stator efficiency improvement by cutting both core losses and copper losses. For core loss pick thinner laminations and good steel. Compare core loss vs lamination thickness to match your speed. For copper loss lower resistance with thicker wire or higher slot fill factor. Keep leads short and clean.
Plan cooling methods for stators. Add stator ventilation paths and fans if needed. Improve heat dissipation in stator with better potting and tight fit to the frame. Watch noise reduction in stators with distributed windings and good tie work. Study rotor stator interaction. Better electromagnetic design stator choices reduce harmonics and raise optimizing stator performance. Choose the advantages of different winding types that fit your goal. Smoother distributed winding can lower ripple. Tight concentric winding can fit small spaces.
Can I build special stators for BLDC generators drones EVs and wind?
Yes. A BLDC motor stator winding uses permanent magnets on the rotor and coils on the stator. You can choose concentrated or distributed coils. You will drive them with power electronics that switch phases at the right time.
A generator stator winding or alternator stator winding makes voltage when a rotor spins. You can build a stator for a generator in your shop. A how to make a stator for a wind turbine project can use large wire and many turns. A drone motor stator or RC motor stator winding uses many poles and thin laminations for high speed. An electric vehicle motor stator often runs three phase with strong cooling. A small motor stator winding can be hand wound. A large motor stator construction may call for machine help.
You can try an educational stator winding project to learn. Keep notes. Create prototype stator construction first and test. Adjust winding calculations for motor design before you scale up.
Where do I get quality laminations and parts?
Great cores start with great steel. If you want ready-made packs look at trusted suppliers. For example you can explore high quality stator core lamination for many motor sizes. If you need full motor stacks see motor core laminations. For brushless builds check BLDC stator core laminations. When you want raw sheet choices learn about electrical steel laminations.
Problem: Cheap steel or poor stacks raise loss and heat. Agitate: That robs your torque eats power and shortens life. Solution: Use proven laminations and correct thickness so your stator runs cool and strong.
Safety notes cost and time
Respect the work. Wear eye protection and gloves. Keep the bench clean. Keep tools tidy. Do not touch live parts. Unplug before you test. Use the insulation tester (Megger) with care. High test voltage can bite.
Time varies. A manual stator winding for a small or medium frame can take 2 to 10 hours based on slots and skill. A big build can take longer. Budget for wire resin and stator core assembly parts. Include tools and a small oven if you plan to bake.
Quick data you can use
Here is a handy table with simple facts. It helps you pick materials and plan steps.
| Topic | What to know | Why it matters |
|---|---|---|
| Lamination thickness | 0.35 mm to 0.65 mm common. Thinner like 0.1–0.2 mm for high frequency | Thinner cuts eddy current loss so the core runs cooler |
| Steel grade | Silicon steel with high permeability. Pick NO or GO as needed | Guides flux well and reduces hysteresis loss |
| Copper | Conductivity about 5.8×10^7 S/m at 20°C | Lower wire resistance cuts copper losses |
| Insulation class | B 130°C F 155°C H 180°C C 200°C+ | Keeps life high at design temp. Follow the 10-degree rule |
| Slot fill | Aim 40–65% in industry. Hand work is lower | Higher fill lowers resistance and boosts power density |
| Impregnation | Dip and bake or VPI | Improves thermal conductivity and dielectric strength |
| Tests | Visual continuity resistance megger inductance | Finds shorts opens imbalance and ground faults |
Real talk: Why each step helps you
- Problem: You want smooth torque and low heat. You do not know which winding to choose.
- Agitate: Pick wrong and you get hum noise heat and poor life.
- Solution: Use distributed winding for smooth torque in AC machines. Use concentric winding for tight spaces. Match winding pitch and pole pitch to your slot map.
- Problem: Your stator runs hot.
- Agitate: Heat cuts life. Every 10°C above rating can cut life in half.
- Solution: Use good impregnation add stator ventilation pick proper steel and wire size. Balance loss with your electromagnetic design stator plan.
- Problem: Your motor buzzes.
- Agitate: Buzz can shake parts and fail ties.
- Solution: Tie coils tight. Use potting. Use noise reduction in stators methods like better patterns and clean slots.
Simple math touch points
You do not need to be a Mechanical Engineer or Electrical Engineer to get started. A few rules help a lot.
- Faraday says voltage equals turns times change in flux. Want more voltage at a set speed. Add turns or more flux density in Tesla or Gauss.
- Ohm says voltage equals current times resistance. Want less heat. Lower resistance with thicker wire or more fill.
- Lenz says the induced voltage fights the change. As speed climbs back EMF climbs. Your drive must allow for that.
Use a meter to check inductance and resistance. Keep notes on winding data for stator. You can tweak and get better each build.
Extra notes on manufacturing and quality
A clean stator manufacturing process helps you win. Watch for stator manufacturing defects like burrs loose stacks and bent slots. Do quality control stator winding checks at each step. Keep winding techniques for stators consistent. Use neat lay and even pull. Keep a log of winding calculations for motor design. Note actual slot fill factor. Note cure times. Note test values.
If you scale work a small stator coil winding machine can boost speed. That pushes stator winding automation closer and helps repeat jobs. A tight stator core assembly with straight stacks and true bores keeps the rotor stator interaction clean.
FAQs
Q: Can I use aluminum wire
A: You can but it has higher resistance than copper. You must size it larger. You also must be careful with joints.
Q: Do I need VPI
A: Not always. Dipping with bake cycles can work well for DIY. VPI gives best fill but needs special gear.
Q: How do I pick AWG
A: Look at current and space. Use charts. Balance slot fill and heat. If in doubt go a bit thicker or use parallel strands.
Q: Can I rewind a failed stator
A: Yes. Strip inspect and do a stator re-winding process. Check the stator rewinding cost first. It can take time.
References
- NEMA Standards for Motors and Insulation Systems
- IEC Standards for Rotating Electrical Machines
- IEEE Color Books and Tutorials on Electric Machines
- Magnet Wire Manufacturer Datasheets for Class B F H C enamels
- Electrical Steel Manufacturer Datasheets for NO and GO grades
- Classic Texts on Electric Machines and Electromagnetism
Summary: Key takeaways
- Build on a sound core with thin clean laminations to reduce core losses.
- Pick the right magnet wire size and insulation class so heat stays in check.
- Choose a winding pattern that fits your goal. Distributed for smooth torque. Concentric for tight space.
- Keep coils neat. Use slot insulation inter-layer insulation and good ties.
- Pot the windings with varnish or epoxy and cure well for strength and cooling.
- Test everything. Do visual continuity resistance megger and inductance checks.
- Use smart electromagnetic design stator choices to cut eddy current and hysteresis losses.
- Match connections. Series vs. parallel and Star vs. Delta shape voltage and current.
- Plan cooling with stator ventilation. Watch temperature rise and keep it under the class rating.
- Source quality cores. Consider trusted stator laminations and motor core stacks for best results.
With care patience and the right steps you can build a stator that works hard lasts long and makes your project shine.