How to Build a Simple Electric Motor: A Step-by-Step Guide for Beginners
Table of Contents
- Introduction: The Magic of Simple Motors
- Safety First: Important Precautions
- Gathering Your Materials: What You’ll Need
- Essential Components
- Tools Required
- Step-by-Step Construction: Building Your Simple Motor
- Step 1: Preparing the Copper Coil
- Step 2: Setting Up the Battery and Supports
- Step 3: Positioning the Magnet
- Step 4: Assembling and Testing Your Motor
- The Science Behind the Spin: How It Works
- Electromagnetism
- Magnetic Interaction
- The Lorentz Force
- The “Commutator Effect”
- Troubleshooting Common Problems
- My Motor Isn’t Spinning
- It Only Spins a Little Bit
- Tips for Success and Further Exploration
- Make It Spin Faster
- Experiment Ideas
- Advanced Variations
- Conclusion: Unleash Your Inner Engineer
Introduction: The Magic of Simple Motors
I still remember the first time I made a DIY electric motor at my kitchen table. I had a battery, a couple of paper clips, a magnet, and a messy ball of copper wire that looked more like a bird’s nest than a proper coil. I struggled for a while. Then I sanded the wires the right way and nudged the coil. It took off. Not fast at first, just a gentle spin. That tiny rotation felt like magic.
Here’s the real magic. It isn’t magic at all. It’s physics you can hold in your hand. When you build a simple DC motor you see electromagnetism come alive. You feel the Lorentz force push on the coil. You watch a basic motor construction transform electric current into motion. You build it and you understand how a simple motor works because you made it spin.
Why build one? Because it’s a fun motor experiment that teaches core ideas you’ll see in every electric motor from toys to power tools. It’s perfect for a science fair motor, a kids motor project, or a hands-on STEM project motor you do at home. You don’t need fancy tools. You only need patience, a steady hand, and an eye for detail. By the end you’ll know how to build your own motor, how to troubleshoot it when it doesn’t behave, and how to make it faster.
In this guide I’ll share what I use, how I build it step by step, and the lessons that keep beginners from getting stuck. I’ll show you the science behind the spin too. We’ll keep things simple and practical. I’ll drop in tips for improving motor performance, speeding it up, and exploring variations like a homopolar motor or adding a proper commutator. Consider this your easy motor instructions and your step-by-step motor guide rolled into one.
Safety First: Important Precautions
Before we wind the copper coil and chase that first spin let’s talk safety. You’re working with a battery, metal parts, and a magnet. Nothing scary here if you follow a few rules.
- Avoid short circuits. Do not connect the battery terminals directly together with metal. That creates a short, it can heat up fast, and it can damage the battery or burn you. Keep your paper clips and wires arranged so that current flows through the coil not around it.
- Watch for heat. If the coil or paper clips feel hot stop. Your battery might be pushing too much current. Give it a break. Use a fresh battery later and reduce friction so the coil doesn’t stall.
- Use tools carefully. Pliers and wire strippers can pinch hard. Keep fingers clear. Cut away from yourself. Sandpaper can irritate skin so use gentle strokes and avoid breathing dust.
- Clear your workspace. Magnets pull on metal tools and bits of wire. Keep a tidy area so the magnet doesn’t snap parts together unexpectedly. I learned that lesson the loud way.
When in doubt slow down and check the setup. This is a beginner motor tutorial yet it teaches good lab habits you’ll use again.
Gathering Your Materials: What You’ll Need
You can find most of these parts around the house or at a hardware store. Educational kits work too yet I like picking my own because I can tune the parts for better performance.
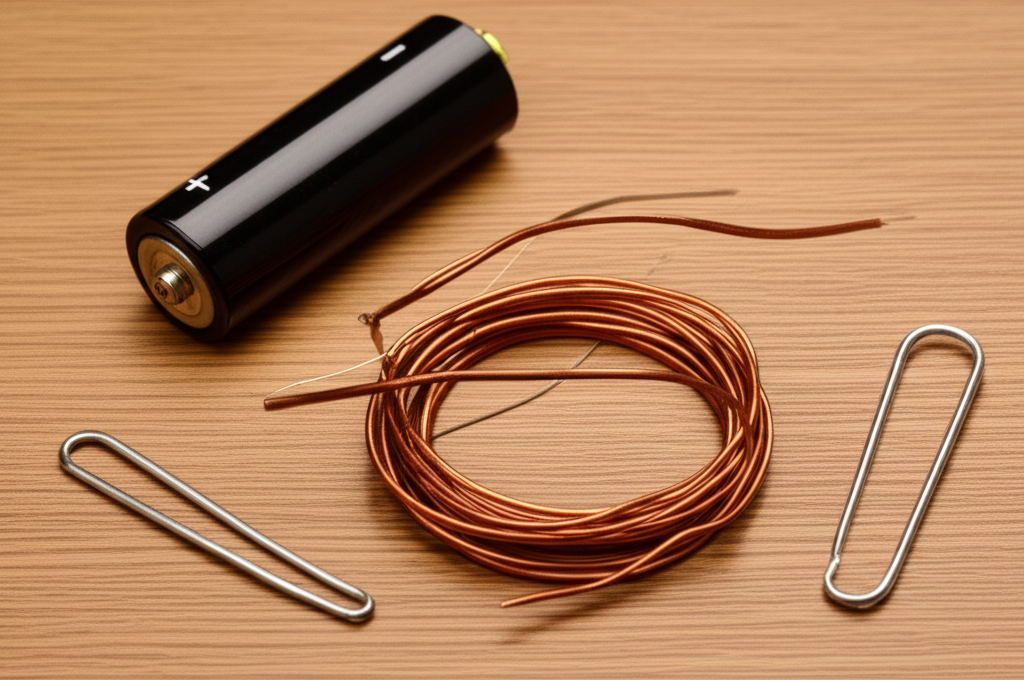
Essential Components
1) Insulated copper wire: Use enameled magnet wire in the 22–26 gauge range. I usually cut about 3 feet or roughly 1 meter. Thicker wire (lower gauge) carries more current yet it’s harder to bend. Thinner wire needs more turns.
2) Strong magnet: A neodymium magnet works best for a beginner because it gives you a strong magnetic field. A ceramic magnet can work too. I like a disc magnet that fits beneath the coil.
3) Battery: AA, C, or D cell all work. A D battery gives you more stability and longer life. I often use a D cell for classroom demos.
4) Battery holder: Optional, but helpful. It keeps the battery from rolling and it gives you easy terminals to clip onto.
5) Large paper clips: Two of them. They act as the supports and the electrical contacts.
6) Sandpaper: Fine grit. You’ll use it to remove insulation from the wire. I prefer 400–600 grit. A nail file can work in a pinch.
Optional helpful items:
- Electrical tape for securing the paper clips or magnet
- A marker to mark the top side of the coil
- Pliers or wire strippers
- Alligator clips if you want easy connections
- A safety pin as an alternate support
- A multimeter for testing voltage and continuity
These simple electrical components form a basic series circuit. The coil acts as a load. The battery provides voltage. The wire carries current or amperage. The paper clips and battery terminals create conductors. The enamel on the wire is an insulator until you remove it where you want current to flow.
Tools Required
- Wire strippers or pliers with a cutting edge
- Sandpaper
- Pliers for bending the paper clips
- Optional hot glue gun for stability if you plan to keep the setup for a science fair display
That’s all you need for a working copper coil motor made from household items.
Step-by-Step Construction: Building Your Simple Motor
I break the build into four parts. Prepare the coil. Set the battery and stands. Position the magnet. Assemble and test. Each step matters. The trickiest part is the wire stripping so I’ll walk you through it in detail.
Step 1: Preparing the Copper Coil (The Heart of Your Motor)
- Winding the coil: Wrap the wire around a round form. A AA battery, a thick marker, or your three middle fingers all work. I wind 20–30 turns for a starter coil. Keep the turns tight and stacked. Slide the coil off the form. Leave 1–2 inches of wire free on each end. These two free ends will become your axle and your electrical contacts.
- Securing the coil: Take those free ends and wrap each around the coil a couple of times to hold the shape. Aim for a round coil that stays together. Good symmetry reduces wobble. If your coil looks like a potato it may still work yet it will eat more energy in friction.
- Stripping the coil ends: This is the secret sauce. You’ll create a simple commutator by sanding the enamel differently on the two ends.
Here’s the method that works for me every time:
- Pick one end of the coil and sand off the enamel completely for about 1/4 inch. Bare copper should shine all the way around the wire. This end will conduct current all the time.
- On the other end only sand the enamel off the top half of the wire. I lay the wire flat on the table and gently sand the top face until I see bright copper. Then I rotate it slightly and check that the bottom half still looks dark and insulated. You want a “half-stripped” end. When the coil spins the bare half will make contact during one half of each turn and the insulated half will block current during the other half. That on-off timing keeps the torque in the same direction.
A marker helps here. I draw a dot on the top of the coil so I know which side I just sanded. That keeps me from stripping the wrong face. If you mess up don’t sweat it. Cut and redo the ends. I’ve redone ends more times than I can count.
Step 2: Setting Up the Battery and Supports
- Secure the battery: Slip the battery into a holder if you have one. If not tape the battery to the table or to a heavy book so it stays put. Keep the positive and negative ends clear.
- Shape the paper clips: Straighten one end of each paper clip. Then bend a small open loop near the end. That loop will cradle the coil axle. You want as little friction as possible. Size the loop so the wire spins freely but doesn’t fall out.
- Attach the paper clip stands: Fix one paper clip to the positive terminal and the other to the negative terminal. If you use a holder clip them to the screw terminals. If you taped the battery, tape each paper clip to the battery body so each loop rises up next to a terminal. Then bend the end of each clip to touch its terminal. I often wrap the end of the paper clip around the terminal and tape it in place. Make sure the two paper clips do not touch each other. Keep them aligned and facing each other so the coil can sit between them.
Step 3: Positioning the Magnet
- Place the magnet under where the coil will spin. I set the magnet on top of the battery holder or tape it to the battery. You want the magnet as close to the coil as possible without touching. Close distance creates stronger magnetic interaction which creates more force. If the coil drags on the magnet lift the coil by bending the paper clip loops up a hair.
- Check polarity and orientation. It doesn’t matter which side of the magnet faces up for a beginner build. It matters more that the coil sits right above the magnet’s center.
Step 4: Assembling and Testing Your Motor
- Place the coil into the paper clip loops. The two stripped ends now form a simple axle that rests in the loops. The completely stripped end should contact its paper clip. The half-stripped end should present a shiny copper face on top and enamel below.
- Align and balance. The coil should sit centered over the magnet. It should spin freely with a gentle flick. If it rubs bend the paper clip loops a bit. If it leans to one side rewrap the coil ends to balance it.
- Power up. The moment the bare copper touches both paper clips current flows from the battery through the coil. Give the coil a gentle push. You’ll see it twitch then catch and spin if the stripping and alignment are right. Sometimes it needs a stronger nudge to overcome static friction. That’s normal.
- Observe. Once it spins steadily look for any wobble or scraping. A smooth coil with low friction runs longer and faster on the same battery.
You just built a working wire coil motor with household items. Take a second and enjoy that first spin. It never gets old.
The Science Behind the Spin: How It Works
I love this part because the physics feels tangible. Every piece has a job. Every effect plays a role. You’re not just building a toy. You’re exploring electromagnetism, current flow, and force and motion.
Electromagnetism
When electric current flows through a conductor it creates a magnetic field. Hans Christian Ørsted discovered this link between current and magnetism while teaching a class. Your coil becomes an electromagnet the moment current flows. The more turns the coil has the stronger the magnetic field for a given current. That’s why coil winding matters.
Magnetic Interaction
The coil’s magnetic field interacts with the permanent magnet’s field. Magnetic poles attract or repel. North likes south. North dislikes north. As the coil carries current its field aligns one way relative to the magnet. That alignment produces a torque on the coil. The torque tries to rotate the coil toward a lower energy position.
The Lorentz Force
The Lorentz force explains the push that each bit of wire feels. Current flows through the coil. The magnet provides a magnetic field. The force on a current-carrying wire in a magnetic field depends on the direction of current and the direction of the field. Use the right-hand rule to predict the direction of the force. Point your thumb in the direction of current. Point your fingers in the direction of the magnetic field. Your palm faces the direction of the force. Each side of the coil feels a force in opposite directions which creates a torque and that torque makes the coil spin.
The “Commutator Effect”
So why doesn’t the coil just swing into alignment and stop. That’s where the half-stripped wire trick shines. The coil only gets current during half of each rotation. When the coil passes the top the insulated half faces the paper clip which breaks the circuit. Current stops. The coil coasts through the flip without generating torque in the wrong direction. When the bare half swings back into contact current resumes in the same orientation relative to the magnet. That timing keeps the torque pointing the same way each cycle. The result is continuous rotation.
This simple trick acts like a commutator and brush system in a brushed DC motor. A true commutator does the same job with more reliability. In our little build the coil ends and paper clips play those roles well enough.
Troubleshooting Common Problems
I’ve coached lots of students through this build. Nine times out of ten the problem lives in one of five places. Work through this checklist and you’ll get your motor spinning.
My Motor Isn’t Spinning
- Check coil stripping. This causes most failures. One end must be fully stripped all the way around. The other end must be half stripped on the top face only. If both ends are fully stripped the coil will fight itself and stall. If the half-stripped end has insulation where the paper clip touches you won’t get current at all. Re-sand as needed. Shine matters. I want bright copper.
- Verify electrical connections. Are both paper clips making solid contact with the battery terminals. Are the coil ends actually touching the paper clips. A little oxidation or enamel residue can block current. I sometimes scrape the paper clip loop with sandpaper to freshen the contact.
- Ensure magnet strength and proximity. A weak magnet or a magnet too far from the coil makes the force too small. Move the magnet up. Use a neodymium magnet if you have one. Center it under the coil.
- Adjust coil balance. If one side of the coil is heavier it sags and rubs. Re-wrap the securing loops to even it out. The coil should spin freely with a light flick.
- Battery power. A dying AA might not push enough current. Swap in a fresh battery. A D battery usually gives more stable current and longer runtime.
- Friction in the paper clip loops. Tight loops hold the axle firmly yet they can choke motion. Open them slightly. A tiny drop of graphite from a pencil can reduce friction if you want a pro move.
- Coil turns and wire gauge. If you used very thick wire with too few turns the magnetic field might be weak. If you used very thin wire with too many turns resistance might be too high. I aim for 20–30 turns of 22–26 gauge wire as a safe start.
- Polarity checks. Flip the magnet over or flip the coil orientation and try again. Sometimes that small change helps.
It Only Spins a Little Bit
- Better balance and symmetry. Round coils with even turns run smoother and faster. Oval coils stutter.
- Reduce friction. Widen the loops slightly. Align the coil dead center. Raise it just enough to avoid scraping the magnet.
- Improve the magnet’s position. Slide the magnet until the coil finds the sweet spot where the torque feels strongest. You’ll know it when the motor speeds up.
- Fresh battery. As the battery sags the motor slows. Give it new juice and it perks right up.
- Fine-tune the half-stripped end. If you stripped too much or too little the timing can be off. Resand the top face so the coil gets powered when it’s in the right orientation to push itself around.
Tips for Success and Further Exploration
Once you get a clean spin you’ll want more. Faster spin. More reliable starts. Neater builds. Let’s talk about the knobs you can turn.
Make It Spin Faster
- Stronger magnet. A stronger field increases force. Neodymium magnets usually beat ceramic magnets here.
- More turns on the coil. More turns boost the coil’s magnetic field for the same current. There’s a tradeoff since extra turns add resistance. Test a few counts and listen for speed.
- Higher battery voltage. A fresh C or D cell can give a bit more oomph than a tired AA. Don’t jump to multi-cell packs without thinking about heat. Higher voltage raises current and heat. Watch for hot wires and paper clips.
- Reduce friction. Smooth paper clip loops. Clean contacts. A light touch makes a big difference.
- Optimize coil diameter. I’ve had good luck with coils that barely clear the magnet’s edge. Too big and the field gets weak at the wire. Too small and the coil scrapes.
- Balance the coil. Even small wobbles rob speed. I tweak the loop wraps until the coil spins like a coin on its edge.
Experiment Ideas
- Coil shape variations. Try a square coil or an oval. You’ll see how geometry affects motion.
- Iron core. Slip a small iron nail inside the coil. The iron increases magnetic flux in the coil which can boost torque. Be careful though. Added mass increases inertia and the nail can drag on the magnet.
- Resistor in series. Add a small resistor to limit current if your coil runs hot. You’ll learn about resistance and power tradeoffs.
- Alligator clip upgrades. Replace paper clip supports with smooth wire loops connected by alligator clips. Less friction and easy adjustments.
- Multimeter measurements. Measure voltage across the coil and estimate current. You can talk about amperage, resistance, and power like a pro.
- Homopolar motor. For the absolute simplest motor try the single battery magnet and wire setup. It demonstrates the same current-magnetic field interaction yet it skips the commutator effect. It’s a fun side quest.
Advanced Variations
Once you master the basics you might enjoy building a true brushed DC motor with a separate commutator and brushes. You can add multiple coils and a proper armature and explore classic DC motor design. In a real motor you meet parts like the stator and the rotor which you’ve already met in simplified form. Modern motors also use stacked laminations in the stator and rotor cores to cut eddy current losses and improve efficiency. If you’re curious about how those stacks look in industry you can read about stator core lamination and how manufacturers build the stationary core. The spinning part gets built from segmented stacks too which you’ll see in rotor core lamination.
Engineers design entire motor families by selecting the right motor core laminations for torque, speed, and efficiency. They choose materials with the magnetic properties they need. Many of those laminations come from specialty steels with low losses. If materials intrigue you take a look at electrical steel laminations and how sheet steel gets punched and stacked for motors and transformers.
If you prefer brushless designs you can explore BLDC concepts. Brushless motors trade brushes and a commutator for electronics and permanent magnets on the rotor. That’s a bigger leap than our paper clip motor yet the core ideas remain the same. Current plus magnetic field creates force. Force creates rotation.
The Science Fair Angle and Real-World Payoff
I’ve used this simple motor as a science fair project and as a classroom demo. It wins hearts because it’s hands-on and it works fast. It’s also packed with teachable moments. Students learn:
- How electric current creates magnetic fields
- How magnetism and electricity interact inside a DC motor
- How energy converts from electrical to mechanical form
- How rotation depends on torque, friction, and balance
- Why commutators matter in brushed motors
It also builds practical skills. Coil winding and wire stripping develop fine motor skills. Troubleshooting builds patience and logical thinking. You can even make a neat cardboard display with a diagram of the circuit and labeled components like the coil, battery, magnetic field, and supports. Add a simple motor diagram that shows current direction and the right-hand rule. Judges love clear explanations backed by a working model.
As for cost and time I usually build one in 15–45 minutes depending on how much tuning I want. If I have to re-strip the coil ends it takes longer. Most parts cost very little if you already have a magnet and a battery. Kits simplify things if you want guaranteed compatibility and a tidy look.
Deeper Physics Nuggets Without the Jargon Overload
Let’s connect a few dots in plain language.
- Voltage, current, and resistance: The battery provides voltage which pushes charge through the coil. The coil’s wire has resistance which limits current. More current means a stronger magnetic field in the coil which means more torque. Too much current means heat. We find a sweet spot by choosing wire gauge and coil turns.
- Inductance: Coils resist changes in current because of inductance. In our motor the current switches on and off each half turn. The coil’s inductance smooths that a bit. You don’t need to calculate it to make this motor work. Just know that bigger coils react more slowly.
- Magnetic flux: Think of flux as the number of magnetic field lines passing through the coil. More flux through the coil means more torque. That’s why we move the coil close to the magnet and sometimes add an iron core.
- Polarity and direction: If you flip the battery the current flips direction. If you flip the magnet the field flips. The motor usually still spins in the same direction because the commutator effect also flips the timing. If yours reverses or stops you can just give it a nudge or adjust the coil stripping.
- Conductors and insulators: Bare copper conducts. Enamel insulates. We use this contrast to make a simple commutator by sanding one end fully and the other end half-way.
These concepts pop up in bigger motors too. Your paper clip motor is a pocket-sized physics lab.
Common Mistakes I See and How I Fix Them
- Both ends fully stripped: The motor twitches but stalls. I re-strip one end so only the top half is bare.
- Half-strip on the wrong side: The coil never gets power when it faces the right way. I mark the top of the coil and resand the correct face.
- Loose coil windings: The coil slumps and rubs. I rewind tighter or I secure the shape with an extra wrap on each end.
- Oversized loops: The axle hops out of the paper clips. I bend smaller loops and align them level.
- Weak magnet too far away: The motor looks perfect yet nothing happens. I switch to a neodymium magnet and raise it closer. It usually wakes right up.
- Dead battery: It happens more than you’d think. Fresh battery fixes it.
- Stripped too aggressively: I cut the wire or flatten it with heavy sanding. I go easy on the pressure and let the sandpaper do the work.
Frequently Asked Questions I Get
- What is the simplest motor I can make? A homopolar motor wins that contest. You need a battery, a magnet, and a piece of wire. Our coil motor adds a bit of complexity to teach commutation.
- How many turns should the coil have. I start with 20–30 turns. More turns increase the field yet add resistance. Test and listen.
- Does wire gauge matter. Yes. Thicker wire carries more current with less resistance yet it’s stiffer. I like 22–26 gauge because it balances strength and bendability.
- Can I use a 9V battery. I don’t recommend it for a first build. It can push more current than your setup can handle. Your coil and paper clips can overheat. Start with a single AA, C, or D cell.
- Why does the coil sometimes need a push to start. Static friction and the timing of the half-stripped contact can keep it from starting on its own. A small flick gets it into the powered part of the cycle.
- Can I add a switch. Sure. Break the connection from one paper clip to the battery with a small toggle switch. That gives you an easy on-off control.
A Quick Word on Learning Outcomes
I’ve used this project as a “learning by doing” cornerstone in STEM education. It checks all the boxes:
- Clear link to physics curriculum: electromagnetism, Lorentz force, current flow
- Real-world relevance: it mirrors components of brushed DC motors
- Skill building: measurement, careful construction, iterative improvement
- Accessibility: low cost and approachable for beginners as young as middle school with supervision
Students light up when the coil spins. You can’t beat that for engagement.
Going From Simple To Sophisticated
If the bug bites you keep going. Build a commutator with split metal rings and spring brushes. Add an armature with multiple coils. Experiment with different stator designs. Try a rotor with multiple poles. If you get deep into motor design you’ll discover why industry builds cores from stacked laminations rather than solid steel. Laminations reduce eddy currents which waste energy as heat. That’s why you’ll see layered packs in both stators and rotors in commercial motors.
Brushless designs open a new world too. They shift the commutation job from brushes to electronics. You still chase the same physics and you trade wear parts for control circuits.
However you choose to advance the core lesson stays the same. Current in a magnetic field feels a force. We arrange conductors and magnets so that force becomes torque and that torque becomes rotation. You felt it in your first spin. You’ll see it again in every motor you meet.
Conclusion: Unleash Your Inner Engineer
You just learned how to make a simple motor with everyday parts. You gathered insulated wire, a strong magnet, a battery, and two paper clips. You wound a coil and you sanded the ends with care. You positioned the magnet and aligned the supports. You gave the coil a gentle flick and you watched physics push it forward.
Along the way you met the key ideas that power modern life. Electromagnetism. The Lorentz force. The right-hand rule. Commutation. You solved real problems too. You tuned balance and friction. You checked connections. You learned to read a stubborn build and fix it one step at a time.
Don’t stop here. Try a homopolar motor for a minimal build. Add a proper commutator for a performance upgrade. Explore stators, rotors, and laminations if the engineering bug bites. Share your project with someone who hasn’t seen a motor made from a battery and a bit of wire. That spark of wonder matters. It did for me the first time my coil spun and it still does every time I hear that soft whir.
Now it’s your turn. Grab the wire and the magnet and build your own motor. Then teach someone else. That’s how curiosity turns into understanding and how understanding turns into skill.
Quick Reference Checklist
- Materials: 22–26 gauge enameled copper wire, strong neodymium magnet, AA/C/D battery, two large paper clips, fine sandpaper
- Tools: wire strippers or pliers, electrical tape, marker
- Steps:
1) Wind 20–30 turns around a AA or marker
2) Secure the coil with end wraps
3) Strip one end fully and the other end half on the top face
4) Build paper clip stands and attach to battery
5) Place magnet under the coil
6) Set the coil in the loops and flick to start
- Troubleshooting: recheck stripping, connections, magnet proximity, friction, balance, battery freshness
- Upgrades: stronger magnet, more turns, cleaner bearings, iron core, resistor for current control, true commutator, homopolar variant
Keywords and Concepts You Covered
- DIY electric motor, homemade motor project, simple DC motor build, build your own motor, kids motor project, science fair motor, electromagnetism experiment, basic motor construction, how a simple motor works, materials for simple motor, step-by-step motor guide, easy motor instructions, motor science project, copper coil motor, battery and magnet motor, physics motor experiment, beginner motor tutorial, making an electric motor at home, simple motor circuit, wire coil motor, magnet motor principle, electric motor for school, simple homopolar motor, how to build a small motor, mini motor construction, crafting a basic motor, motor assembly steps, educational motor project, hands-on motor activity, understanding motor function, motor troubleshooting tips, what makes a motor spin, components of a simple motor, electrical motor basics, magnetism and electricity motor, Lorentz force motor, right-hand rule motor, commutator alternative motor, simple motor diagram, coil winding for motor, battery power for motor, magnetic field motor, current flow motor, simple motor for beginners, wire stripping for motor, insulated wire motor, sandpaper for motor coil, paper clip motor stand, safety pin motor support, how to connect motor wires, testing a simple motor, common motor mistakes, motor not spinning fixes, enhancing simple motor speed, variations of simple motor, learning about motors, STEM project motor, fun motor experiment, elementary motor project, middle school motor project, high school motor experiment, motor building challenge, sustainable motor project, recycled materials motor, simple electric current motor, magnetic induction motor, basic physics of motors, motor with everyday items, science of motion motor, force and motion motor, principles of rotation motor, homemade motor for kids, super easy motor project, building a motor from scratch, how to power a simple motor, safe motor building practices, exploring electric motors, understanding motor mechanics, coil diameter motor effect, magnet strength motor impact, battery voltage motor performance, number of coil turns motor, improving motor efficiency, simple motor safety, basic electrical components motor, magnetic repulsion motor, magnetic attraction motor, classroom motor project, home learning motor, simple engineering project, motor with household items, step by step DIY motor, guide to making a motor, create a working motor, basic principles of an electric motor
Entities You Practiced
- Copper wire, neodymium magnet, AA battery, paper clip, safety pin, electrical tape, sandpaper, pliers, wire strippers, electromagnetism, magnetic field, electric current, Lorentz force, homopolar motor, DC motor, brushed motor, commutator, armature, stator, rotor, science fair, STEM education, physics experiment, Michael Faraday, Hans Christian Ørsted, circuit diagram, insulated wire, multimeter, soldering iron (optional), hot glue gun, battery holder, alligator clips, iron core, resistor, polarity, magnetic poles, coil, permanent magnet, electromagnet, series circuit, inductance, voltage, amperage, resistance, conductors, insulators, magnetic flux, right hand rule
I’m excited for you. That first spin looks small. The lesson behind it fills a whole world.