How Hard Is It to Replace a Stator? A Comprehensive DIY Guide & Difficulty Assessment
Replacing a stator sounds scary. It does not have to be. In this guide I show you what makes it hard or easy, what tools you need, how long it takes, and when to call a pro. You will see clear steps, simple tests, and smart tips to save money. Read this if your bike will not charge the battery. You will know what to do next.
Table of Contents
- The Short Answer: It Depends, But Often DIY-Friendly
- What Factors Make Stator Replacement Hard?
- What Tools and Materials Do You Need?
- Step-by-Step: How Do You Replace a Stator?
- What Are the Most Common Problems and Traps?
- When Should You Call a Mechanic?
- DIY vs Pro: Time and Cost Compared
- How Do You Know Your Stator Is Bad?
- Is It Worth Doing It Yourself?
- What Else Should You Replace With the Stator?
- Conclusion: Is Stator Replacement For You?
- Optional FAQ
- Key Takeaways
The Short Answer: It Depends, But Often DIY-Friendly
Here is the truth. The job sits at a moderate level. On most motorcycles and ATVs it is a 3 out of 5. You drain oil. You pull a cover. You may use a flywheel puller. You use a torque wrench. You follow your shop manual. If you have basic DIY skill and time you can do it.
What makes it easier or harder? Your vehicle type and model, the tools you own, and your experience. Some bikes hide the stator behind fairings and an exhaust. Some dirt bikes make it a breeze. If you can change oil and read a manual you can likely handle a DIY stator replacement guide like this. If not you can plan for a professional stator replacement cost and still feel smart about the choice.
Problem. Your battery dies. Your headlight goes dim. Your bike stalls at night. That hurts. It wastes rides and money. Solution. Learn the stator replacement step by step right now so you fix the charging system with confidence.
What Factors Make Stator Replacement Hard?
First is vehicle type & model. On a motorcycle the stator cover sits on the side of the engine case. A cruiser may need you to pull the primary drive or an exhaust system removal for stator access. A sportbike might need fairings off. An ATV sometimes needs a coolant drain for stator access. A Harley‑Davidson can involve the rotor and the primary. In a car the alternator usually holds the stator inside it, so you replace the alternator vs stator replacement as a unit. That is a different process.
Second is required tools & equipment. You need basic hand tools. A flywheel puller for stator job is often essential. An impact wrench for flywheel nut helps but you can do it by hand if you lock the crank per the manual. A multimeter stator test saves you from swapping parts for no reason. A torque wrench for stator cover keeps bolts safe. You also want thread locker for stator bolts and maybe RTV sealant for stator cover if the manual allows it.
Third is your mechanical skill & experience level. Are you okay with draining oil for stator access. Can you follow shop manual stator instructions. Can you keep track of wiring harness for stator routes and electrical connector clips. If yes you are good. If not then a beginner mechanic stator job can feel rough.
Fourth is time commitment. A pro needs 1–4 hours. A DIYer may spend 2–6 hours for the first time. You need to plan for stuck parts and troubleshooting. A seized flywheel can add an hour. The average mechanic hours stator in books range from 2 to 4. Your time may vary.
What Tools and Materials Do You Need?
You do not need a race shop. You do need the right stuff. Here is a quick list.
- Basic hand tools: socket set, wrenches, screwdrivers, pliers
- Specialized tools: bike‑specific flywheel puller, crank holding tool, optional impact driver/wrench
- Measuring tools: torque wrench, multimeter, ohm meter function
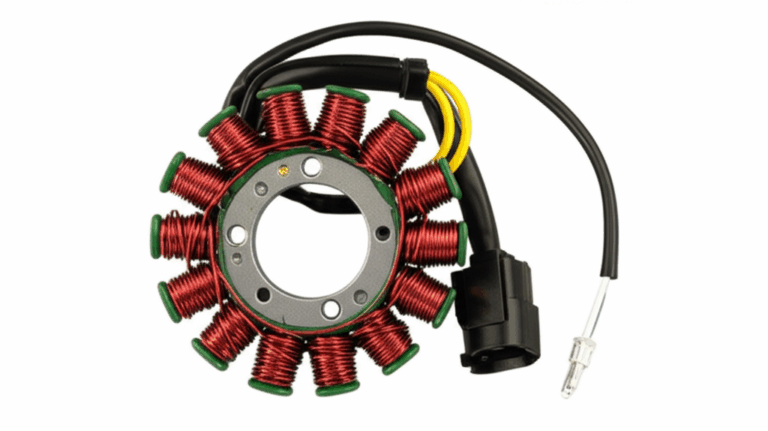
- Consumables: new stator coil replacement, stator cover gasket, engine oil, coolant if needed, RTV if the manual says so, Loctite on bolts, shop rags, oil drain pan
The quality of the stator core matters too. Good winding insulation and tight coils live longer and run cooler. The magnetic field issues stator sees depend on the steel and the build. Makers use precise electrical steel laminations to keep heat low and output high. If you are sourcing parts or building motors look for trustworthy suppliers of electrical steel laminations. High grade metal and clean insulation improve life.
Inside a motor the stator pairs with the rotor and magnets. The fit and finish of the stator core lamination and the rotor core laminations set the tone. Poor stacks waste power and make heat. If you manage builds or buy assemblies check the pedigree of the motor core laminations. You can learn more about modern motor core laminations and high quality rotor core laminations if you want a deep dive.
Step-by-Step: How Do You Replace a Stator?
Here is the big picture. Different brands like Honda, Yamaha, Kawasaki, Suzuki, KTM, and BMW (Motorrad) change the details. Always check your shop manual.
1) Preparation
- Disconnect the battery.
- Put the bike on a stand.
- Place an oil drain pan.
- Do the draining oil for stator access. Some models need a coolant drain for stator access.
- Remove body parts and stuff in the way. This can be fairings, exhaust system removal for stator access, or a starter motor interference stator bracket.
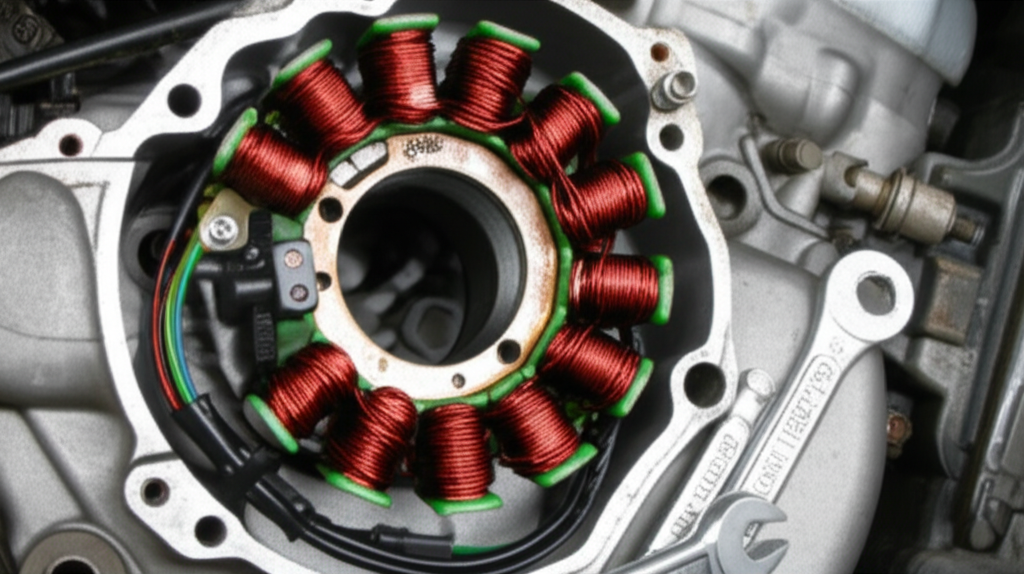
2) Accessing the stator
- Find the stator cover on the engine case.
- Remove bolts in a cross pattern.
- Gently pry the cover. Do not gouge the case.
- Watch for engine oil still inside.
3) Removing the flywheel
- The flywheel sits on the crank and holds the magnets.
- Lock the crank per the manual.
- Remove the flywheel nut.
- Use a proper flywheel puller. Do not pry with a screwdriver. You can cause a crack.
4) Replacing the stator
- Disconnect the wiring harness for stator at the electrical connector.
- Unbolt the old stator. Check the windings for burning smell from stator.
- Install the new one. Use thread locker if the manual says so.
- Route the wiring along stock clips and grommets. Avoid pinch points.
- If your bike uses a rectifier/regulator (RR) in a known failure loop consider a voltage regulator replacement with stator at the same time.
5) Reassembly
- Inspect the flywheel and magnets. Clean magnet residue on stator and dust.
- Torque the flywheel to the spec.
- Install a new gasket. Clean and dry the stator cover mating face. No gouges.
- Use RTV sealant for stator cover only where the manual says.
- Torque the cover bolts to the proper torque specifications stator cover.
- Refill engine oil and coolant if you drained it. Replace the oil filter if the manual recommends oil filter removal for stator service.
6) Final checks
- Reconnect the battery.
- Start the engine.
- Do a post-replacement charging test with a multimeter.
- Confirm checking voltage output after stator. Then ride.
I also look at the oil I drained. Inspecting engine oil during stator job can show metal dust. Small sparkle can be normal. Big chunks are not. Check the flywheel inspection stator replacement step for cracks or damage.
What Are the Most Common Problems and Traps?
- Seized flywheel
The seized flywheel is the top snag. Use the correct puller. Soak the taper with a bit of penetrating oil if the manual allows it. Use straight steady pressure. Do not hammer the crank.
- Stripped bolts or damaged threads
Old covers can have stuck bolts. Tap the head. Use hand tools first. If you must use an impact driver/wrench be gentle. Follow proper torque on install so you never face this again.
- Oil leaks
An oil leak after stator replacement can ruin a good day. Clean the surface. Use a new gasket replacement considerations. Use RTV only at case seams if the book says so. Torque in a cross pattern.
- Wiring mistakes or shorts
Do not guess. Follow the proper wiring connections stator path. Tie the wiring harness away from the rotor. A pinch makes a short circuit or ground fault. That leads to an open circuit stator diagnosis later. Also check the rectifier regulator issues after stator if the battery still does not charge.
- Incorrect torque specs
Over‑tight bolts crack covers. Under‑tight bolts weep oil. Use the torque wrench. Keep a note of the thread locker strength and the value.
- Contamination
Keep dirt out of the engine case. Clean the stator cover. Wipe magnet residue. A little grit goes a long way in a bad way.
When Should You Call a Mechanic?
Call a pro when you lack a flywheel puller. Call a pro when you do not have a shop manual. Call a pro if you see a cracked case or a torn wiring harness. If you tried and now have a stripped bolt or damaged threads this is not the time to learn tapping.
You should also call for lack of time. A shop has standard shop tools, specialized pullers, and diagnostic equipment. A mechanic does this often. The job is low‑moderate for them. You will pay labor rates for stator replacement but you get speed and a warranty for the work.
DIY vs Pro: Time and Cost Compared
Here is a side by side view. It helps you plan your day and your wallet.
Now let us talk parts. You can buy aftermarket stator quality or OEM stator vs aftermarket. OEM often costs more but fits great. Aftermarket can save cash. Watch reviews. Look for good winding insulation. Check fit of the gasket. Some brands share suppliers so ask around on forums or a local tech you trust.
How Do You Know Your Stator Is Bad?
Look for these symptoms of a bad stator:
- Battery not charging stator while you ride
- Dim lights stator problem at idle or with revs
- Difficulty starting and a weak crank
- A burning smell from stator or dark oil near the cover
- A charging system warning light on some bikes
Test it before you buy parts. Use a multimeter.
- AC output test
Unplug the stator leads. Start the bike. Measure AC voltage between stator leads at idle and with revs. Each pair should rise with rpm. No rise means a problem.
- Resistance test
With the engine off test each pair with ohm meter. Compare to the shop manual spec. Odd numbers mean continuity test stator windings failed.
- Ground fault test
Measure from any stator lead to engine case ground. You want no path. A path means a ground fault test stator fail.
- Open circuit and short tests
If a coil is open you will see infinite ohms. If coils are shorted you will see near zero. That is open circuit stator diagnosis or short circuit detection.
Do not skip the voltage regulator check. A bad Rectifier/Regulator (RR) can cook a good stator. After you replace parts do a post-replacement charging test. Confirm DC voltage at the battery around 13.5–14.5 volts when you rev.
Is It Worth Doing It Yourself?
It can be. You save on labor. You learn your bike. You fix the charging system repair difficulty fear in your head. The benefits of DIY stator repair add up. The risks are real too. A pinched wire or bad seal can cost more later.
Ask yourself:
- Do you own or can you borrow a flywheel puller and torque wrench
- Do you have time to wait for parts if you hit a snag
- Do you have a clean space and a phone with online tutorial stator replacement or a youtube guide stator repair ready
- Can you follow vehicle specific stator instructions
If you said yes to those then the easiest way to replace a stator is to plan and go slow. If not then a pro can do it fast. That is okay too.
What Else Should You Replace With the Stator?
I often replace the stator gasket and check the voltage regulator. I also test the battery health check stator. A weak battery can fry a new stator and regulator under strain. Inspect the wiring harness and each electrical connector. Clean and tighten them.
Check the flywheel for damage. Look for loose magnets. Clean off magnet residue and dust. Some bikes ask you to remove an engine mount removal for stator or a starter motor interference stator piece. Replace any worn seal while you are there. On some bikes you may pull the oil filter too. Follow your book.
If you build or source parts pay attention to the core. Better stator core lamination makes better output and heat control. If you care about the source I suggest reading about stator core lamination. Good laminations mean less eddy loss which means cooler windings and longer life. That is how you get a charging system that lasts.
Conclusion: Is Stator Replacement For You?
You asked, how hard is it to replace a stator. Here is my answer. It is a moderate job for most motorcycles, ATVs, and dirt bike models. You can do it if you can follow steps and use a multimeter and a torque wrench. You will face parts like the flywheel, the rotor, the Rectifier/Regulator (RR), and a stator cover. You will handle engine oil and maybe coolant. You will use thread locker and set proper torque specifications stator cover.
If the time commitment and tools scare you then call a mechanic. There is no shame in that. You will pay labor rates and be done in a day. If you love learning and want to save money then grab your shop manual and try it. Either way you now know the score.
Optional FAQ
Q: How long does a stator last?
A: It varies. Heat kills stators. Good winding insulation and a clean charging system help. Many last years. Overheating and poor RR control shorten life. That is why preventative stator maintenance matters. Keep connectors clean and airflow open.
Q: What makes stator replacement difficult?
A: Hidden fasteners. Seized flywheel. Stripped bolts. Lack of a flywheel puller. Bad wiring routes. No manual. Those slow you down.
Q: Should I replace the regulator with the stator?
A: If the regulator failed or runs hot I replace it with the stator. A weak RR can burn new coils fast.
Q: Can I test the stator with the engine off?
A: Yes. Do resistance and ground tests with the ohm meter. You need the engine on for the AC voltage output test.
Q: Will I need to remove the engine?
A: No in most cases. Some bikes ask you to shift the engine or remove an engine mount. Read the shop manual.
References
- Manufacturer Service Manuals: Honda, Yamaha, Kawasaki, Suzuki, KTM, BMW Motorrad, Harley‑Davidson
- Haynes Manual: Motorcycle Electrical Techbook
- Clymer Service Manuals for popular motorcycles and ATVs
- Basic multimeter use: Fluke Application Notes for AC and DC voltage, resistance, and continuity
Key Takeaways
- The job is moderate. Plan for 2–6 hours if DIY and 1–4 hours for a shop.
- Must‑have tools: multimeter, torque wrench, and the correct flywheel puller.
- Follow your shop manual for vehicle specific steps and torque specs.
- Test first. Confirm with AC voltage, continuity, ground fault, and open circuit checks.
- Replace the stator gasket and check the Rectifier/Regulator (RR) and battery.
- Keep it clean. Avoid contamination. Use thread locker and the right RTV use.
- Quality cores matter. If you build or source, look for robust motor core laminations and precise stator core lamination.
- Remember the pair. The rotor and stator work together. Learn about rotor core laminations and magnets to understand wear.
- Choose parts wisely. OEM fits well. Good aftermarket can save money.
- When in doubt call a mechanic so you get it done right the first time.