How a Simple Electric Motor Works: An Easy-to-Understand Guide
Table of Contents
- Introduction: The Everyday Magic I Still Love
- What Is a Simple Electric Motor?
- The Essential Building Blocks: Parts of a Simple DC Motor
- Stator: The Stationary Magnetic Field
- Rotor or Armature: The Spinning Heart
- Commutator: The Switch That Keeps the Spin Going
- Brushes: The Electrical Bridge
- Power Source and Simple Circuit
- The Science Behind the Spin: Step by Step
- Step 1: Current Enters the Coil
- Step 2: Electromagnetism in Action
- Step 3: Magnetic Fields Interact and Create Force
- Step 4: Torque Turns into Rotation
- Step 5: The Commutator Reverses Polarity at the Right Moment
- The Physics in Plain English
- Magnetic Field, Current, and Force
- Torque, Speed, and Efficiency Basics
- Back EMF and Why Motors Don’t Spin Forever for Free
- Analogies That Made It Click for Me
- Timing a Push on a Swing
- Two Magnets That Keep Trying to Line Up
- Building a Simple DIY Motor: What Worked for Me
- Materials
- Steps
- Safety and Troubleshooting Tips
- Everyday Applications: Where Simple Motors Show Up
- Simple Motor Types and Variations
- Brushed DC Motors
- Brushless DC Motors (for context)
- AC vs DC in Plain Terms
- Motor vs Generator: Same Physics Different Direction
- Common Questions I Hear All the Time
- Conclusion: Why Understanding a Simple Motor Pays Off
Introduction: The Everyday Magic I Still Love
I remember the first time I bent two paper clips into makeshift brush holders and watched a copper coil spin under a small magnet. The coil lurched. It twitched again. Then it caught a rhythm and whirred. That simple DIY motor taught me something powerful. Electricity can turn into motion with just a coil, a magnet, and a clever way to flip current. I’ve built and torn down many motors since then yet that first spin still feels like a magic trick I never get tired of explaining.
What Is a Simple Electric Motor?
Here’s the short answer I give students. A simple electric motor converts electrical energy into mechanical energy. It does that by sending current through a coil inside a magnetic field. The coil becomes an electromagnet. The magnetic field pushes on the current-carrying wires. That push produces a rotational force called torque. In everyday language the motor turns electricity into spin.
When people say “simple motor” they almost always mean a brushed DC motor. DC stands for direct current. Batteries supply DC. These motors use permanent magnets for the stator and a spinning coil for the rotor or armature. A commutator and brushes flip the current direction in the coil at just the right time so the rotor keeps turning in the same direction. That’s the whole idea. Clean. Elegant. Practical.
The Essential Building Blocks: Parts of a Simple DC Motor
Stator: The Stationary Magnetic Field
- Permanent magnets: The stator provides a constant magnetic field. Many small motors use strong neodymium or ferrite permanent magnets. They set up a North and South field. That field is the stage where the action happens.
- Frame or casing: It holds everything in place and defines the air gap where the rotor spins.
- Magnetic flux: You’ll hear this phrase a lot. Flux is just the density of magnetic field lines. More flux inside the motor usually means more force on the coil.
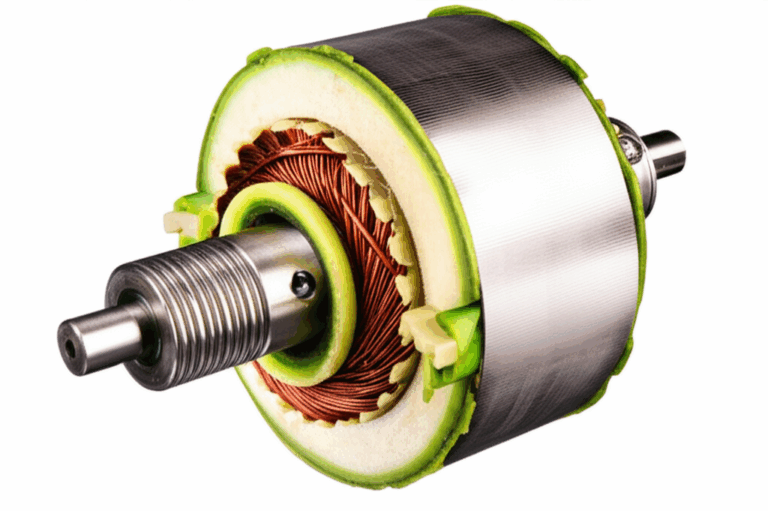
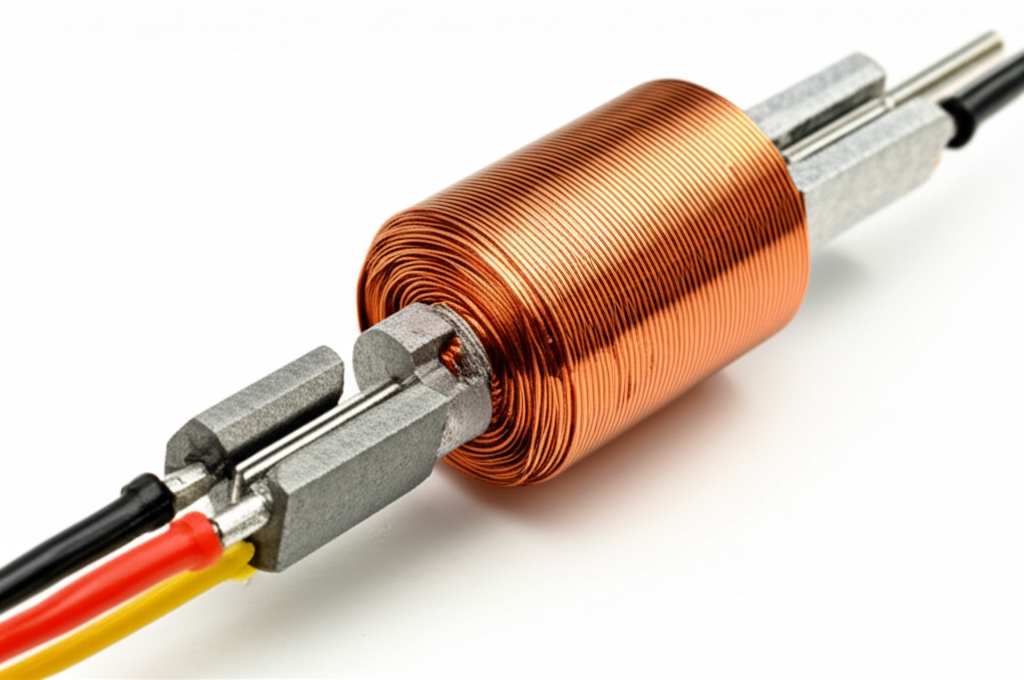
Rotor or Armature: The Spinning Heart
- Coils of copper wire: The rotor carries current. Coils increase the magnetic effect because a loop adds up the force along its length. Copper wire works well because copper has low resistance.
- Iron core: Many rotors wrap copper around a laminated iron core. Iron concentrates magnetic flux and boosts torque. Engineers stack thin steel sheets called laminations to reduce wasted energy from eddy currents. If you want a deeper look at how manufacturers handle this in real motors the pages on motor core laminations, stator core lamination, and rotor core lamination show why those thin electrical steels matter.
- Shaft: The shaft connects the rotor to the outside world. That’s where mechanical work comes out. Fans spin. Gears turn. Wheels move.
Commutator: The Switch That Keeps the Spin Going
- Split ring: The commutator is a ring split into segments and attached to the rotor. Brushes press against it. As the rotor turns the commutator reverses the direction of current in the coil every half turn. That keeps the coil’s magnetic poles flipping at the right time.
- Why timing matters: Without the commutator the rotor would line up with the stator magnets and stop. You need the flip exactly when the coil passes the neutral point so the magnetic forces keep producing torque in one direction.
Brushes: The Electrical Bridge
- Carbon brushes: Brushes ride on the commutator and deliver current into the spinning coil. Carbon works well because it conducts electricity and self-lubricates which reduces wear.
- Wear-and-tear: Brushes are consumable parts in brushed DC motors. They wear out. That’s why brush replacement is normal maintenance for old tools.
Power Source and Simple Circuit
- Battery or DC supply: A battery makes this easy. Voltage pushes current through the circuit. Current through the coil creates the electromagnet effect.
- Connections: The circuit runs power source -> brush -> commutator segment -> coil -> another commutator segment -> second brush -> back to the power source.
- Polarity: Reverse the battery and the motor spins the other way. That’s a neat classroom demo that shows how current direction controls rotation.
The Science Behind the Spin: Step by Step
Step 1: Current Enters the Coil
A DC power source pushes current through the brushes into the commutator. The commutator sends the current into the rotor winding. Now the coil carries current and sits inside the stator’s magnetic field.
Step 2: Electromagnetism in Action
When current flows in the wire it creates a magnetic field of its own. Wrap that wire into a coil and the field adds up into a North and South pole. This is the coil acting as an electromagnet. The direction of current sets which end becomes North and which end becomes South.
Step 3: Magnetic Fields Interact and Create Force
The coil’s temporary magnetic field interacts with the permanent magnet’s field. Opposite poles attract. Like poles repel. More precisely the current-carrying conductors experience force in a magnetic field. This is the Lorentz force. If the wire sits perpendicular to the magnetic field lines the force on a straight segment is roughly F = B I L where B is magnetic field strength in Tesla, I is current in Amps, and L is the length of wire in the field. That force acts in opposite directions on opposite sides of the coil which creates a twisting effect.
Step 4: Torque Turns into Rotation
That twisting effect is torque. Torque is the rotational form of force. Enough torque and the armature starts to rotate. Now the shaft spins and you’ve got mechanical output.
Step 5: The Commutator Reverses Polarity at the Right Moment
As the coil rotates past the midpoint the brushes switch contact to the next commutator segment. That flips the current direction in the coil relative to the stator magnets. The flip happens just as the torque would otherwise change direction. The timing keeps the torque pushing the rotor forward instead of letting it stall or reverse. That’s the secret to continuous rotation in a brushed DC motor.
The Physics in Plain English
Magnetic Field, Current, and Force
What still impresses me is how little you need to make motion. A magnetic field. A conductor. Current. That’s it. Ampère and Faraday laid the groundwork for this in the early 1800s. Ørsted linked electricity and magnetism. Faraday showed a wire could move around a magnet when current flows. Michael Faraday’s first motor looked crude by today’s standards yet the core idea hasn’t changed.
If you want an easy memory aid use Fleming’s Left-Hand Rule. Point your index finger along the magnetic field. Point your middle finger in the current direction. Your thumb shows the force direction. Do that on both sides of the coil and you’ll see why a loop twists rather than just slides.
Torque, Speed, and Efficiency Basics
- Torque vs current: For a simple DC motor torque roughly scales with current. More current creates a stronger electromagnet which boosts force and torque.
- Speed vs voltage: Speed rises with voltage up to the motor’s limits. Higher voltage pushes more current at a given load which increases back EMF and speed until forces balance.
- Efficiency: Small brushed DC motors often reach 50 to 85 percent efficiency. Larger or better optimized designs do better. Losses come from brush friction, air drag, copper resistance, and magnetic losses in the iron. Those magnetic losses drop when you use thin electrical steel laminations in the core because laminations reduce eddy currents that turn energy into heat.
Back EMF and Why Motors Don’t Spin Forever for Free
As the rotor spins it cuts through magnetic field lines. Moving conductors in a magnetic field create voltage. That induced voltage opposes the supply voltage. We call it back EMF. At higher speeds back EMF rises which reduces the net voltage across the coil and limits current. That’s why a motor running without load draws less current than a motor under heavy load. Back EMF is also why speed stabilizes rather than shooting off to infinity.
Analogies That Made It Click for Me
Timing a Push on a Swing
Imagine a swing set. You push at the right time and the swing goes higher. Push at the wrong time and you fight the motion. The commutator acts like a perfectly timed push. It flips current right when the coil passes the neutral zone which keeps the torque in the forward direction.
Two Magnets That Keep Trying to Line Up
Hold two bar magnets near each other. They twist to align North to South. Now imagine you keep flipping one magnet just as it lines up. It will never settle. It keeps twisting. That’s a brushed motor. The coil is the flipping magnet. The commutator does the flipping.
Building a Simple DIY Motor: What Worked for Me
I’ve built this with kids, with new engineers, and with friends who just wanted to see electricity turn into motion. The build teaches the fundamentals better than any lecture. Here’s the version that works reliably.
Materials
- 1 AA battery or a DC power supply around 1.5 to 3 V
- A small neodymium magnet or a strong ferrite magnet
- 30 to 28 AWG enamel-coated copper wire
- Two large paper clips
- Electrical tape or a rubber band
- Sandpaper or a knife to scrape wire insulation
- A couple of rubber bands for mounting
- Optional: a base made from a cardboard box or wood
Steps
1) Wind the coil. Wrap the copper wire around a marker 15 to 20 times. Slide it off and wrap the ends around the coil a few times to hold its shape. Leave two straight tails about 2 to 3 cm long sticking out opposite each other.
2) Make the commutator surfaces. Scrape insulation off only the top half of each tail. That means when the coil spins one half of each tail conducts and the other half doesn’t. This half-scrape creates a crude commutator that cuts current at the right time and reverses the direction relative to the fixed magnet.
3) Build the supports. Bend the paper clips into “U” shapes. These will be the brushes and bearings. Tape or rubber band the paper clips onto the battery so the coil can rest in the clip ears. The coil should hang centered above the magnet.
4) Place the magnet. Put the magnet under the coil. North or South up doesn’t matter for a first try. You’ll see which way it wants to spin.
5) Assemble the circuit. Touch each paper clip to the battery terminals. One clip to the positive end. One to the negative end. The clips now serve as brushes and supports. The scraped faces of the coil tails will conduct when they face down toward the brushes.
6) Nudge and watch. Give the coil a gentle flick. The coil should begin to spin. If it only wiggles try flipping the magnet, swapping battery polarity, or adjusting the scraped area so it conducts only half a turn.
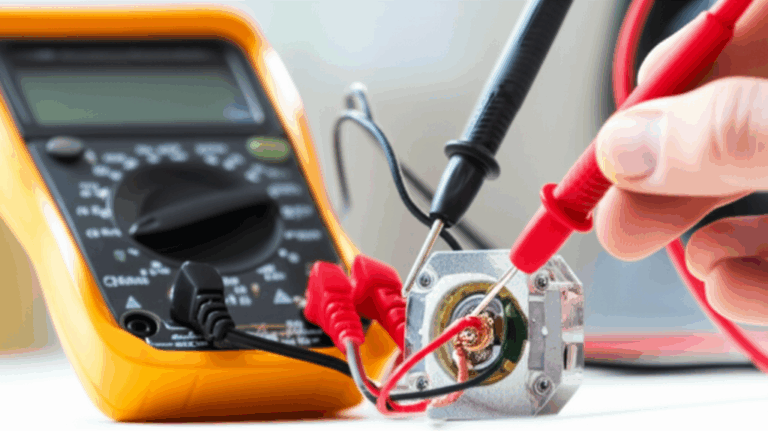
Safety and Troubleshooting Tips
- Don’t let the wire heat up. Thin wire and a strong battery can get hot. If the coil smokes you’ve got too much current or a short.
- Balance matters. The coil should spin freely and stay centered. If it wobbles bend the tails or the paper clips for better alignment.
- Scrape carefully. You want insulation removed from only half of each tail’s circumference. That half-on half-off behavior creates the switching action.
- Stronger magnet equals more torque. Too strong and friction issues show up. It’s a balancing act.
- Clean contacts. Oxidation on paper clips adds resistance. A quick sand helps.
Everyday Applications: Where Simple Motors Show Up
Once you see the pattern you’ll spot simple motors everywhere. Toy cars and trains use tiny brushed DC motors. Small fans in computers and game consoles often use brushless DC motors yet the physics is the same. Electric toothbrushes, shavers, and pumps rely on compact motors to convert electrical energy into mechanical energy. Open your car’s door window and a small DC motor drives a lift mechanism. Use a cordless drill and you’ll feel a powerful motor turning electrical power into torque at the chuck. From washing machines to electric pumps, from computer fans to robot kits, motors quietly turn current into useful work all day long.
Simple Motor Types and Variations
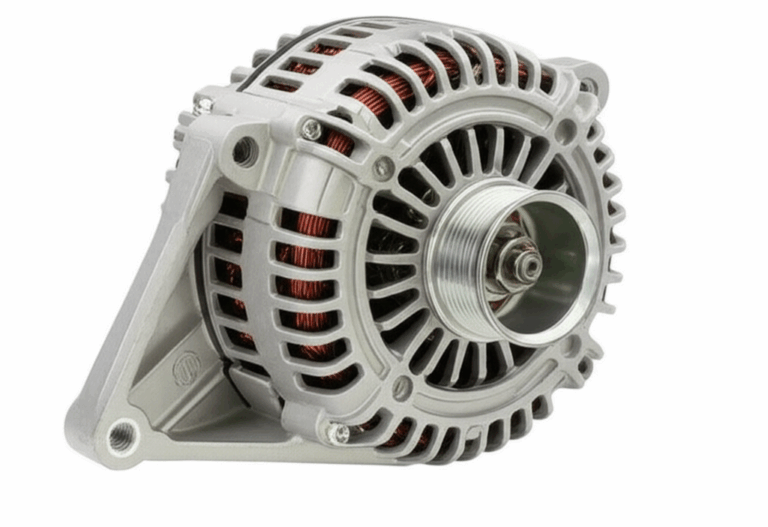
Brushed DC Motors
This is the “simple motor” I’ve described so far. It uses brushes and a commutator. It’s easy to understand and easy to drive. You change voltage and you change speed. You increase current and you increase torque. Brushes wear though. The commutator needs clean contact. That’s the trade-off for simplicity.
Brushless DC Motors (for context)
Brushless DC motors remove the commutator and brushes. Electronics replace them. The stator has multiple windings. The rotor holds permanent magnets. A controller switches the windings in sequence so the rotor follows the rotating magnetic field. That design cuts friction and improves efficiency. If you’re curious about the stator structure and materials used for these you might enjoy reading about a bldc stator core although our focus stays on the brushed DC motor.
AC vs DC in Plain Terms
Direct current flows one way. Alternating current reverses direction many times per second. Simple DIY motors use DC because you can run them from a battery and because the commutator gives you automatic polarity switching in the rotor. AC induction motors don’t need brushes because the alternating stator field induces current in the rotor. That’s a different animal yet the core idea of magnetic fields pushing on current remains unchanged.
Motor vs Generator: Same Physics Different Direction
Flip the story and you get a generator. Spin a coil in a magnetic field and you get electricity out. Faraday’s law sits at the heart of both. Motors turn electrical energy into mechanical energy. Generators turn mechanical energy into electrical energy. Change the direction of energy conversion and you change the name.
Common Questions I Hear All the Time
How does a motor create torque?
Current in the coil interacts with the stator’s magnetic field. Each side of the coil feels a force in opposite directions. That pair of forces creates a turning effect called torque. More current and stronger magnetic field equals more torque. Increase the coil length in the field and force rises as well.
Why doesn’t the rotor just stop at alignment?
It would if current never flipped. The commutator reverses current every half turn. The flip happens when torque would switch direction. That timing keeps a steady push in one direction.
What determines motor speed?
Voltage. Load. Magnetic field strength. Friction. Speed rises with voltage because current rises until back EMF balances the system. Heavier loads slow the motor because torque demand rises and speed settles at a point where torque equals load.
What is the difference between motor and engine?
People use them loosely. Technically an engine converts chemical energy into mechanical energy by burning fuel. A motor converts electrical energy into mechanical energy. That’s why an electric car uses motors and a gasoline car uses engines. Hybrids use both.
What is magnetic flux and why should I care?
Flux is the measure of magnetic field through a surface. Pack more flux into the motor and you get more force for a given current. That’s why designers care about core materials, magnet types, and air gap size. Laminated iron cores keep flux where it does the most good and reduce wasted heat.
What’s with laminations in the core?
Solid iron would be simple yet it loses energy to eddy currents. Thin insulated steel sheets reduce those currents. The stack channels the magnetic flux while cutting losses. If you want to see how industry builds these stacks the resources on stator core lamination, rotor core lamination, and motor core laminations explain the manufacturing side with photos and specs.
How do I control speed and direction?
- Speed control basics: Change voltage for simple control. Use a pulse-width modulation (PWM) controller for better efficiency. PWM switches the voltage on and off quickly so the motor sees an effective average.
- Direction: Reverse polarity. Swap the leads and the motor turns the other way.
What causes motor heating?
Losses. Copper resistance turns current into heat. Magnetic core losses show up as eddy currents and hysteresis. Friction in brushes and bearings adds heat. Designers reduce these with better materials, good ventilation, and laminated cores. That is where high-quality electrical steel laminations earn their keep.
A Walk Through the Whole Cycle in One Breath
Power source pushes current. Brushes conduct into the commutator. Commutator feeds the rotor coil. The coil becomes an electromagnet. The stator’s magnetic field pushes on the coil. Opposite forces on opposite sides of the loop create torque. The rotor spins and does mechanical work at the shaft. The commutator flips current at the midpoint. Torque keeps pointing the same way. Back EMF rises with speed and current settles at a level that balances load and losses. Simple. Beautiful. Reliable.
Design Choices That Matter in Real Motors
In my teardown work and projects a few choices always stand out:
- Magnet type and strength: Neodymium magnets tighten the air gap and raise flux which increases torque density.
- Wire gauge and turns: Thicker wire lowers resistance and allows more current. More turns increase the magnetic field for a given current yet raise resistance. You balance torque and heating.
- Core material and laminations: High-permeability steels focus flux and improve performance. Laminations reduce eddy currents. Thin is better for high speeds and frequencies.
- Commutator segments and geometry: More segments smooth the torque ripple. Better materials reduce wear and electrical arcing.
- Brushes: Carbon composition and spring pressure change contact resistance and lifetime. Too much pressure increases friction and heat. Too little pressure increases arcing and electrical noise.
- Cooling: A fan on the rotor or vents in the frame keep the windings cool. Heat is the silent killer for insulation and magnets.
What I Watch For When Diagnosing a Simple Motor
- Does the rotor free-spin with no power? If not check bearings and alignment.
- Does it draw high current but spin slowly? Look for a shorted coil or a weak magnet.
- Does it spark heavily at the commutator? Check brush wear and spring tension. Clean the commutator. Smooth rough segments with a gentle polish.
- Does it stall under load? Measure voltage at the brushes under load. If voltage sags the supply can’t deliver enough current. If voltage holds then the motor may be undersized for the torque demand.
A Note on Diagrams and Visuals
When I teach, I sketch a side view. Two big block magnets form the stator with North on one side and South on the other. A loop sits between them on an axle. Wires run from a battery to the brushes then to a two-segment commutator. I draw the current direction on each side of the loop and mark the force directions with arrows. That picture turns a page of physics into a story your eyes can follow.
Quick Recap of Key Concepts You Can Carry Forward
- Motors convert electrical energy to mechanical energy by exploiting the force on a current-carrying conductor in a magnetic field.
- The stator’s magnetic field interacts with the rotor’s electromagnet. That interaction creates torque.
- The commutator and brushes reverse current each half turn which keeps rotation going in the same direction.
- Voltage tends to control speed. Current tends to control torque. Back EMF limits current as speed rises.
- Laminated iron cores and good materials reduce losses and raise efficiency.
Where This Knowledge Shows Up Next
Understand a brushed DC motor and the world of motors opens up. You’ll understand why fans ramp up smoothly with PWM. You’ll see how a brushless controller replaces a physical commutator with timed electronic switching. You’ll grasp why motor and generator are two sides of the same coin. Better yet you’ll have the confidence to fix a toy car, to build a science fair project, or to spec the right motor for a small robot.
Conclusion: Why Understanding a Simple Motor Pays Off
I love simple motors because they reveal big physics with small parts. A battery. A coil. A magnet. A smart way to flip current. That’s it. From there you can explore torque generation, magnetic flux, polarity switching, and efficiency. You can trace energy conversion from electrical input to mechanical output and see every step. You’ll notice laminations in real cores and understand why manufacturers stack thin sheets instead of using solid iron. You’ll catch why brushes wear and why back EMF makes speed self-limiting. Most of all you’ll turn a piece of everyday “magic” into a clear mental model you can use anywhere electricity meets motion.
If you want to go deeper into how the core materials inside real motors cut losses and boost performance the manufacturing overviews for stator core lamination, rotor core lamination, motor core laminations, and electrical steel laminations are worth a look. They connect the classroom model to the production floor which is where your simple motor turns into the workhorse you rely on every day.