Does a Motorcycle Stator Charge the Battery? Understanding Your Bike’s Electrical Lifeline
Table of Contents
- Introduction: The stator’s crucial role in your bike’s power
- How a motorcycle stator works to generate power
- What a stator is and where it sits
- Electromagnetic induction explained the simple way
- Why AC isn’t enough for your battery
- The essential partnership: stator, rectifier, and regulator
- The rectifier: turning AC into DC
- The regulator: controlling charging voltage
- The battery: storage for starting and stability
- Symptoms of a failing stator or charging system
- Battery-related symptoms
- Performance changes you can feel
- Visual and smell checks that tell the story
- Diagnosing your motorcycle’s charging system
- What you need: multimeter and basic tools
- Step 1: battery health checks
- Step 2: charging voltage at the battery
- Step 3: stator AC output test
- Step 4: stator resistance and ground tests
- Step 5: regulator/rectifier checks
- Extras: ripple, voltage drop, and parasitic draw
- Real-world examples from my bench
- Maintaining your charging system for longevity
- Specs, numbers, and what they mean (reference table)
- Final thoughts: ride farther with a healthy charging system
Introduction: The stator’s crucial role in your bike’s power
I’ll answer the big question right off the line. Yes, the stator plays a key role in charging your motorcycle battery. It generates the electrical energy that the regulator/rectifier converts and controls so your battery stays topped up while you ride. When the stator or its partners stumble your battery pays the price. I’ve watched great bikes limp home because the charging system couldn’t keep up.
Why does this matter to you? Because a weak charging system doesn’t just leave you with a dead battery. It can cause flickering lights, a weak spark, random engine stalling, and a lot of head scratching. Once you understand how the motorcycle charging system works, you’ll spot problems faster and fix them with confidence. That’s the goal here. I’ll walk you through the stator, the regulator rectifier, the testing process, and the common failure points I see over and over.
How a motorcycle stator works to generate power
What a stator is and where it sits
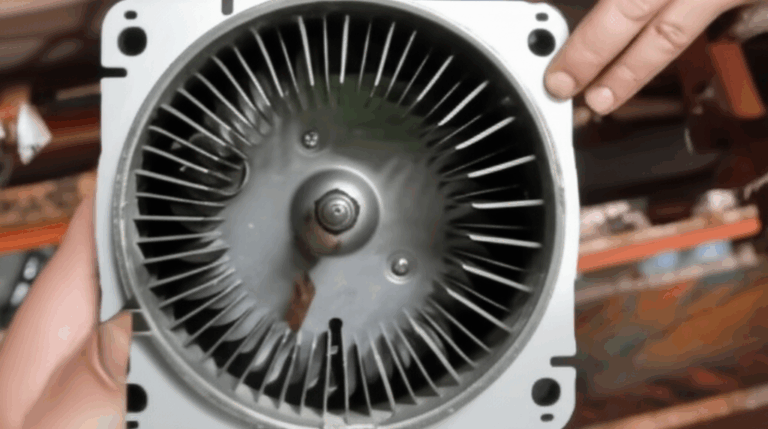
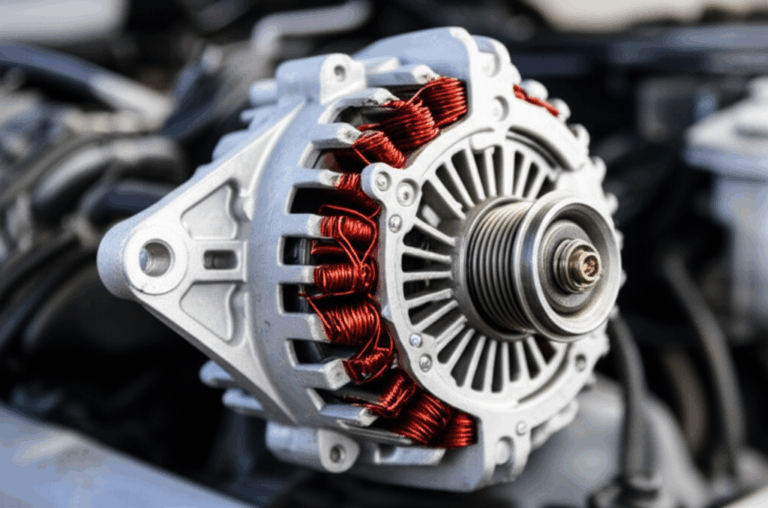
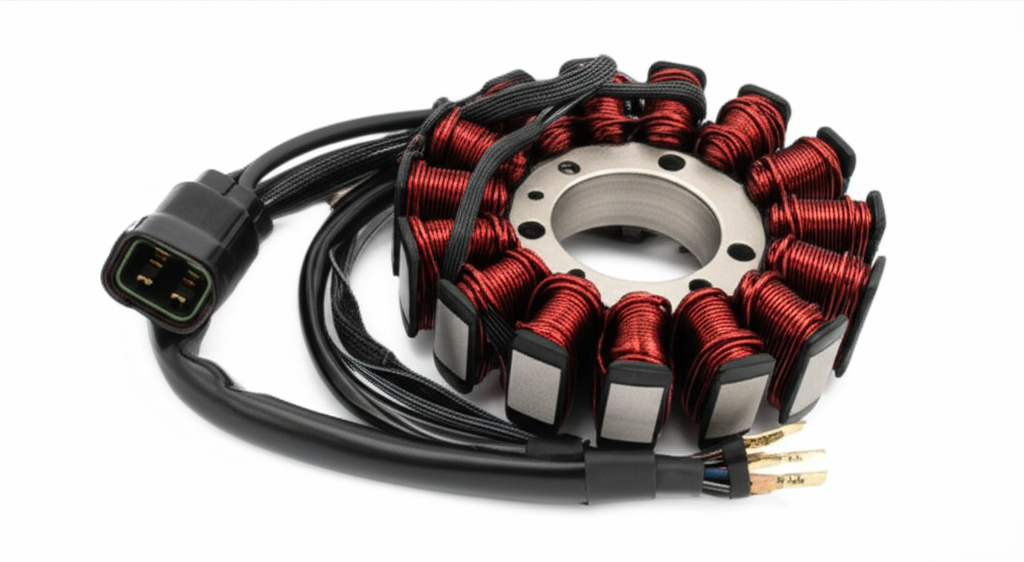
The stator is a set of coil windings mounted around the engine crankshaft. It’s stationary, which is why we call it a stator. It pairs with the flywheel or rotor that carries permanent magnets. As the engine spins, those magnets sweep past the stator coil windings. That sweeping magnetic field induces alternating current in the coils. Your service manual might call this assembly a permanent magnet alternator. Same idea.
Some bikes use a single-phase stator. Many modern bikes run a three-phase stator for more output and smoother current. You’ll see three yellow wires coming out of the stator on most three-phase setups. Those wires go to the regulator/rectifier.
Electromagnetic induction explained the simple way
Picture a bicycle dynamo that powers a light when the wheel spins. The faster it spins the brighter the light. Your motorcycle stator works on the same physics. The flywheel’s permanent magnets create a changing magnetic field as they pass the stationary coils. That changing field makes electrons move. That movement is your AC voltage. Engine RPM matters. Higher RPM means more stator output. That’s why the charging voltage you measure at the battery rises when you crack the throttle.
Why AC isn’t enough for your battery
Your battery needs direct current. The stator produces alternating current. So the bike uses a rectifier to convert AC to DC. That DC gets regulated to a safe voltage for the battery and the rest of the electrical system. Without rectification and regulation you’d either undercharge or fry the battery. I’ve seen both. Neither ends well.
The essential partnership: stator, rectifier, and regulator
The rectifier: turning AC into DC
Inside the regulator/rectifier (R/R) you’ll find a rectifier bridge. It’s a set of diodes that allow current to flow one way. The diodes clip the negative part of the AC wave and stack the positive part so the output becomes DC. If a rectifier diode fails, the system undercharges or the output turns noisy with AC ripple. That ripple shows up as flickering lights or an erratic dash on some bikes.
The regulator: controlling charging voltage
The regulator controls charging voltage so your battery and electronics stay safe. Most factory bikes use a shunt regulator that bleeds off extra stator output as heat once the battery reaches target voltage. Some aftermarket upgrades use a MOSFET-based shunt regulator. These run cooler and hold voltage steadier. A series regulator is another option that limits current from the stator rather than shunting it. Series units reduce stator heat at cruise. I’ve installed a few Shindengen MOSFET R/R units on older bikes with good results. The key is the same. You want charging voltage around 13.5 to 14.5 volts at the battery with the engine running.
The battery: storage for starting and stability
Your motorcycle battery stores energy to crank the starter motor. It also smooths voltage and supports the electrical load at idle when stator output is lower. A healthy charging system keeps the battery full. A weak system forces the battery to carry the load until it goes flat. Lead-acid, AGM, gel, and lithium-ion batteries all live in this world yet they prefer slightly different charge profiles. Lithium-ion batteries in particular want tight regulation. Overcharging can end their day in a hurry.
Symptoms of a failing stator or charging system
Battery-related symptoms
When the charging system underperforms you feel it at start-up first.
- The battery feels weak. The starter motor cranks slowly or clicks.
- The bike starts after a ride, then won’t restart after a short stop. Classic undercharging.
- You need a jump or the battery tender more often than before.
- The battery tests fine off the bike yet dies in service. Charging system issues can mask as a bad battery.
Performance changes you can feel
Charging problems don’t stop at the battery.
- Headlights and dash lights dim or flicker at idle. They brighten when you rev the engine. That often screams weak charging voltage.
- The engine may misfire at low RPM. A weak spark shows up under load or at idle first.
- The bike stalls at lights. You pull in the clutch and the dash resets. Not fun in traffic.
- Heated grips or added lights push the system over the edge. Electrical load matters.
Visual and smell checks that tell the story
Sometimes your nose and eyes do the diagnosis.
- Burnt smell near the stator cover or regulator. Heat kills insulation fast.
- Discolored or melted stator connector. The classic three-yellow-wire block loves to cook itself.
- R/R heat sink scorching hot at idle. Some heat is normal. It shouldn’t be a branding iron.
- Oil darkened around the stator plug on the engine case. Heat and vibration don’t help seals.
Diagnosing your motorcycle’s charging system
What you need: multimeter and basic tools
A good multimeter, a test light, basic sockets, and your service manual will take you far. I also keep a load tester for batteries, dielectric grease for connectors, and a terminal cleaner. Cable ties help tidy things as you go. If you have an oscilloscope you can do a ripple test. Most home mechanics don’t, so I’ll show multimeter methods that get you 90% there.
Step 1: battery health checks
Start simple. Check battery static voltage with the engine off.
- 12.6 to 12.8 V on a lead-acid battery means fully charged.
- 12.4 V shows partial discharge. Charge it before you test the bike.
- 12.0 V or less suggests deep discharge or a failing battery.
If you can, do a load test. A weak battery can mimic a charging issue. Don’t skip this step. It saves time and parts.
Step 2: charging voltage at the battery
Fire the bike up. Measure DC voltage right at the battery terminals.
- At idle you might see 13.0 to 13.5 V depending on the bike.
- At 2,000 to 5,000 RPM you should see 13.5 to 14.5 V on most systems.
- Below 13.0 V at 3,000 RPM means undercharging. Think stator or R/R.
- Above 15.0 V means overcharging. The regulator is suspect.
Test lights and accessories on. Watch the numbers. Charging current rises with load. A healthy system holds voltage under reasonable load. If voltage sags with the high beam on or the fan cycling, you found a clue.
Step 3: stator AC output test
If the battery and charging voltage fail the first tests, isolate the stator.
- Unplug the stator from the regulator/rectifier. You should see two or three stator leads depending on single-phase or three-phase.
- Set your meter to AC volts. Measure phase-to-phase on a three-phase stator. A-B, B-C, and C-A.
- At idle you might see 20 to 30 VAC per phase. At 4,000 RPM you might see 50 to 70 VAC or more. The exact spec lives in your service manual. What you want is even output across phases and a steady rise with RPM.
- If one phase reads low yet the others are strong, the stator has a short or an open in that winding.
- If there’s no output, look for an open circuit or physical damage.
Step 4: stator resistance and ground tests
Shut the engine off. Let’s test resistance.
- Set your meter to ohms. Measure resistance between phases on a three-phase stator. You’ll typically read 0.1 to 1.0 ohm. All phases should match closely.
- Now test each phase to ground. You want infinite resistance. Any continuity to ground means a ground fault in the stator. That’s a common failure.
- Wiggle the stator connector while you measure. Intermittent opens or shorts often live in those heat-baked plugs.
Step 5: regulator/rectifier checks
If the stator checks out, move to the R/R.
- With the R/R unplugged, use the diode test function on your meter. Test each diode path per your service manual’s chart. You should see a forward voltage drop in one direction and open in the other.
- Reconnect and measure DC output at the battery again. If stator AC looks good yet DC output stays low or climbs too high, the regulator/rectifier has failed.
- Consider a MOSFET regulator rectifier upgrade if your bike uses an old shunt unit and you ride in heat. I’ve replaced failed shunt regulators with Shindengen MOSFET R/R units on a few Hondas and Suzukis with very stable results.
Extras: ripple, voltage drop, and parasitic draw
You can go deeper without fancy tools.
- Ripple test: Set your meter to AC volts and measure across the battery with the engine running. You want minimal AC ripple. A reading above a few hundred millivolts AC hints at a bad rectifier.
- Voltage drop test: Measure from the battery positive to the R/R positive output with the engine running. You want a minimal drop. Do the same from battery negative to the R/R ground. A big drop points to dirty connectors or a weak ground wire.
- Parasitic draw: With the engine off, measure current draw at the battery with a meter in series. Most bikes should sit near zero or a tiny draw for clocks and ECUs. A high draw drains the battery overnight. Track it down before you blame the stator.
Real-world examples from my bench
A Harley stator that ate itself
A friend brought me his Harley-Davidson that kept killing batteries. The charging voltage sat at 12.4 V at 3,000 RPM. Bad news. We unplugged the stator and measured AC output. One phase read 9 VAC at 3,000 RPM while the others jumped to 45 VAC. Resistance between phases looked odd too. When we pulled the stator cover we found heat damage and darkened windings. The open circuit on one phase told the tale.
We replaced the stator with an OEM unit and swapped the cooked connector. I used dielectric grease on the new terminals and secured the harness with cable ties to stop vibration chafing. Charging voltage returned to 14.2 V hot. That bike hasn’t needed a jump since.
A sportbike saved by a MOSFET R/R
A Yamaha owner complained about flickering lights at idle and a dash that reset during city rides. The stator’s AC voltage looked great. Resistance matched spec. The DC voltage at the battery bounced between 12.8 and 15.2 V as the fan cycled. That pointed straight at the regulator. We installed a MOSFET R/R mounted in a spot with better airflow. After the swap the charging voltage held 14.1 V at 3,500 RPM with the high beam and fan on. Smooth as butter. No more flicker.
A “bad battery” that wasn’t
A commuter bike landed on my stand with a “dead battery” complaint. The owner kept it on a battery tender and still needed jumps. Battery tested fine after a charge. With the engine running at 3,000 RPM the charging voltage sat at 12.9 V with heated grips on low. He didn’t know the grips were wired straight to the battery without a relay. They stayed on with the ignition off. Parasitic draw. We rewired the grips to an ignition-switched relay and cleaned the ground points. The charging system delivered 14.4 V after that and the battery stayed happy.
Maintaining your charging system for longevity
I treat the charging system like I treat tires. It carries the whole ride. A little care goes a long way.
- Check the battery often. Measure static voltage every few weeks if the bike sits. Keep lead-acid electrolyte topped up if your battery isn’t sealed. Replace aging batteries before they strand you.
- Inspect the wiring harness. Look for heat damage at the stator connector and the R/R plugs. Clean terminals with a terminal cleaner and protect them with dielectric grease. Poor connections create heat and drops in charging voltage.
- Keep the regulator/rectifier cool. The heat sink needs airflow. Don’t bury it behind bodywork or a tool bag. If your OEM spot runs hot consider relocating it.
- Avoid overloading the system. Accessories like heated gear, extra lights, and phone chargers add electrical load. Know your charging current limits. If the bike undercharges with everything on, reduce the load or upgrade components.
- Follow the service manual. Every model has stator output specs, resistance specs, and diagnostic flowcharts that save time. Yamaha, Honda, Kawasaki, Suzuki, and Harley-Davidson manuals all spell out testing steps that mirror what I’ve shared here.
A quick word on construction quality
Heat and vibration attack stator insulation first. Quality coil windings and tight lamination stacks help the stator shed heat. I’ve noticed that the quality of the stator core lamination matters for durability because better laminations reduce eddy current losses and keep temperatures in check. The same goes for the rotor core lamination under the flywheel. If you’re deep into a rebuild or you’re sourcing high-performance parts, pay attention to the materials and the lamination design. Good motor core laminations and the grade of electrical steel laminations make a real difference in charging system efficiency and longevity.
Specs, numbers, and what they mean (reference table)
Here are the numbers I use on most jobs. Always check your service manual for your exact motorcycle. Stator output varies a lot by engine and alternator design.
| Metric / Component | Typical Value / Range | What it means | If it’s off |
|---|---|---|---|
| Battery static voltage (engine off) | 12.6 to 12.8 V | Healthy, fully charged lead-acid battery | Below 12.4 V shows discharge. Below 12.0 V hints at deep discharge or failure |
| Charging voltage (engine running 2,000 to 5,000 RPM) | 13.5 to 14.8 V DC | Normal regulated output at the battery | Below 13.0 V means undercharging. Above 15.0 V means overcharging |
| Stator AC output (unplugged from R/R) | 20 to 70 VAC per phase depending on RPM | Measure phase-to-phase on a three-phase stator | Low output on one phase points to a short or open. No output suggests an open winding |
| Stator winding resistance | 0.1 to 1.0 ohm per phase | All phases should match closely | High resistance means an open. Very low or uneven means a short |
| Stator to ground test | Infinite resistance | No continuity to ground allowed | Any continuity shows a ground fault |
| R/R diode test | Forward drop one way, open the other | Use meter diode function per manual | Failed diodes cause undercharging or AC ripple |
| Typical stator lifespan | 20,000 to 60,000+ miles | Wide range due to heat and use | High heat and sustained high RPM shorten life |
| Parts cost (stator) | $50 to $400+ | OEM costs more. Aftermarket varies | Consider warranty and known quality |
| Parts cost (R/R) | $50 to $300+ | MOSFET units cost more yet run cooler | Many riders replace stator and R/R together if unclear |
Common questions I hear while testing
- Does a motorcycle stator charge the battery at idle? Sometimes. Many bikes barely break even at idle with lights on. The system shines above 2,000 RPM.
- Can a bad regulator kill a good stator? Yes. Overheating the R/R can cook connectors and stress the stator. A shorted battery can do the same.
- Is it better to use a battery tender or ride more? Both help for different reasons. A battery tender maintains the battery when the bike sits. The charging system keeps it full while you ride. If you need a tender to survive a work week, check for parasitic draw or undercharging.
- Lead-acid or lithium-ion for motorcycles? Lead-acid and AGM tolerate heat and charging quirks better. Lithium-ion saves weight and cranks hard yet needs tight voltage regulation. Make sure your R/R and charge voltage suit the lithium pack you choose.
How to test a motorcycle stator with the engine off versus running
I follow a simple path.
- Engine off: resistance test between phases and to ground. You’re checking for open circuits, short circuits, and ground faults.
- Engine running: AC voltage test from the stator unplugged. Then DC charging voltage at the battery with the stator plugged in. You’re checking for target voltage, steady output, and how it responds to RPM and load.
- If either set of tests fails, you found your next step.
A quick tour of stator types and designs
Most modern motorcycles use a three-phase stator with a flywheel full of permanent magnets. Dirt bikes and small scooters sometimes use simpler single-phase setups. ATVs and UTVs live in the same family. Output specs vary. Some high-performance bikes pack stronger rotor magnets and tighter windings for more charging current at lower RPM. That helps with big headlights and fans in traffic.
Common stator failures I see
- Insulation breakdown from heat. The winding varnish turns dark and brittle. Shorts follow.
- Connector meltdown. Resistance builds at a loose terminal which creates more heat. The plug warps and the problem feeds on itself.
- Ground fault. A winding rubs or burns through to the laminated core which sends output to ground.
- Magnet issues. Rare yet real. Weak rotor magnets reduce output across all phases.
Why stators fail, and how to prevent it
Heat is the killer. Shunt regulators run the stator hard at cruise since they dump excess energy as heat. Mount the R/R in cool air. Upgrade to a MOSFET or series regulator if your bike runs hot in slow traffic. Keep connectors clean and tight. Watch for oil level issues that hurt stator cooling on bikes that run the stator in oil. Replace tired batteries that force the system to work overtime.
Wiring harness sanity checks
I always walk the harness when a bike has charging issues.
- Look for chafing points around the frame or near the engine. Vibration wears through insulation.
- Check fuses and relays for heat marks. A corroded main fuse holder can drop voltage.
- Confirm the ignition switch and ground wire connections are clean. A flaky ground can make a healthy charging system look bad.
- Use a wiring diagram from the service manual. A quick trace often reveals a missed connector or a previous owner’s “repair”.
Battery tech basics that matter here
- Lead-acid battery: familiar and forgiving. Likes 13.8 to 14.4 V charging. Hates deep discharge.
- AGM battery: sealed, handles vibration well. Similar charging needs to lead-acid.
- Gel battery: needs slightly lower voltage. Read the spec sheet.
- Lithium-ion battery motorcycle packs: lighter and punchy. They need tight voltage control and protection. Check your regulator output before you switch.
When to replace the stator versus repair
You can rewind a stator. I’ve seen good rewinds last years. The decision comes down to cost, availability, and confidence. OEM stators cost more yet often last longer. Some aftermarket units work great, others run hot. If you go aftermarket, read rider reviews for your exact model. I’ve had good luck with OEM on high-heat bikes and quality aftermarket on smaller bikes. If the R/R has failed, consider replacing it with the stator. Paired failures happen often.
What about an overcharging problem
Undercharging gets more attention yet overcharging kills batteries fast. If you see 15.5 V or higher at the battery with RPM, park the bike. The regulator failed. You can cook a lead-acid battery in minutes. A lithium pack may shut down or suffer permanent damage. Replace the R/R and confirm all grounds and connectors are tight. Then retest.
Battery tender versus the motorcycle charging system
A tender maintains the battery while the bike sits. It doesn’t fix a weak charging system. If you ride daily and still need a tender to start, your charging system isn’t doing its job. Treat a tender like a toothbrush. Handy for good hygiene. Not a substitute for a dentist.
Voltage numbers to remember
- 12.6 to 12.8 V at rest: full lead-acid battery.
- 13.5 to 14.5 V while running: healthy charging voltage.
- 20 to 70 VAC per stator phase at moderate RPM: common range for many bikes.
- 0.1 to 1.0 ohm between stator phases: typical resistance for multi-phase stators.
- Infinite resistance from stator to ground: the only acceptable reading.
Ripple and noise
You can test ripple with a multimeter set to AC volts at the battery. You want a small number. Excess ripple means the rectifier diodes are failing or a phase is weak. Ripple can cause the ECU to behave badly or the lighting to flicker. Fix the root cause. Don’t band-aid it with bulbs or a bigger battery.
Accessory planning 101
Before you add lights, GPS, heated grips, and a jacket, check your bike’s charging current capacity. The service manual lists alternator output in watts or amps. Do the math for your electrical load. Leave headroom for the fan, the ECU, the fuel pump, and the ignition system. If the system undercharges with accessories on, reduce the load or upgrade components. I’ve seen a set of high-wattage halogens be the only reason a bike wouldn’t hold 13.8 V at cruise.
Testing tips to save time
- Always charge and test the battery first.
- Clean every connector you unplug. You’re there anyway.
- Test at both idle and 3,000 to 5,000 RPM. Some faults only show with revs.
- Wiggle test the harness while watching the meter. Intermittent issues hide in motion.
- Use the service manual’s specs. Don’t guess.
In short, here’s your step-by-step checklist
1) Verify battery health with static voltage and a load test.
2) Measure DC charging voltage at the battery at idle and 3,000 to 5,000 RPM.
3) If low or high, unplug the stator and measure AC voltage per phase at idle and with RPM.
4) If AC looks off, test stator resistance phase-to-phase and to ground.
5) If AC looks good, diode-test the R/R and check grounds and voltage drop on the harness.
6) Fix connectors, replace failed parts, and retest. Ride with confidence.
Final thoughts: ride farther with a healthy charging system
So does a motorcycle stator charge the battery? It generates the power that makes charging possible, and it does that job every time you fire up the engine. The regulator/rectifier turns that raw AC into clean DC and holds the voltage steady. The battery stores energy for starting and smooths everything out. When these three work together your bike starts easy, lights stay bright, and rides feel simple again.
I’ve chased these problems across brands and miles. The pattern rarely changes. Test the battery. Measure the charging voltage. Isolate the stator. Confirm the regulator. Clean the connectors. Respect heat. Do that and you’ll solve 95% of motorcycle charging system problems without throwing parts at the wall.
Ride safe. Keep your multimeter handy. Your electrical lifeline depends on it.