Do Outboard Motors Have Alternators? Understanding Your Boat’s Charging System
Table of contents
- Direct answer and why it matters
- Alternator vs stator in outboards
- Magnetic induction in plain English
- AC to DC: rectifier and regulator
- Where the ECU/ECM fits in
- Do all outboards charge a battery
- Size matters: small vs large
- Age and technology differences
- Special cases and exceptions
- What the charging system actually powers
- Specs that matter: amps, volts, RPM, and output
- The parts that do the work
- How I test an outboard charging system step by step
- Common failures and symptoms I watch for
- Battery types and setups that pair well with outboards
- Starting vs deep cycle vs dual-purpose
- AGM, lead-acid, lithium on boats
- Dual battery systems, isolators, and switches
- Wiring basics that save headaches
- Real-world setups I’ve used
- Quick answers to frequent questions
- Final thoughts and simple next steps
Direct answer and why it matters
I’ll cut to the chase. Yes, most outboard motors have a charging system. It might be a traditional alternator on bigger modern engines. It might be a stator with a rectifier/regulator on small and mid-size motors. Either way the goal is the same. Keep your boat’s battery charged and supply 12V power for your electronics while the engine runs.
Why does this matter? Because a healthy charging system means your GPS stays on at dusk, your VHF radio has the juice to transmit, and your engine fires right up after a long drift. If you’ve ever limped back to the ramp on a near-dead battery you know how quickly “electrical theory” turns into “real-world problem.”
Alternator vs stator in outboards
I learned this the hard way when I jumped from a 9.9 hp kicker to a 115 hp main outboard. The small motor gave me a trickle at best. The bigger motor suddenly felt like a tiny power plant.
- Traditional alternator: Bigger outboards, especially 4-strokes from brands like Yamaha Outboards, Mercury Marine, Suzuki Marine, Honda Marine, and Evinrude, often use a charging system that behaves like a car alternator. Some are true alternators with a rotor spinning inside a stator plus a rectifier and voltage regulator. A few very large models even use belt-driven alternators tucked under the cowl.
- Stator with rectifier/regulator: Many small and mid-sized outboards use a flywheel magneto with a charging coil. The flywheel spins magnets past a stationary coil (the stator) to create AC. The rectifier converts that AC to DC. The regulator keeps voltage in check so you don’t cook your battery.
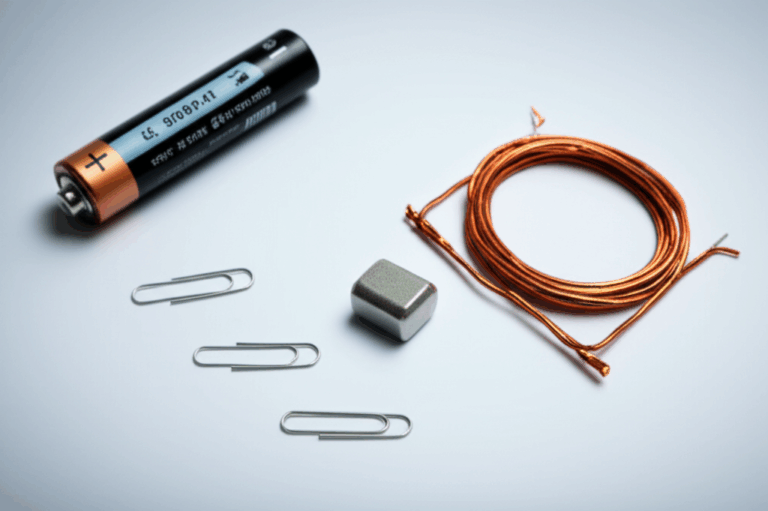
Magnetic induction in plain English
Picture a bicycle dynamo light. As the wheel spins, magnets pass coils and the light turns on. Your outboard does something similar at a higher power level. The flywheel carries magnets. The stator carries coils. Movement makes electricity. No movement means no charging which is why idle output can be low.
The core materials inside those coils matter more than most boaters realize. Performance and heat management hinge on the quality of the laminations inside the stator and rotor. Manufacturers build these from stacked electrical steel for a reason. Better laminations mean less wasted energy and less heat. If you want a deeper peek into the guts, the quality of the stator core lamination and the matching rotor core lamination directly affects efficiency and durability. It sounds like factory stuff because it is, yet it explains why some systems hold steady voltage under load and others sag.
AC to DC: rectifier and regulator
Your battery needs DC. The stator makes AC. The rectifier flips the AC into DC. Then the regulator controls the voltage and protects the system from overcharging. When that regulator fails you see ugly symptoms fast. I’ve seen 16+ volts at the battery and boiling electrolyte. That ends with a dead battery and fried electronics if you ignore it.
Where the ECU/ECM fits in
On modern outboards the ECU or ECM watches the electrical system. It can adjust idle speed, limit output during faults, and throw a warning light if the voltage climbs too high or drops too low. You don’t see it working yet you feel the benefits. Smoother voltage at low RPM and better behavior under sudden load.
Do all outboards charge a battery
Short answer. No. Not all. Many do and most mid-to-large engines do it well.
Size matters: small vs large
- Very small outboards (2.5–5 hp): Many have no charging coil at all. Some offer a very small output like 1–3 amps, often optional via a kit. It keeps a small battery from dying. It does not run a stereo and a livewell and a fish finder at once.
- Small to mid-size (8–25 hp): You’ll often see 6–15 amps from a stator with a rectifier/regulator. That’s enough for a starting battery and light electronics such as a fish finder and navigation lights. Output climbs with RPM. Idle output can be weak.
- Mid to large (30–70 hp): 12–25 amps is common. You can run more gear with less worry. Many of these newer systems hold voltage steadier at lower RPM than older two-strokes did.
- Large (75–150 hp): 20–40 amps is typical from higher-capacity stators or compact alternators. Dual battery setups make sense here. You can power GPS, VHF radio, a livewell pump, and a small stereo without sweating it too much.
- Very large (150+ hp): 35–70+ amps is not unusual. High-output models can push even higher. Center consoles with multiple screens and pumps feel right at home on engines in this league.
Age and technology differences
Older outboards often used simpler stator systems with lower output and less stable voltage. Many modern four-strokes use beefier charging coils or proper alternators that produce cleaner power at idle. Integration with the ECU helps. The result is fewer voltage dips and more predictable charging.
Special cases and exceptions
- Trolling motors draw from a separate deep cycle battery bank and they don’t get charged by your outboard. You need shore power charging, a DC-DC charger, an onboard battery charger, or solar.
- Vintage or very basic engines may have no charging output. You’ll know because your battery never rises above resting voltage even while running.
What the charging system actually powers
In my boats the outboard keeps the starting battery topped up first. Then it supports add-ons like:
- Fish finder and GPS multifunction displays
- Navigation lights
- VHF radio
- Bilge pump and livewell pump
- Small stereo or phone chargers
- Small accessories like a NMEA network or a basic AIS receiver
These items live on 12V DC power. Some draw very little at idle. Some spike when they start. A bilge pump can take a few amps when it kicks on. A VHF radio might pull 5–6 amps when you transmit. A fish finder can sip 0.5–2 amps depending on screen size and brightness. It all adds up which is why engine RPM and available charging amps matter.
Specs that matter: amps, volts, RPM, and output
You don’t need to become an electrical engineer. Focus on four things.
- Voltage at the battery: A healthy outboard will raise battery voltage over the resting value. You’ll usually see 12.6–12.8V at rest on a full lead-acid battery. You should see roughly 13.8–14.6V when the engine runs and the regulator is happy. Lithium chemistry sits a little different yet the same idea applies. Running voltage should be higher than resting voltage.
- Amps: That’s the current available for charging and loads. An outboard with 10 amps of output can charge lightly and run basic electronics. A 40 amp system can handle a lot more. Many makers publish “maximum output” at specific RPM. Expect less at idle and more as you rev up.
- RPM: More engine speed usually equals more charging current. I often bump idle up slightly when I need more output at the dock. Don’t gun the engine for power for long periods since fuel use goes up and noise becomes a problem.
- Voltage drop: Long wire runs and undersized cables create voltage drop. That makes electronics misbehave. Keep wire runs short where possible and choose proper gauge wire. Marine-grade tinned copper helps fight corrosion and keeps resistance consistent.
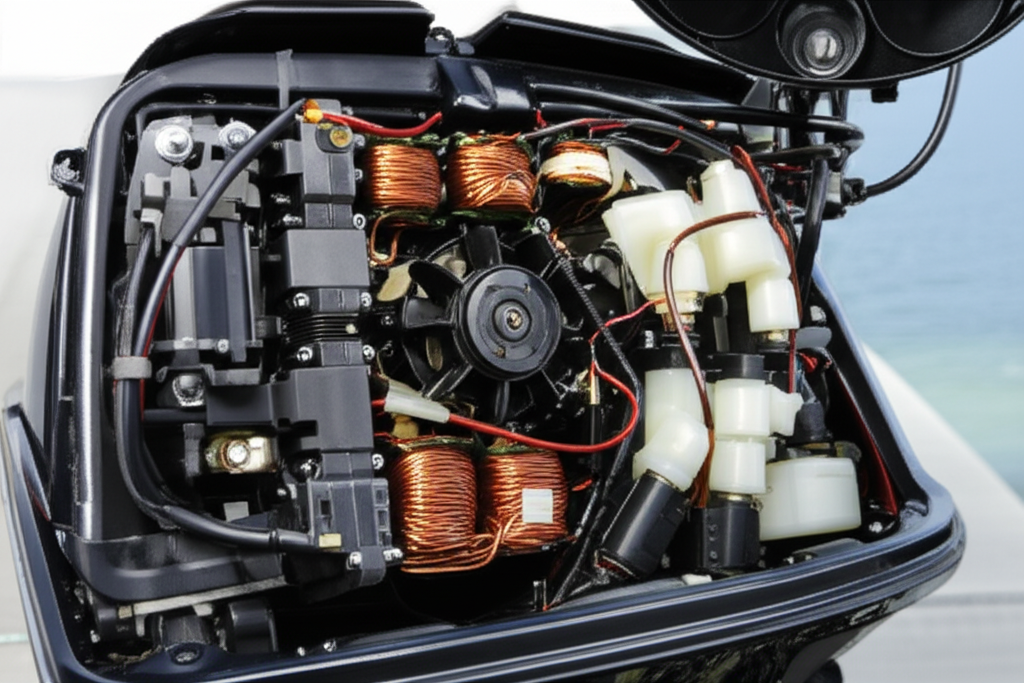
The parts that do the work
Here’s the quick tour:
- Flywheel and magnets: The spinning part that drives magnetic flux past the coils.
- Stator and charging coil: Stationary coil assembly under the flywheel. Core quality matters. The layered laminations inside the stator reduce eddy currents and heat. If you’ve ever wondered why some stators run cooler under load it comes back to materials and design. The broader world calls these motor core laminations and they’re the backbone of efficient magnetic circuits.
- Rectifier: Turns AC into DC. Older designs use simple diode packs. Many modern units combine rectifier and regulator in a single module.
- Voltage regulator: Holds voltage in the safe zone. It protects the battery and electronics from overvoltage.
- Alternator assembly on big engines: Essentially a beefed-up version of rotor and stator in a compact package. Some are belt-driven. Most live under the cowl and look nothing like a car alternator even though they share the same job.
- Wiring harness, fuses, and circuit breakers: They route power safely. They also corrode in salt. Bad grounds and loose ring terminals cause more “mystery problems” than failed parts.
- Battery: Starting battery or starting/deep-cycle combo. No battery means no stable reference for voltage regulation. Do not run the engine with the battery switch OFF unless the manual explicitly allows it.
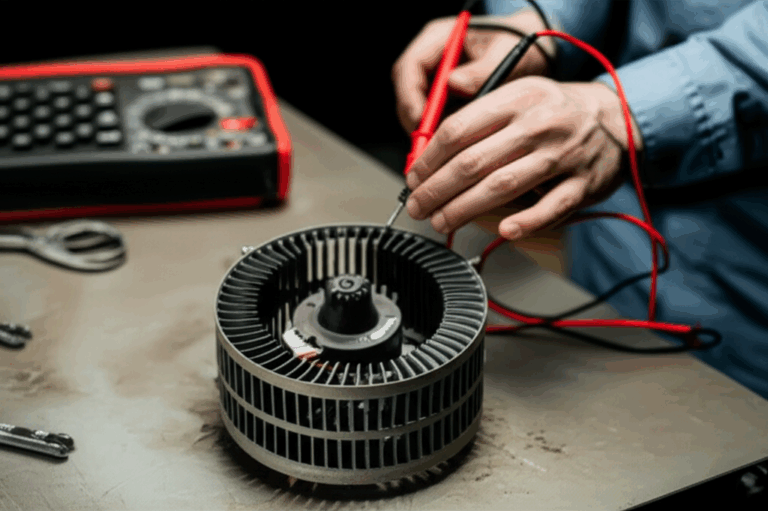
How I test an outboard charging system step by step
I keep this simple and repeatable. You can do it dockside with a basic digital multimeter.
1) Start with a fully charged battery
- Let the boat sit with everything off for 30 minutes. Measure battery voltage at the posts. A healthy, rested lead-acid battery reads about 12.6–12.8V. Lower is fine if it’s partially discharged. Make a note.
2) Check basics
- Inspect battery terminals. Clean and tight. No green fuzz or crusty white buildup. Tug gently on the cable ends to catch a loose crimp.
- Look at fuses and circuit breakers in the charging circuit. Replace blown fuses with the right rating. Do not upsize a fuse to “solve” a problem.
3) Run the engine at idle
- With your multimeter on DC volts measure at the battery again. You should see voltage rise above resting. 13.2–14.6V is common. Idle output can be low on smaller engines so the reading might hover near the low end.
4) Raise RPM
- Bring RPM up to a fast idle or light cruise in gear. Watch voltage stabilize. Many engines show their best behavior around 2000–3000 RPM under load.
5) Turn on some accessories
- Switch on lights or a fish finder. Watch voltage when the bilge pump cycles. If voltage dips badly and stays low the engine may not have enough output for your load at that RPM.
6) If voltage spikes
- Anything over about 15V on a lead-acid system is a red flag. That points at a bad regulator or a bad connection. Shut down and diagnose before running again.
7) If voltage never rises above resting
- Suspect a blown fuse, a broken charging coil, a bad rectifier/regulator, or a bad connection. Check the service manual for stator resistance specs and test with your multimeter. If the stator checks out the regulator is next on the list.
I keep a tiny log with RPM, voltage, and what was turned on. It helps me spot a failing regulator before it ruins a trip.
Common failures and symptoms I watch for
- Rectifier/regulator failure: Overvoltage is classic. Batteries get hot. Electronics flicker or shut down. You might smell cooked plastic. Undervoltage is possible too if a diode fails open.
- Stator coil failure: Hard starting, weak charging at all RPM, or no charging at all. You can check stator resistance and compare to service specs. Visual inspection sometimes reveals burned windings.
- Wiring harness corrosion: Intermittent charging. Works when cool then fails when hot. Wiggle testing near connectors can expose it. Replace corroded terminals and use proper marine-grade heat-shrink.
- Bad grounds: Low or unstable voltage. Lights dim when you hit the trim. Scrape to clean metal and resecure with a star washer.
- Overheating: Charging parts hate heat. Blocked cooling passages or running the engine too hot can shorten the life of the rectifier/regulator. I’ve seen a regulator bolted to a corroded mount run hotter because it lost its heat sink contact.
Battery types and setups that pair well with outboards
Starting vs deep cycle vs dual-purpose
- Starting battery: High cold-cranking amps for cranking the engine. Not great for deep discharge. Works best as the engine’s dedicated start source.
- Deep cycle battery: Built for repeated discharge and recharge. Perfect for trolling motors and house loads. Not ideal as a sole starting source on a larger engine.
- Dual-purpose battery: A middle ground for small boats with limited space. It cranks reasonably well and tolerates modest deep cycling.
AGM, lead-acid, lithium on boats
- Flooded lead-acid: Common and affordable. Needs ventilation and occasional water top-offs. Handles conventional charging voltages well.
- AGM (absorbed glass mat): Sealed and less messy. Holds voltage under load nicely. Often charges well on standard outboard regulators.
- Lithium (LiFePO4): Light and powerful. Needs a proper charging profile and a battery management system. Some outboard regulators work fine if the battery’s BMS cooperates. Some setups need a DC-DC charger between the start battery and a lithium house bank. Always check your engine manual and the battery maker’s specs before mixing lithium with a stock regulator.
Dual battery systems, isolators, and switches
When I added a second battery I slept better on overnight trips. You can do the same.
- Battery switch: The classic OFF/1/2/BOTH switch gives you control. Start on 1 then run on BOTH to charge both banks when you have healthy voltage. Switch to 2 if the start battery ever sags. Never switch to OFF while running unless your engine manual says it’s safe.
- Automatic charging relay (ACR) or battery isolator: These devices combine batteries for charging when voltage is high then separate them when voltage drops. They protect the start battery from house loads while still letting the outboard charge both.
- DC-DC charger: If you run a lithium house bank a DC-DC charger from the lead-acid start battery to the lithium bank can protect the outboard regulator. It also gives the lithium battery the profile it wants.
Wiring basics that save headaches
Small mistakes here create big problems later.
- Use marine-grade tinned copper wire and heat-shrink connectors. Corrosion never sleeps on a boat.
- Size your wire to the load and the length. Too small equals voltage drop and heat. Follow ABYC guidelines for gauge and fuse sizing.
- Fuse as close to the battery as possible. Protect the wire not just the device.
- Keep grounds clean and tight. Use star washers for a bite into clean metal.
- Plan for water. Drip loops, dielectric grease at connectors, and strain relief go a long way.
A quick note for the curious. All those magnetic parts depend on steel laminations that guide flux while minimizing losses. That’s why the industry obsesses over electrical steel laminations and core lamination stacks. Better stacks mean better charging in a small package. You never see them yet you enjoy the benefits every time your voltage stays rock steady at idle.
Real-world setups I’ve used
On my 9.9 hp kicker
I ran a small fish finder and nav lights. The engine put out a handful of amps. At idle the voltage barely budged. I learned to keep the screen dim and avoid long idle periods with everything on. A small solar panel on the battery box helped the battery recover at anchor.
On a 60 hp two-stroke
Output sat in the low teens. It charged fine at cruise and held voltage better than the kicker. I could run a fish finder, GPS, VHF receive, and a livewell pump. I avoided running the stereo loud with the engine idling. At the end of the day the battery still felt strong and starts were clean.
On a 150 hp four-stroke
Night and day difference. The charging system pushed 35–40 amps. I added a second battery with an ACR. I ran a pair of MFDs, radar occasionally, VHF, livewell, and a decent stereo at reasonable volume. Voltage stayed stable even at a slow troll. The big four-stroke felt like shore power on the move.
Quick answers to frequent questions
Does a 5 hp outboard charge a battery
Some do yet many small models don’t. If yours has a charging coil it might deliver 1–3 amps. Enough to slow the drain. Not enough for heavy accessory loads.
How do I charge my boat battery with the engine
Connect the battery correctly, start the engine, and check voltage at the battery posts. You want to see something in the 13.8–14.6V range for lead-acid while running. Cruise RPM helps the stator produce more current. If voltage never rises the charging system may not be present or it may be faulty.
Why does my outboard motor not charge the battery
Start with the basics. Loose or corroded battery terminals cause trouble. Check fuses and grounds. Measure voltage with a multimeter at idle and at a fast idle. If voltage does not rise above resting, test the stator and rectifier/regulator. Stator coils and rectifiers are common failure points. Bad grounds and broken wires cause headaches too.
Is idle speed charging any good
It depends on engine size and design. Many small outboards barely charge at idle. Bigger engines with higher-output systems fare better. If you need extra power, raise RPM slightly in gear if it’s safe to do so. Don’t rev in neutral for long. That’s rough on your neighbors and your fuel bill.
Can I run electronics off the starting battery
Yes although I prefer to separate loads if space allows. For simple skiffs with light loads it’s fine. For bigger setups or long days with pumps and screens running a second house battery keeps your starting battery fresh.
Do trolling motors get charged by the outboard
No. Trolling motors typically use separate deep cycle batteries. Charge them with shore power, an onboard charger, or a DC-DC charger that takes power from your start battery while the engine runs. Solar can help if you have space.
Which battery type works best with outboards
Flooded lead-acid and AGM play nicely with most stock regulators. Lithium is fantastic when matched with the right charging gear. Check your engine manual and the battery’s BMS requirements before you switch.
What about ABYC or ISO rules
ABYC and ISO standards give you the playbook for safe marine wiring. Follow their guidance for wire sizing, fusing, and installation practices. It keeps you safe and prevents electrical fires.
Is there a part I can inspect for “quality”
You can’t see the grain of the steel inside your alternator or stator on the dock. Still it’s worth knowing why premium parts cost more. Efficient laminations inside the stator and rotor reduce heat and improve output. If you’re geeking out on design, materials like silicon steel laminations get used to cut losses and handle magnetic flux better.
Can I upgrade the charging output
Sometimes. Some engines offer higher-output kits or optional rectifier/regulator units. You can also add a DC-DC charger from the start battery to a house bank. That boosts usable charging for electronics without touching the engine.
How do I spot a parasitic drain
Turn everything off and measure current draw with a meter in series at the battery negative. A few milliamps is normal for memory circuits. A big draw with everything off means a device or wiring is misbehaving. Pull fuses one at a time until the draw disappears. That reveals the guilty circuit.
Why do my lights dim when I trim the engine
Voltage dip. The trim motor pulls a big current surge. Improve grounds. Check battery health. Consider a larger battery or a dual battery setup. On small engines it’s common at idle.
Final thoughts and simple next steps
Let me leave you with the big picture. Yes, outboard motors have alternators or stator-based charging systems. They’re built to keep your battery alive and your gear running. Small motors trickle. Bigger motors deliver real power. Age and design matter. So does wiring.
Do three things and you’ll avoid most charging headaches:
- Test voltage at the battery at rest and while running. Keep that multimeter handy.
- Keep terminals clean, connections tight, and fuses right-sized.
- Match your battery setup to your loads. If you add gear, add charging capacity or a second battery.
If your boat’s electrical life still feels mysterious take twenty minutes to sketch your system. Label the start battery, house battery, battery switch, ACR or isolator, and your main loads. That simple map will save time when something acts up on the water.
One last tip. If you dig into the technical side, remember that the heart of all this is magnetic steel and copper doing a precise dance. Good materials inside those hidden cores help your voltage stay steady and your trips stay stress free.