DIY Motorized Blinds: Your Complete Guide to Smart, Automated Window Coverings
Table of Contents
- Introduction: Why I Went DIY With Motorized Blinds
- Benefits of Automating Your Blinds
- The Building Blocks: How Motorized Blind Systems Work
- Compatibility Check: Are Your Blinds Good Candidates?
- Choosing the Right DIY Motorized Blind Kit
- Step-by-Step Installation Guide
- Phase 1: Preparation and Measurement
- Phase 2: Motor Integration
- Phase 3: Mounting and Power
- Phase 4: Programming and Calibration
- Phase 5: Smart Home Integration
- Common Challenges and How I Troubleshoot Them
- Cost Analysis: DIY vs Professional
- Safety Considerations I Never Skip
- Data and Trends That Guided My Choices
- FAQs I Hear All the Time
- Conclusion: Enjoy Your Smart Home Upgrade
Introduction: Why I Went DIY With Motorized Blinds
I decided to motorize my blinds for one reason. Every morning I walked into the living room and opened four roller shades by hand. It felt like cranking a car window from the 80s. I wanted smart home convenience without a sky-high price tag. So I dove into do it yourself motorized blinds and took the DIY route.
What started as a single window turned into a full house project. I converted roller blinds in the living room, tilt-only Venetian blinds in my office, and a cellular shade in the bedroom. Along the way I tested a few retrofit blinds motor kits, tried battery and low voltage power, and integrated the setup with Alexa and Apple HomeKit. I made mistakes. I learned a ton. This guide is the playbook I wish I had on day one.
My goal is simple. Show you how to motorize existing blinds with confidence. I’ll help you pick the right motorized blind conversion kit, wire or charge it safely, program it, and bring it into your smart home. If you’ve ever searched for DIY smart blinds, motorized roller blind kit, or how to automate blinds you’re in the right place.
Benefits of Automating Your Blinds
I felt the benefits on day one. Then I noticed the longer-term wins over the first season.
- Convenience: I use remote control blinds and app control on my phone. Schedules raise them at sunrise and lower them at sunset. Voice control with Alexa and Google Home feels natural. I say “Alexa close the living room shades” and it just happens.
- Energy efficiency: Smart blinds cut glare and solar heat gain in summer and keep warmth in during winter. Automated shades can reduce solar heat gain by a big margin in hot months and improve insulation in cold months. I saw my HVAC run less during peak hours. I set scenes based on temperature and light sensor inputs.
- Privacy and security: Away-from-home control matters. I have blinds that run a schedule when I’m traveling. The house looks occupied. It’s a small layer of home security blinds automation that costs almost nothing once you set it up.
- Child and pet safety: Cordless motorized blinds remove dangling strings. That’s peace of mind if you’ve got kids or curious cats.
- Accessibility: For anyone with mobility challenges the difference feels huge. One button replaces a hard-to-reach chain.
- Increased home value: Smart window treatments modernize a space. Buyers expect simple smart home features like automated window coverings.
If you want a quality-of-life boost at home this project delivers.
The Building Blocks: How Motorized Blind Systems Work
Before I touched a drill I learned the components. When you understand the pieces you can plan a clean install.
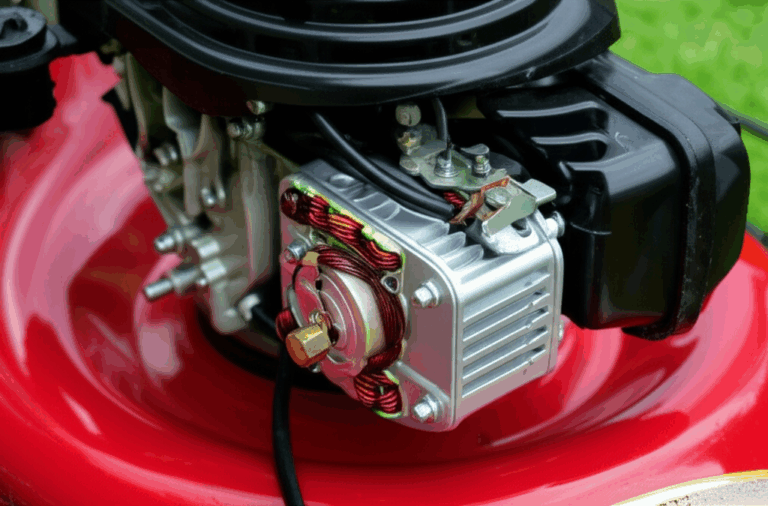
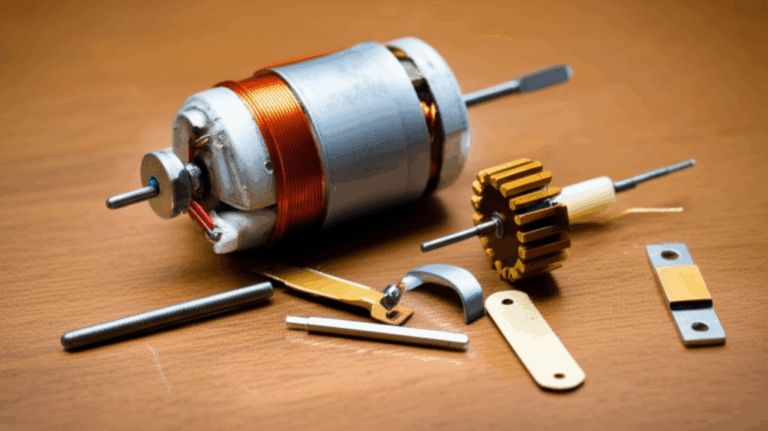
- The motor: You’ll see three main types.
- Tubular motor for blinds: Sits inside the roller tube on roller and zebra shades. This is the most common motorized shades setup.
- Tilt motor for horizontal blinds: Rotates a wand or internal mechanism to tilt Venetian slats. It doesn’t lift the blind.
- Lift motor for roman blinds or cellular shades: Raises and lowers fabric stacks. You need the right torque for weight and width.
- Power source:
- Battery operated blind motor: Easiest for renters and no drill installs. Many use USB rechargeable battery packs or replaceable cells.
- Wired motors: AC powered blind motor for robust installs or low voltage blind motor on DC power for energy efficiency. Reliability improves when you plug in. You remove charging chores.
- Solar powered blind motor: Solar panel feeds a battery. Works well on sunny windows.
- Control mechanisms:
- Remote control: RF remotes pair to one or more motors. IR exists, though most kits use RF.
- Wall switch: Hardwired or wireless puck. Nice for spouses and guests.
- Smart hub or gateway: Z-Wave blind motor kit or Zigbee blind motor solution works with hubs like SmartThings or Aqara. Wi-Fi blind motor options connect directly to your router.
- Smartphone app: Tuya smart blind motor, Brel Home, or Lutron apps make pairing and scheduling easy.
- Voice assistant: Alexa smart blinds DIY, Google Home motorized blinds, and HomeKit motorized blinds all work if the motor or hub supports them.
- Accessories:
- Limit setters for top and bottom travel
- Mounting brackets and adaptors
- End caps and couplers
- Optional sun sensor or temperature sensor for automated scenes
A quick note on motor quality. The quietest motors I’ve used rely on tight tolerances and good core materials. Tubular motors often use BLDC designs with stators and rotors built from stacked laminations. If you’re curious about why some motors run quieter and cooler, it comes down to materials like electrical steel and how the motor core is built. If you want to geek out you can read more about stator core lamination, rotor core lamination, and the role of motor core laminations in reducing losses. The type of electrical steel laminations used can also impact efficiency and noise.
Compatibility Check: Are Your Blinds Good Candidates?
I asked one question when I started. Can I motorize my existing blinds or should I buy new ones? Here’s how I check.
- Best candidates:
- Roller blinds: Easiest to motorize with a tubular motor. A motorized roller blind kit slips into the tube with the right adaptor.
- Roman blinds: Use a lift motor and spools.
- Venetian blinds: Tilt-only conversions turn the wand automatically. Full lift conversions exist but they get tricky.
- Cellular or honeycomb shades: Lighter fabric and smooth lift. Battery motors work well here.
- Zebra blinds: Similar to roller shades with layered fabric.
- Measurements you need:
- Inner diameter of tube for roller shades. Measure accurately so the motor sleeve and adaptors fit.
- Blind width and weight. You’ll size the motor torque for blinds accordingly.
- Headrail space for internal motors or gearboxes.
- Chain or rod mechanism details if you plan a retrofit kit that drives the existing cord loop.
- Other considerations:
- Renter-friendly motorized blinds: Battery motors with no drill brackets are best if you can’t make holes.
- Cordless conversion: Remove or disable old cords to keep things child safe.
- Power access: Check for nearby outlets if you’re considering plug-in or wired DC power.
If your blinds don’t fit a common pattern you still have options. I’ve seen smart curtain motor DIY setups, smart curtain rod DIY, and motorized curtain track DIY that work on sliders and patio doors.
Choosing the Right DIY Motorized Blind Kit
The market is full of choices. I’ve tested affordable motorized blinds DIY kits from Amazon and AliExpress. I also tried Ikea FYRTUR for a clean battery experience. Here’s how I decide.
- Motor type:
- Roller or zebra shade: Pick a tubular motor sized for your tube ID and width. Check torque ratings.
- Venetian slats: Choose a tilt motor for horizontal blinds. It drives the tilt mechanism instead of lifting.
- Roman or cellular: Use lift motors designed for cords or spools.
- Power solution:
- Battery for ease: USB rechargeable blind motor packs are convenient. Battery life depends on shade weight and daily cycles. I charge every few months on a typical living room window.
- Wired for reliability: Low voltage blind motor on DC power runs quietly and needs no charging. AC powered blind motor works great for large shades or long runs. Plan the wiring.
- Solar for eco-friendliness: A small solar panel keeps a battery topped up. Works best on sunny windows with few obstructions.
- Smart home integration:
- Z-Wave blind motor kit: Pairs with SmartThings or compatible Z-Wave hubs.
- Zigbee blind motor solution: Works with hubs like Aqara and SmartThings. Often faster and more reliable than Wi-Fi if you already use Zigbee sensors.
- Wi-Fi blind motor options: Simple app control without a hub. Many Tuya or Smart Life motors fall into this category.
- Proprietary systems: Ikea, Lutron, and Somfy have their own ecosystems. They’re polished. Price can be higher.
- Budget:
- Cost-effective smart blinds: You can start with a single window and add more over time.
- Kits vs components: Kits include everything you need. Components let you customize brackets and adaptors if you have non-standard hardware.
- Brands I’ve used or compared:
- Somfy for premium motors and rock-solid reliability with a higher price.
- Lutron for great app control and refined motion.
- Brel Home as a solid midrange pick.
- Tuya compatible motors for budget-friendly Wi-Fi options.
- Ikea FYRTUR or TREDANSEN for easy battery installs with a clean look.
I buy from Amazon, Home Depot, or AliExpress depending on the project timeline and budget. I read reviews and watch install videos before I pull the trigger.
Step-by-Step Installation Guide
What follows is the way I install almost every time. I adapt the steps for each blind type. The flow remains the same.
Phase 1: Preparation and Measurement
- Gather tools:
- Drill with bits and a driver
- Screwdriver set
- Measuring tape
- Level
- Pencil
- Wire strippers if using low voltage
- Zip ties and cable clips for clean wiring
- Measure everything:
- Tube inner diameter for roller shades
- Blind width and approximate weight
- Headrail and bracket spacing
- Read the kit manual:
- Know how to set limits on your model
- Find the pairing procedure for the remote or app
- Plan the power:
- Battery location and access
- Outlet location for plug-in motors
- Cable routing for low voltage DC runs
I mock up the bracket positions before I drill. This avoids surprises. A dry fit saves time.
Phase 2: Motor Integration
- Disassemble the existing blind mechanism:
- Remove the shade from the brackets
- Slide out the old tube cap or chain clutch
- Insert the motor:
- Fit the motor into the tube with the correct adaptor
- Seat the drive end and end cap firmly
- Secure hardware:
- Attach new end caps and the motor crown
- Confirm there’s no wobble or slack
For Venetian tilt kits I remove the wand and attach the tilt motor to the headrail. I test the tilt manually before I snap everything shut. That saves a lot of rework.
Phase 3: Mounting and Power
- Mount brackets:
- Use anchors appropriate for drywall or mount directly to studs
- Check for level
- Install the motorized blind:
- Lift the tube into place and lock it in
- Confirm smooth rotation by hand if possible
- Connect power:
- Battery: Dock the pack and tidy the cord with clips
- Plug-in: Route the cable cleanly with clips or a small raceway
- Hardwire low voltage: Follow polarity, fuse the line if your manufacturer recommends it, and keep connections secure
Pro tip I learned the hard way. Do a full function test before you hide wires or snap on trims. Fixes are faster with everything exposed.
Phase 4: Programming and Calibration
- Set upper and lower limits:
- Use the motor’s program buttons or the remote
- Run the blind up and down to confirm limits hit cleanly
- Pair a remote:
- Put the motor in pairing mode
- Add a group channel if you want multiple windows to move together
- Fine tune:
- Adjust speed if the motor supports it
- Check for light gaps and even travel
Limits not setting correctly often means the fabric telescopes or binds. I roll the shade evenly on the tube then try again.
Phase 5: Smart Home Integration
This is where the fun begins. I set up schedules, scenes, and voice control.
- Add to your app:
- Connect motors to the manufacturer app or your hub
- Name them clearly by room
- Link to voice assistants:
- Alexa: Enable the skill and discover devices
- Google Home: Link your app account and assign rooms
- HomeKit: Scan the code if supported or bridge through a hub
- Create schedules and scenes:
- Morning open and evening close
- Movie scene that lowers the shades and dims lights
- Sensor automation:
- Sun sensor for blinds that lower in afternoon glare
- Temperature sensor blinds rules to reduce heat gain
If you use Z-Wave or Zigbee expect crisp response and solid reliability. Wi-Fi motors work well in most homes. I keep my 2.4 GHz network less crowded to avoid pairing headaches.
Common Challenges and How I Troubleshoot Them
I’ve hit almost every snag you can imagine. Here’s how I fix the big ones.
- Motor not responding or pairing issues:
- Power cycle the motor or battery pack
- Move closer during pairing since RF has limited range
- Reset and re-add the device if the app shows a ghost entry
- Limits won’t set or drift:
- Re-roll fabric evenly on the tube
- Confirm limit set mode with the instructions since sequences vary by brand
- Check mounting brackets for play
- Battery drains quickly:
- Lower the daily cycle count or reduce speed if possible
- Make sure the fabric isn’t rubbing the window frame
- Consider a larger battery or switch to low voltage DC
- Noise problems:
- Check alignment and bracket tightness
- Add a felt pad where the tube cap meets the bracket
- Heavier fabrics can amplify vibration so slow the speed if the app allows
- Blind jamming or uneven movement:
- Confirm that side channels and guides are straight
- Inspect for bent headrails or fabric telescoping
- Re-measure tube adaptors for a snug fit
Most issues trace back to alignment, torque sizing, or power. Fix the foundation then the smart features fall into line.
Cost Analysis: DIY vs Professional
I priced professional motorized shades for my living room. The quote made my eyes water. I saved a lot with DIY.
- DIY component costs:
- Battery tubular motors: affordable on Amazon or AliExpress
- Midrange Zigbee or Z-Wave motors with remotes: moderate price point
- Accessories and brackets: reasonable
- Optional solar panel: adds a bit but removes charging chores
- Professional install costs:
- Premium hardware plus labor
- Wired power runs if needed
- Programming and commissioning
DIY home improvement often saves 50 percent or more over hiring. Motorized blinds follow that pattern in my experience. The long-term ROI feels real when you add energy savings, convenience, and comfort. Start with one room if budget is tight. Scale as you go.
Safety Considerations I Never Skip
I want blinds that work for years. I also want to avoid avoidable problems. Here’s my short list.
- Electrical safety:
- Cut power before wiring
- Use proper gauge wire and follow polarity on DC runs
- Don’t bury power supplies in walls unless rated for in-wall use
- Secure mounting:
- Use the right anchors for the wall type
- Confirm brackets lock and the tube can’t jump the track
- Child and pet safety:
- Remove cords and wand remnants
- Test auto-stop behavior on obstructions if your motor supports it
- Fire safety:
- Avoid routing wires near heat sources
- Keep battery packs accessible and out of direct sunlight if the manufacturer warns against it
A few minutes on safety beats hours of troubleshooting later.
Data and Trends That Guided My Choices
When I first explored this project I looked at the big picture.
- Smart home market growth continues at a strong clip which means better products and integrations will keep coming.
- Automated blinds and shades are growing fast as a category. This signals demand and competition which drives prices down over time.
- DIY projects save real money compared to professional installs. You trade sweat equity for cost savings.
- Automated shades can reduce solar heat gain significantly in summer and help retain heat in winter. That adds up if you automate south and west facing windows.
- More than half of smart device owners use their gear daily for convenience. I fall into that group since my shades move every day on schedule.
- A large share of homeowners tackle at least one DIY project each year. Smart window treatments fit nicely into that trend.
The bottom line for me was simple. The market and the benefits aligned with what I wanted at home. So I moved forward.
FAQs I Hear All the Time
- Can I motorize existing blinds or do I need to replace them?
- You can motorize existing window shades in many cases. Roller, zebra, and some roman or cellular shades are the easiest. Venetian blinds often support tilt-only conversions.
- What’s the easiest power option?
- Battery operated blind motors are the easiest. Try USB rechargeable packs for simple installs. Solar can work well on bright windows.
- Do I need a smart hub?
- Not always. Wi-Fi motors use an app without a hub. Z-Wave and Zigbee motors need a compatible hub though they offer great reliability and local control.
- How long does battery life last?
- It varies with shade size and usage. My mid-size roller shade runs for months between charges on a USB pack with two cycles a day.
- What about renters?
- Look for no drill motorized blinds. Use removable adhesive brackets or tension mounts if appropriate. Battery power keeps landlords happy since you won’t run wires.
Glossary of Practical Terms I Use
- DIY window automation: Turning manual window coverings into smart devices with retrofit blind motor kits.
- Smart blind installation steps: Measure, mount, motorize, program, and integrate.
- Programming blind limits: Setting the top and bottom stop points. Your motor remembers them.
- Remote pairing blind motor: Putting the motor in pairing mode then binding it to a remote channel.
- Integration with smart hubs: Linking your motor to SmartThings, Aqara, or a Tuya-based app for control and automation.
- Voice control blinds setup: Connecting the app or hub to Alexa, Google Home, or HomeKit for hands-free commands.
Real-World Examples From My Home
- Living room roller blinds: I used a battery tubular motor with a Tuya app. I set up a scene called “Sunset Chill.” It lowers the shades 75 percent and dims lights. I also have a weekend schedule that opens later.
- Office Venetian blinds: I added a tilt motor for horizontal blinds. They tilt to cut glare on the monitors at 2 pm daily. I keep manual lift since I rarely raise them fully.
- Bedroom cellular shade: I picked a quiet low voltage blind motor. It opens at sunrise and closes at bedtime. Battery maintenance in the bedroom bugged me so I went wired DC here.
Every room had a different set of needs. I matched the motor and power to the situation and the result feels seamless.
Tips and Small Lessons I Learned
- Measure the tube’s inner diameter. Eyeballing costs time.
- Torque matters. Heavier shades need a stronger motor.
- Grouping blinds on one channel is addictive. One click moves everything in a room.
- Keep spare end cap adaptors. Non-standard tubes pop up often.
- Label your remotes and app names clearly. “North Window” beats “Device 12.”
- Set a quarterly reminder to check batteries or test the solar input. Little maintenance pays off.
When a Professional Might Be the Better Option
I love DIY but I know my limits.
- Tall windows over stairwells
- Massive shades that need higher torque AC motors
- New construction wiring that you want hidden in walls
- Historic homes where mounting requires special care
A pro can handle those with the right tools and safety gear. For standard rooms with typical windows DIY wins on cost and speed.
Putting It All Together: A Quick Start Checklist
- Choose your candidate window
- Confirm blind type and measurements
- Pick a motor type and power option
- Order a compatible kit with the right adaptors
- Gather tools and plan cable routing
- Install brackets and integrate the motor
- Connect power
- Set limits then test full travel
- Pair the remote and add to your app
- Create schedules and scenes
You’ll finish the first window in an afternoon. The second window goes twice as fast.
Conclusion: Enjoy Your Smart Home Upgrade
I started this project to stop yanking chains every morning. I ended up with a smarter home that feels more comfortable and efficient. DIY motorized blinds deliver convenience, energy savings, and a clean modern look. You can motorize existing blinds with a retrofit blinds motor kit or start fresh with a motorized window blinds kit. Battery, wired, or solar power all work if you match the solution to the window.
If you’ve read this far you’re ready. Pick one window. Install it this weekend. Then share your project and the lessons you learn. I’m willing to bet you’ll plan the next room before the week is over.
Internal links used in this article: